OIC Gen3 Data Stitch: Building Payloads Incrementally
Why do we need Data Stitch when we already have Mapper and Assign?
In my last blogs, I discussed Lookups and Libraries. These are two reusable pieces that you use with an integration. The Mapper and the Assign action are the two primary ways to move data around inside the integration itself. They handle most of what you need on an average day.
But as soon as you try to build a payload across more than one step in your flow, a gap appears.
The Mapper works with full message payloads. When you map into an existing payload, the whole thing gets replaced. There is no easy way to add another item to an array, change a single child element of a complex object, or remove a field before sending the payload downstream.
The Assign action only works with scalar variables. Strings, numbers, booleans, and dates. Assign cannot help you when you need to give a complex object, an array, or a part of a payload a name.
Data Stitch fills this need. It can handle scalar variables, complex variables, full payloads, partial payloads, and arrays. You can build a payload one piece at a time over the course of your integration, which is exactly what most real integrations need.
The Three Operations
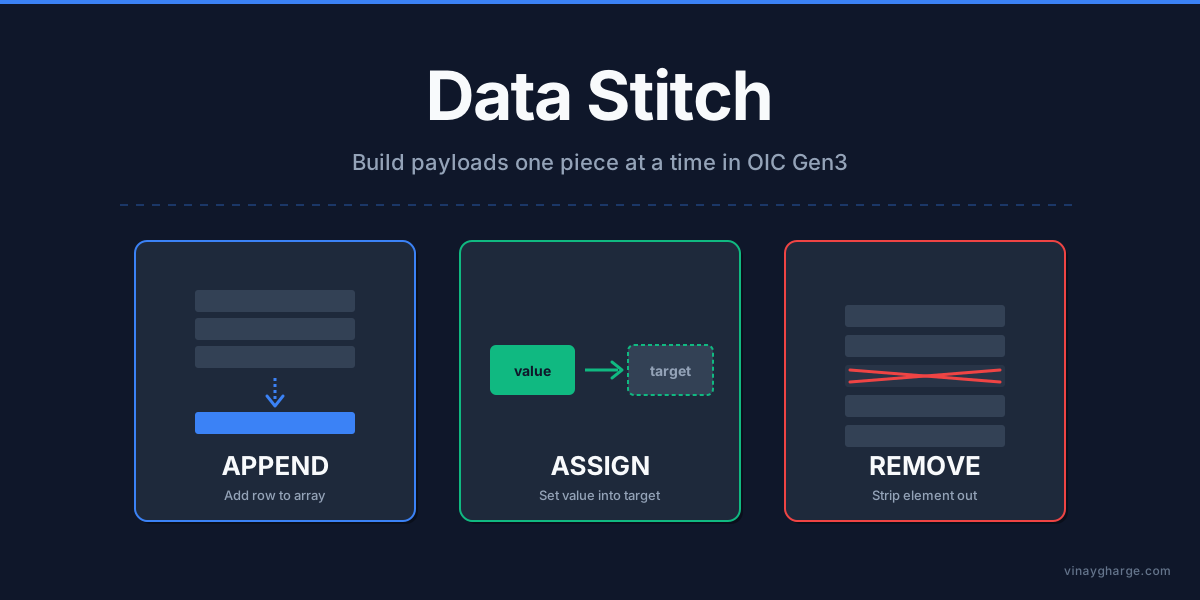
Data Stitch lets you do three things. You can connect almost any payload manipulation problem to one of them once you know what each one does.
Append adds a new item to the end of an array that is either repeating or has no end. A purchase order with five lines is a classic example of this. You need to add a sixth line. You add the new line to the array of lines that are already there.
Assign puts a value, element, or attribute into a target. It takes the place of what was there before. You can set a single field, copy a whole complex object like an address block, or initialize a global variable at the beginning of an integration.
Remove takes a target element or attribute out of a variable. Helpful when the upstream system sends you more data than the downstream system needs, or when you want to remove a field so the target system can figure it out on its own. Remove takes out all instances of repeating elements unless you point to a specific index or predicate.
These three cover everything from "I just want to copy one field from a Scope to a global variable" to "I am building a response array with 5,000 rows in a loop."
Global Variables: The Other Half
Data Stitch works with a Global Variable almost all the time, so these two features go hand in hand. At design time, you declare a Global Variable, and it can be used across all scopes including Global Fault of the integration. That's the part that makes them so useful.
You can create scalar global variables (strings, integers, booleans, dateTimes, etc.) or complex ones based on any schema that already exists in the integration. For example, you might want to use a request payload, a response payload, or a CSV structure you imported via a Stage File action. There can be a maximum of 20 global variables in an integration. Once you've created them, you can't change them. If you want to change the type, you have to delete the variable and create a new one. Then you have to fix every action that used it.
The Scope boundary problem is one of the reasons people use Global Variables. When you run an Invoke from within a Scope, the response variable only exists within that Scope. Once the Scope closes, you can't access the variable anymore. The standard way to get that data out of the Scope and use it later in the integration, even in the response mapper, is to use Data Stitch with a Global Variable.
Tip: If you declare a complex Global Variable, OIC will ask you for a node from the Sources tree. Pick a root element if you can. If you choose a non-root element, OIC will automatically generate a wrapper WSDL in the background, which is just fine, but a root element keeps things cleaner.
Walkthrough: Country Enrichment Service
Let's do an end-to-end integration that uses all three operations. We'll re-use the VG_COUNTRY_LKP lookup and VG REST Trigger Conn connection from our current VG OIC Project.
As part of the use case we get a list of country codes and some internal audit fields from a caller. For each code we append the full country name from VG_COUNTRY_LKP and build the response array in the process. We remove the internal audit field before sending the response back.
Step 1: Make the Integration
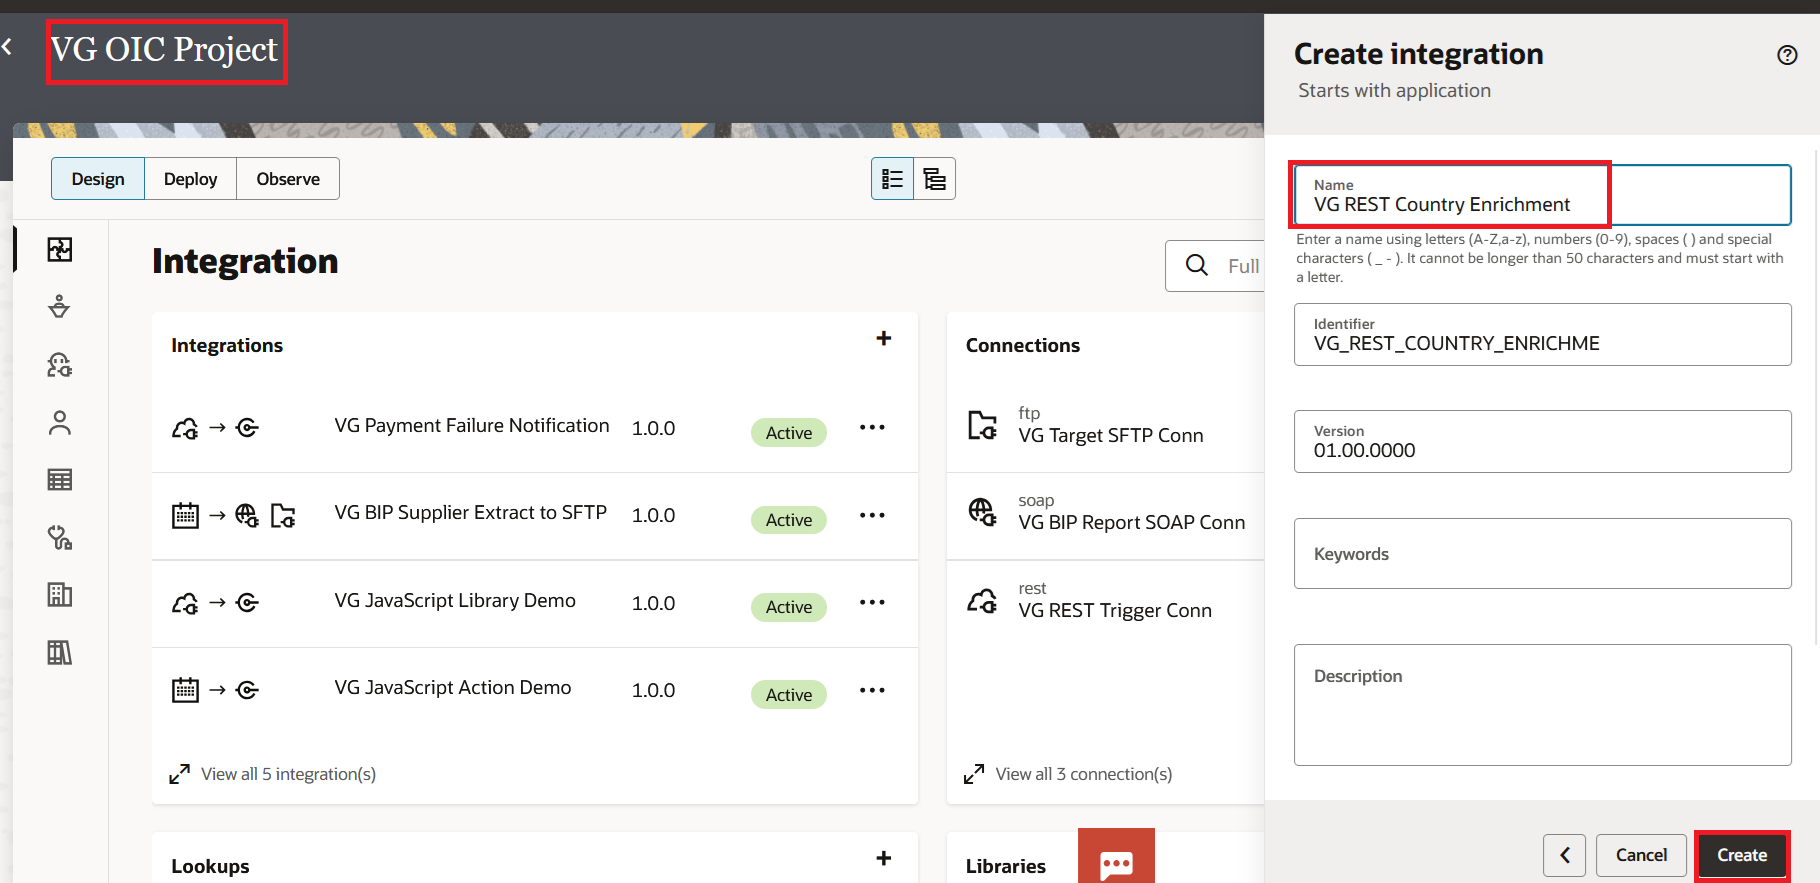
In the VG OIC Project, click on ☰ > Design > Integrations > Add. Select Application as the type of integration. Type in VG REST Country Enrichment and click Create.
Step 2: Set up the REST Trigger
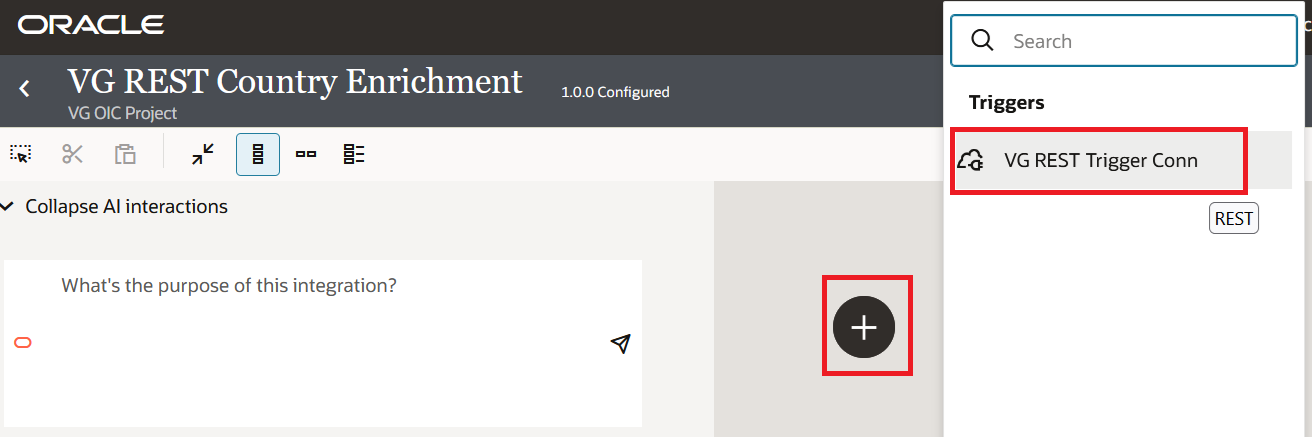
Click on the trigger node and select VG REST Trigger Conn.
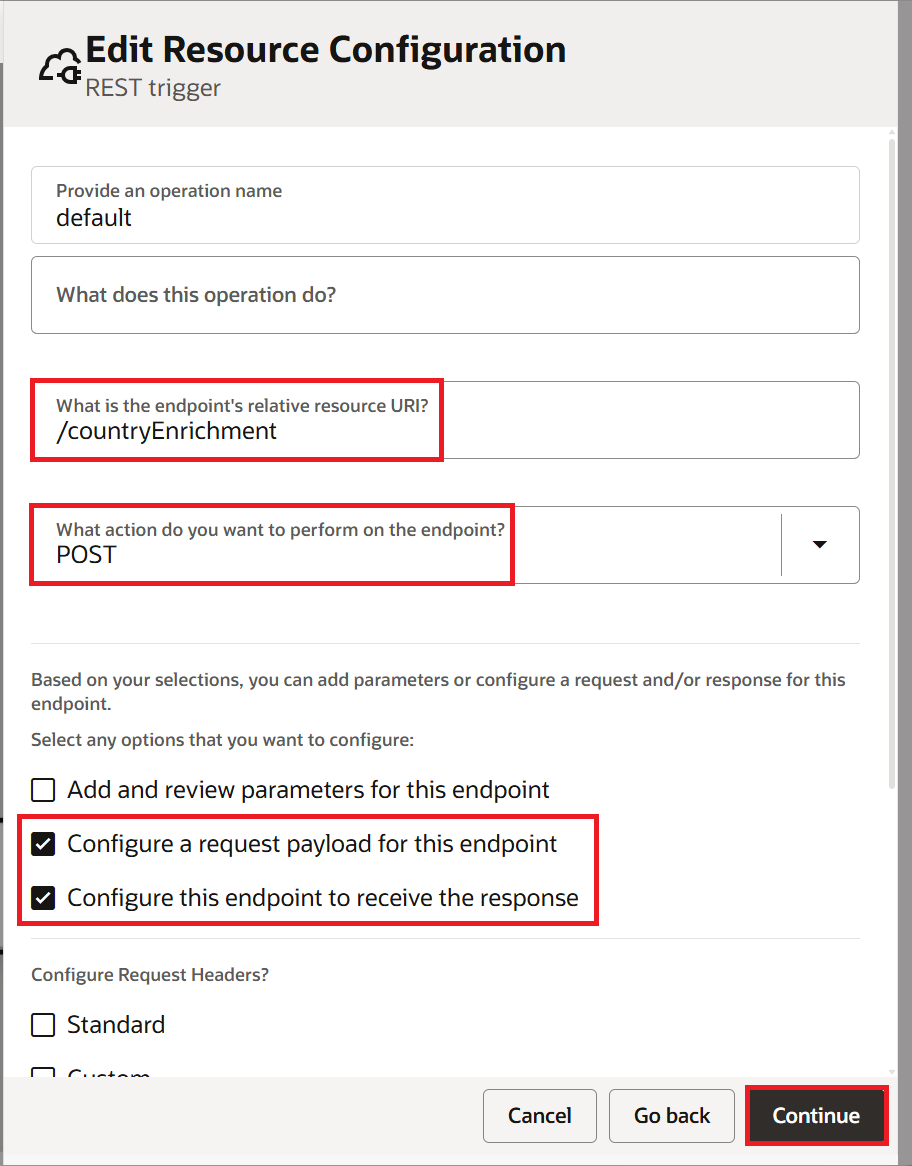
Set up the endpoint:
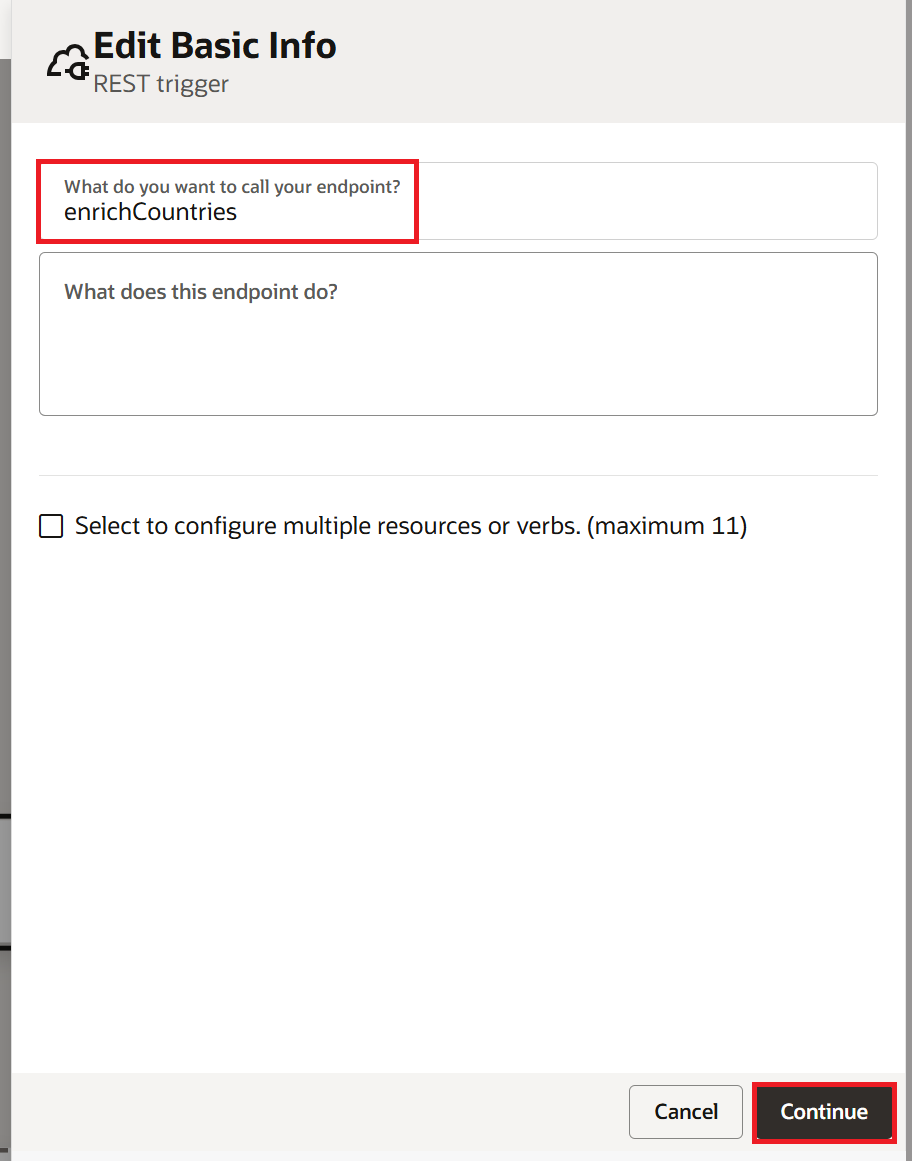
- Endpoint name:
enrichCountriesand click Continue.
- Resource URI:
/countryEnrichment
Method: POST
Choose "Configure a request payload for this endpoint" and "Configure this endpoint to receive the response." and click Continue
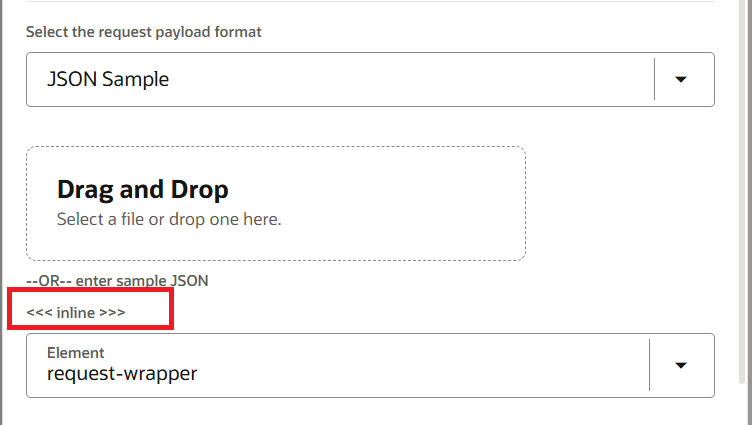
- For the request payload, click on
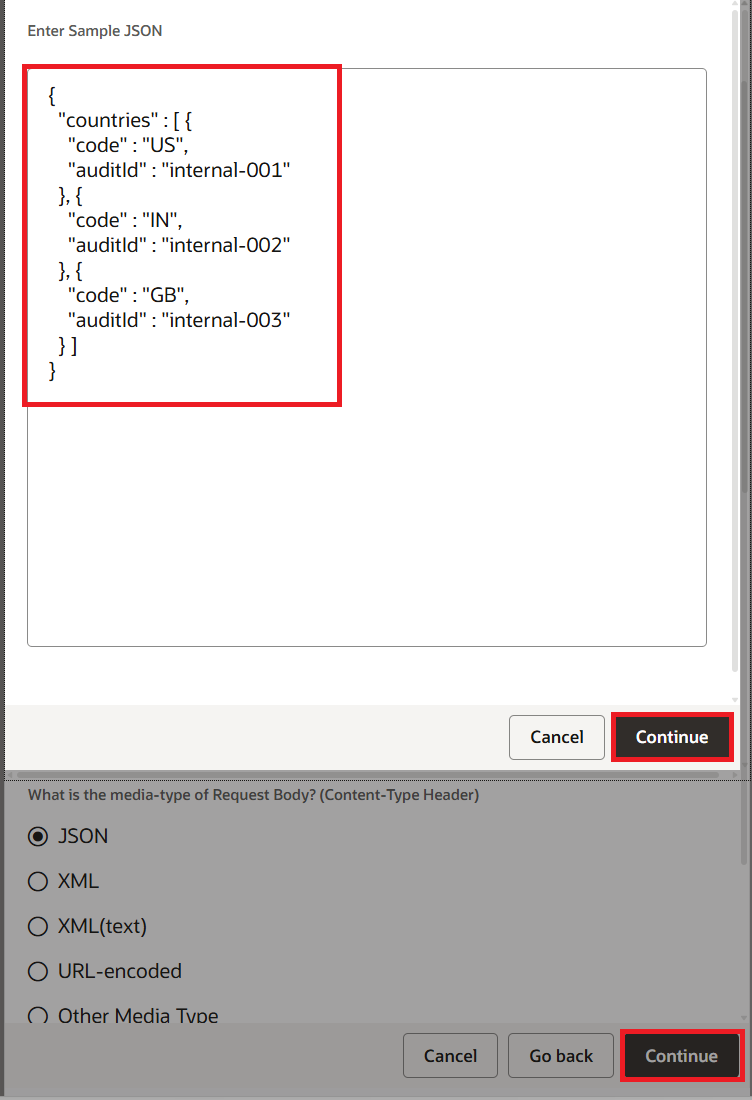
<<< inline >>>as shown in the screenshot below, enter the below JSON Sample Payload, click Continue, and then click Continue again.
{
  "countries" : [ {
    "code" : "US",
    "auditId" : "internal-001"
  }, {
    "code" : "IN",
    "auditId" : "internal-002"
  }, {
    "code" : "GB",
    "auditId" : "internal-003"
  } ]
}
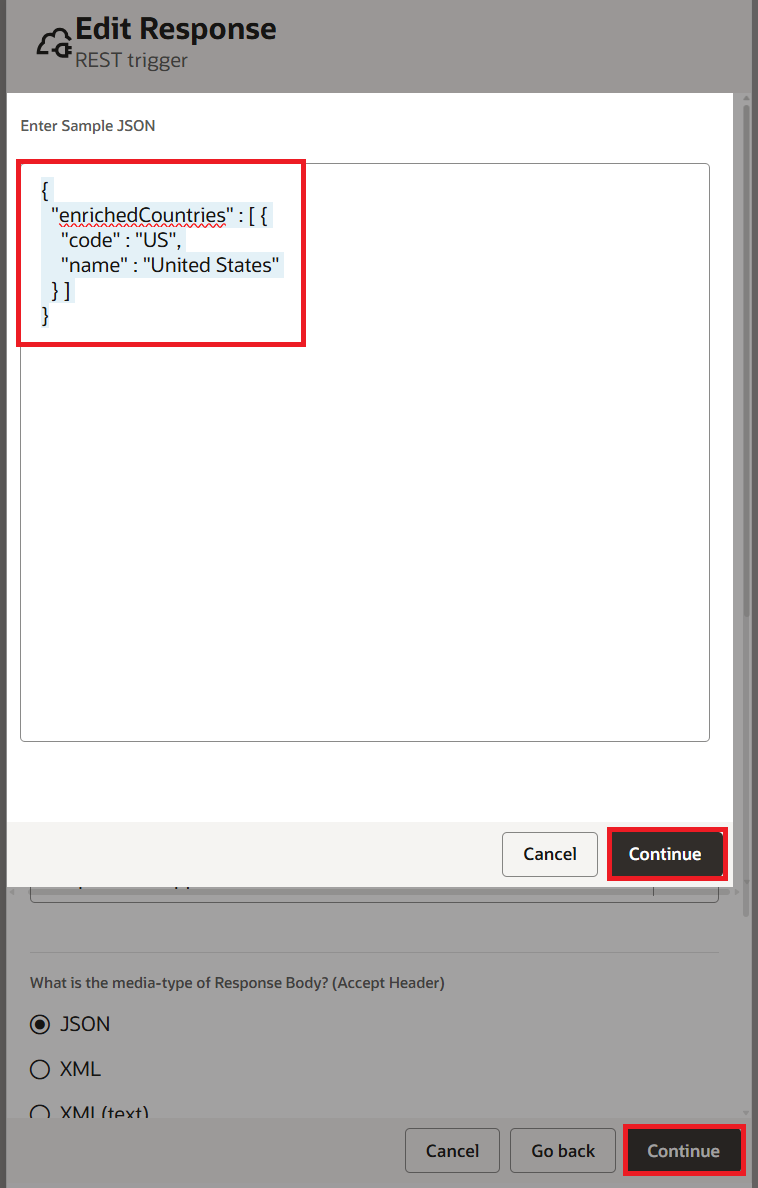
For the response payload, click on <<< inline >>>, enter the below JSON Sample Payload, click Continue, and then click Continue again.
{
  "enrichedCountries" : [ {
    "code" : "US",
    "name" : "United States"
  } ]
}
Step 3: Make the Global Variables
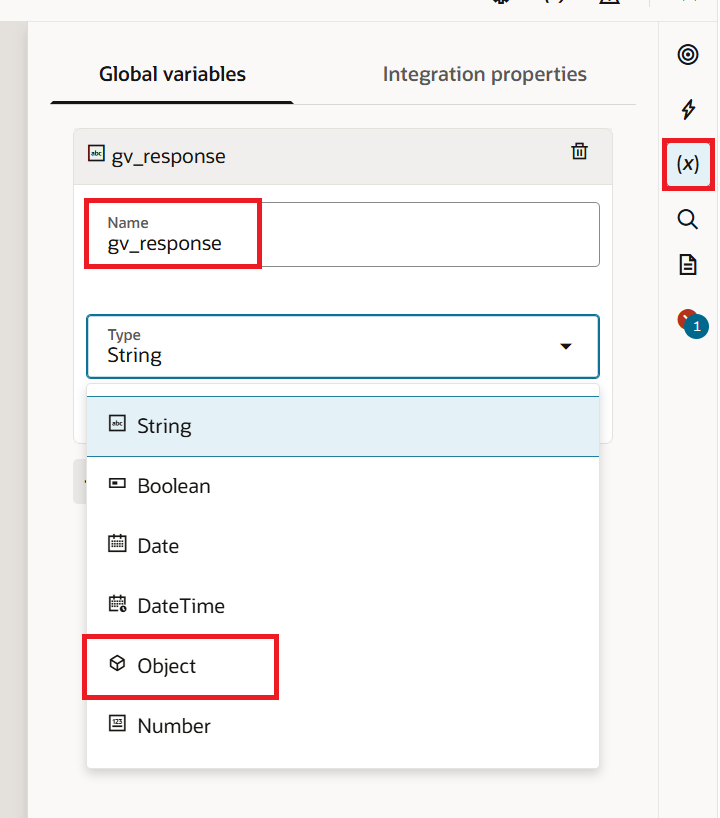
Click the Global Variables (x) icon on the right side of the canvas. We will create two variables for this walkthrough. The first one holds the full response, and the second one is a row builder used inside the loop.
For the response holder, click the + icon to add a Variable and set:
- Name:
gv_response - Type: Object
- The Sources tree opens. Drag the response payload root element (
enrichCountriesResponseor whatever the trigger generated) into the Type field.
For the row builder, click the + icon again to add another Variable and set:
- Name:
gv_tempCountry - Type: Object
- From the Sources tree, drag a single
enrichedCountryelement (the array item itself, not the array wrapper) into the Type field.
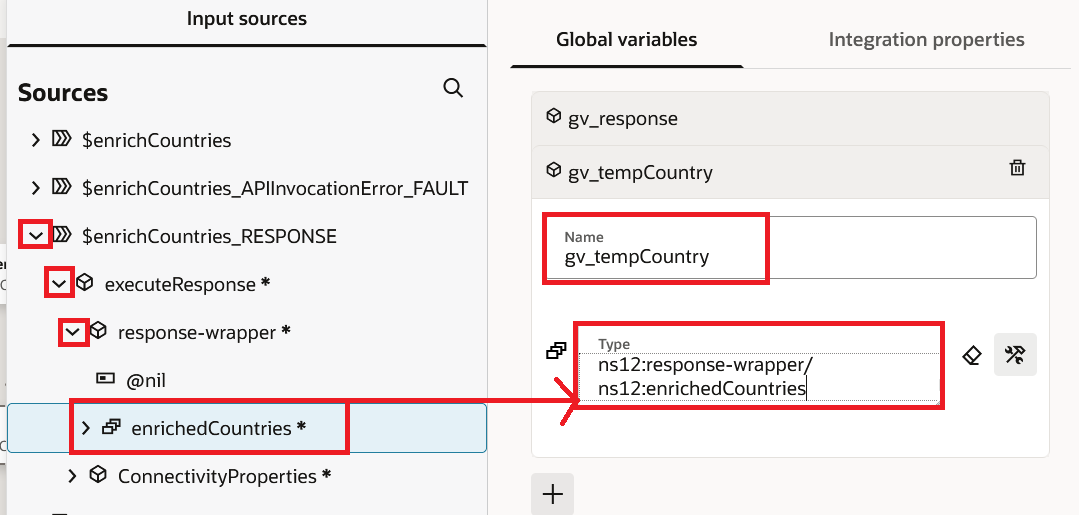
The gv_tempCountry variable will hold one enriched country at a time, we will fill it within the loop with the current row's data and append it to gv_response.
Step 4: Add the For-Each Loop
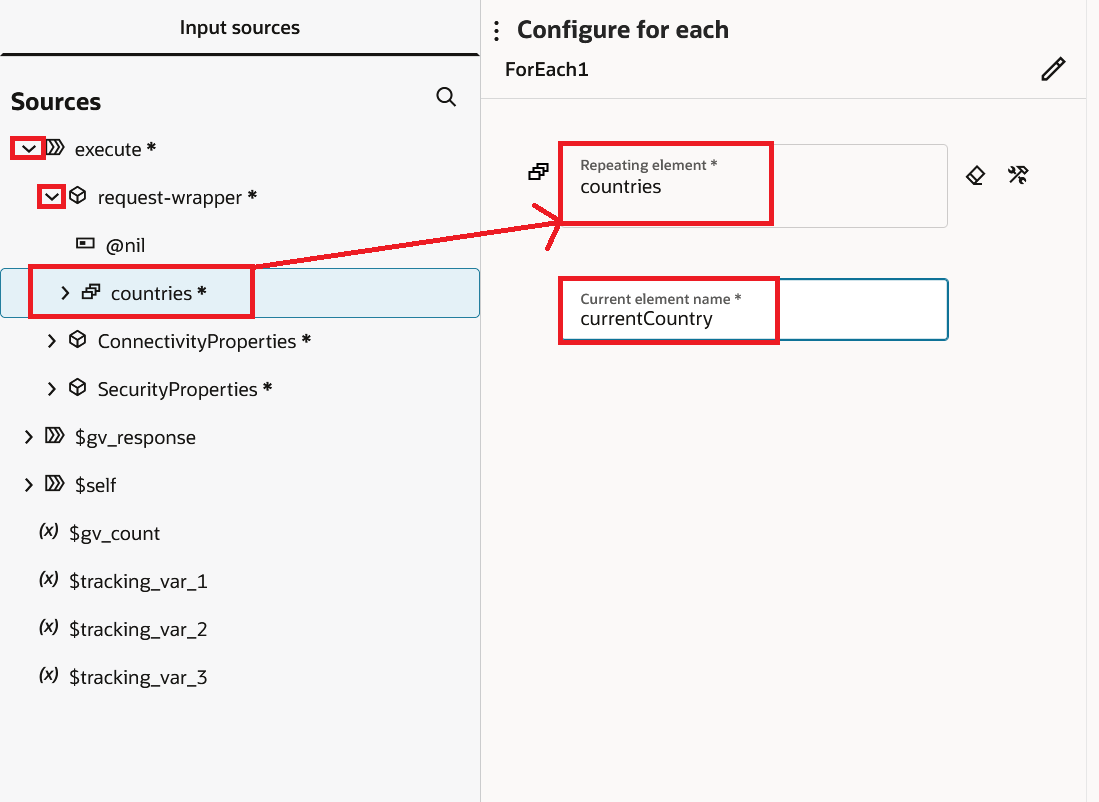
After the trigger, click the plus sign and choose For each. Set up:
- Repeating element: drag
request/countries/country(the array from the trigger request). - Current element name:
currentCountry.
Step 5: Build the Row and Append It Inside the Loop
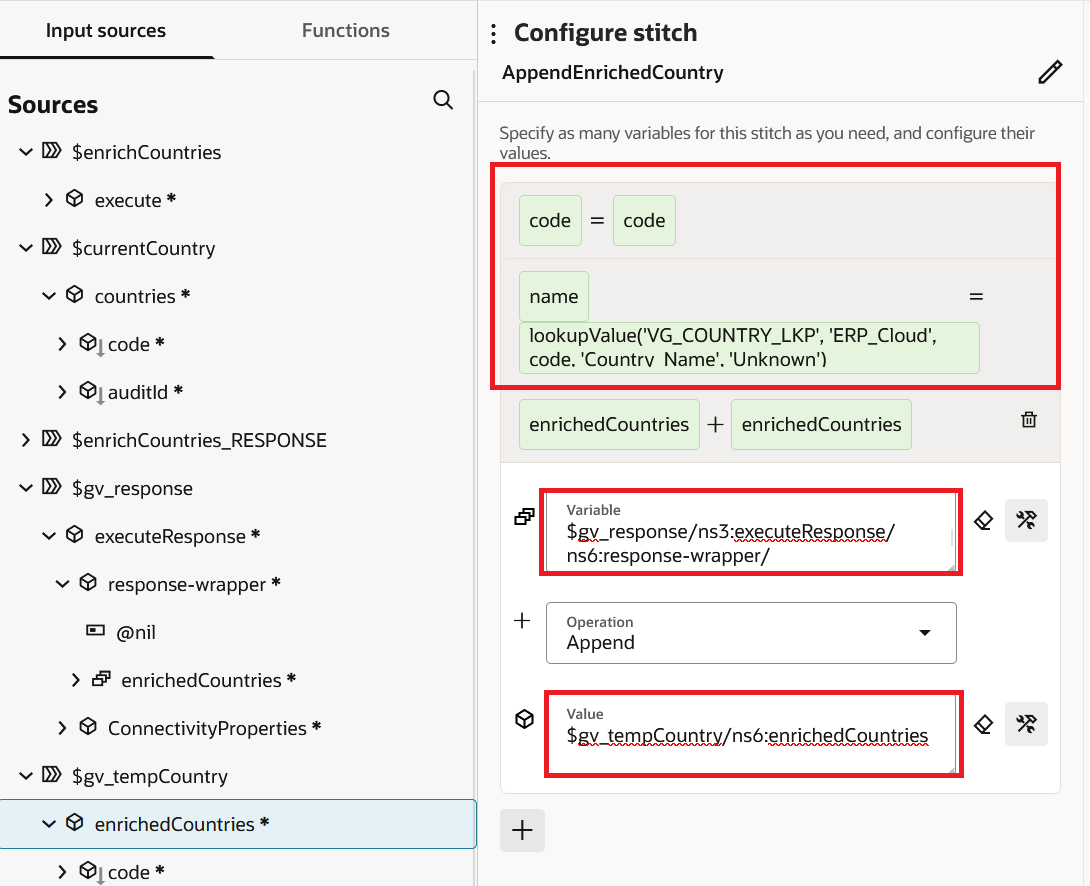
Click the plus sign inside the For-Each and add a Data stitch action called AppendEnrichedCountry. Add three statements in this exact order:
- Assign the code into the row builder.
- Variable:
gv_tempCountry/enrichedCountries/code - Operation: Assign
- Value:
$currentCountry/countries/code
- Variable:
- Assign the looked-up country name into the row builder.
- Variable:
gv_tempCountry/enrichedCountries/name - Operation: Assign
- Value: switch to Developer View and enter the lookup expression:
dvm:lookupValue("VG OIC Project/VG_COUNTRY_LKP", "code", $currentCountry/countries/code, "name", "Unknown")
- Variable:
- Append the completed row to the response array.
- Variable:
gv_response/enrichedCountries/enrichedCountry - Operation: Append
- Value:
$gv_tempCountry
- Variable:
Order matters here. For a complex element, Append won't accept an empty value that you plan to fill in later. The documented Oracle pattern is to first build the row in another variable (gv_tempCountry), then append the completed row to the target array. Statements 1 and 2 build the row, while statement 3 appends it.
Step 6: Remove the Audit Field After the Loop
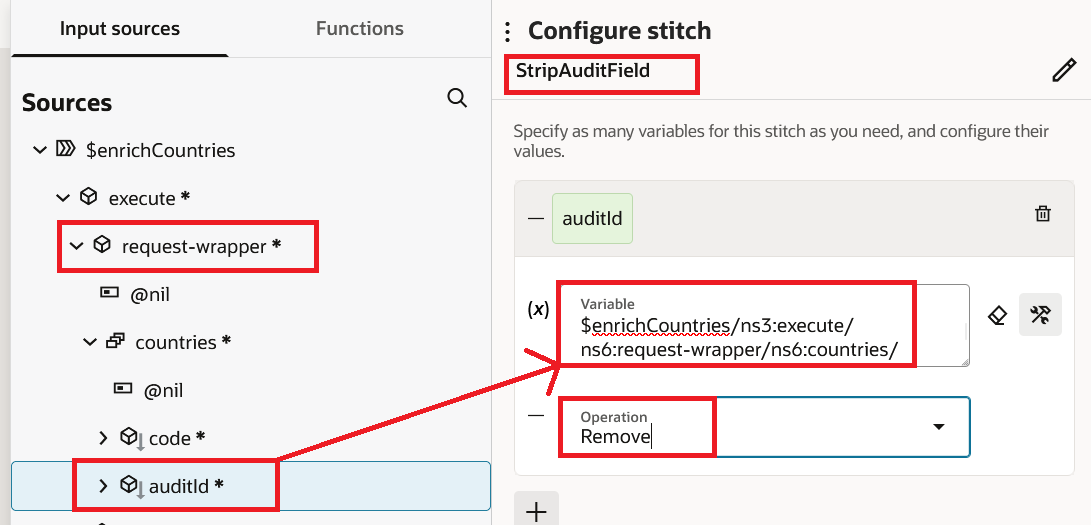
Add a second Data stitch called StripAuditField after the For-Each:
- Variable:
request/countries/country/auditId - Operation: Remove
This wipes the auditId field from all the rows in the request. Useful when you want to keep a sensitive field from getting into a downstream log or response.
Step 7: Map the Global Variable to the Response
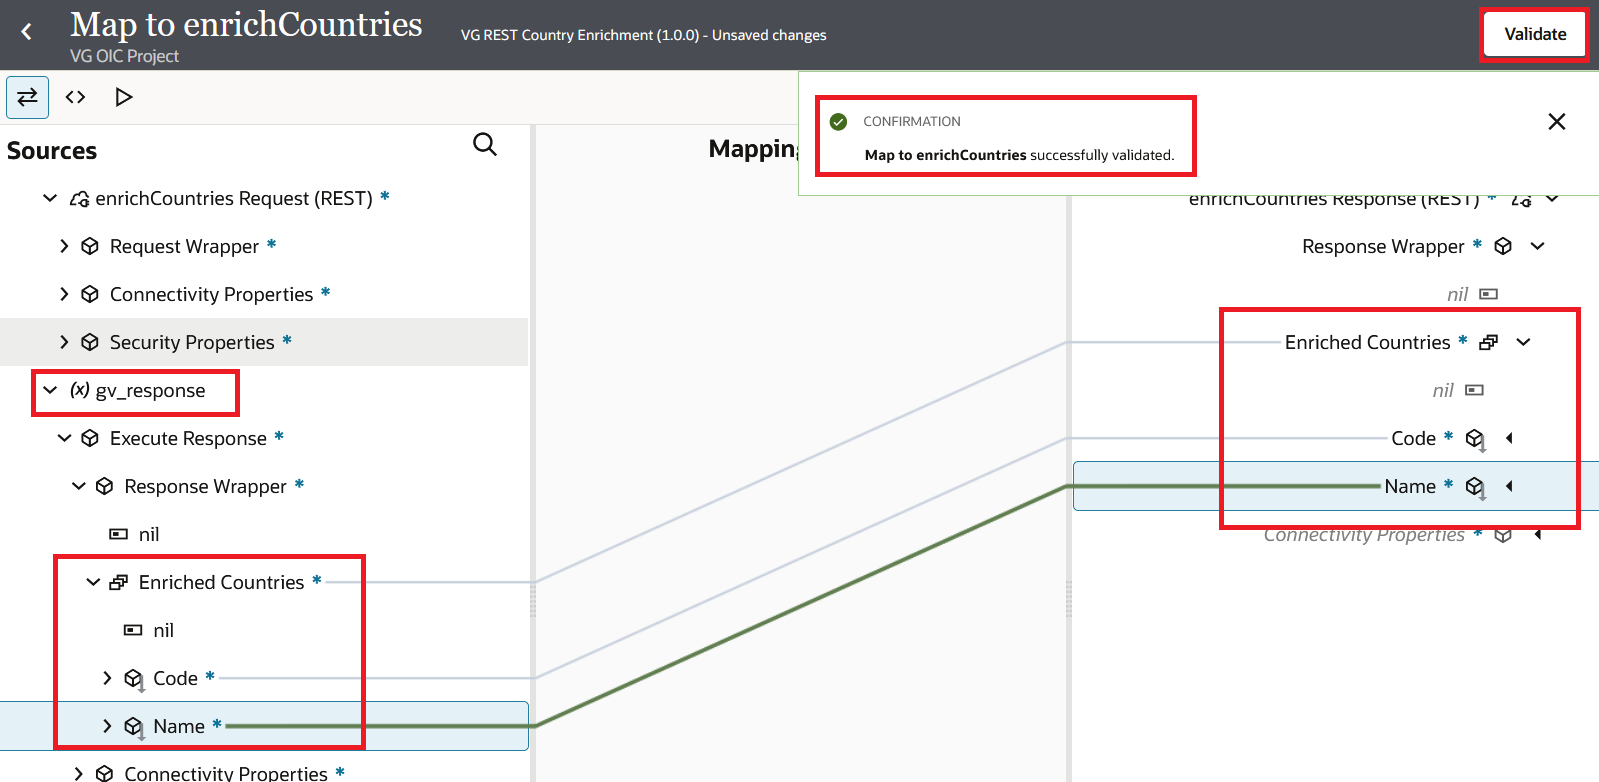
Put a Map action right before the trigger response. Open the mapper and drag gv_response/enrichedCountries onto the response enrichedCountries element.
Step 8: Activate and Test
Save the integration, activate it, and then use the Test panel to test it. Send the sample request and see what happens.
Expected response:
{
  "enrichedCountries": [
    {"code": "US", "name": "United States"},
    {"code": "IN", "name": "India"},
    {"code": "GBU", "name": "Unknown"}
  ]
}
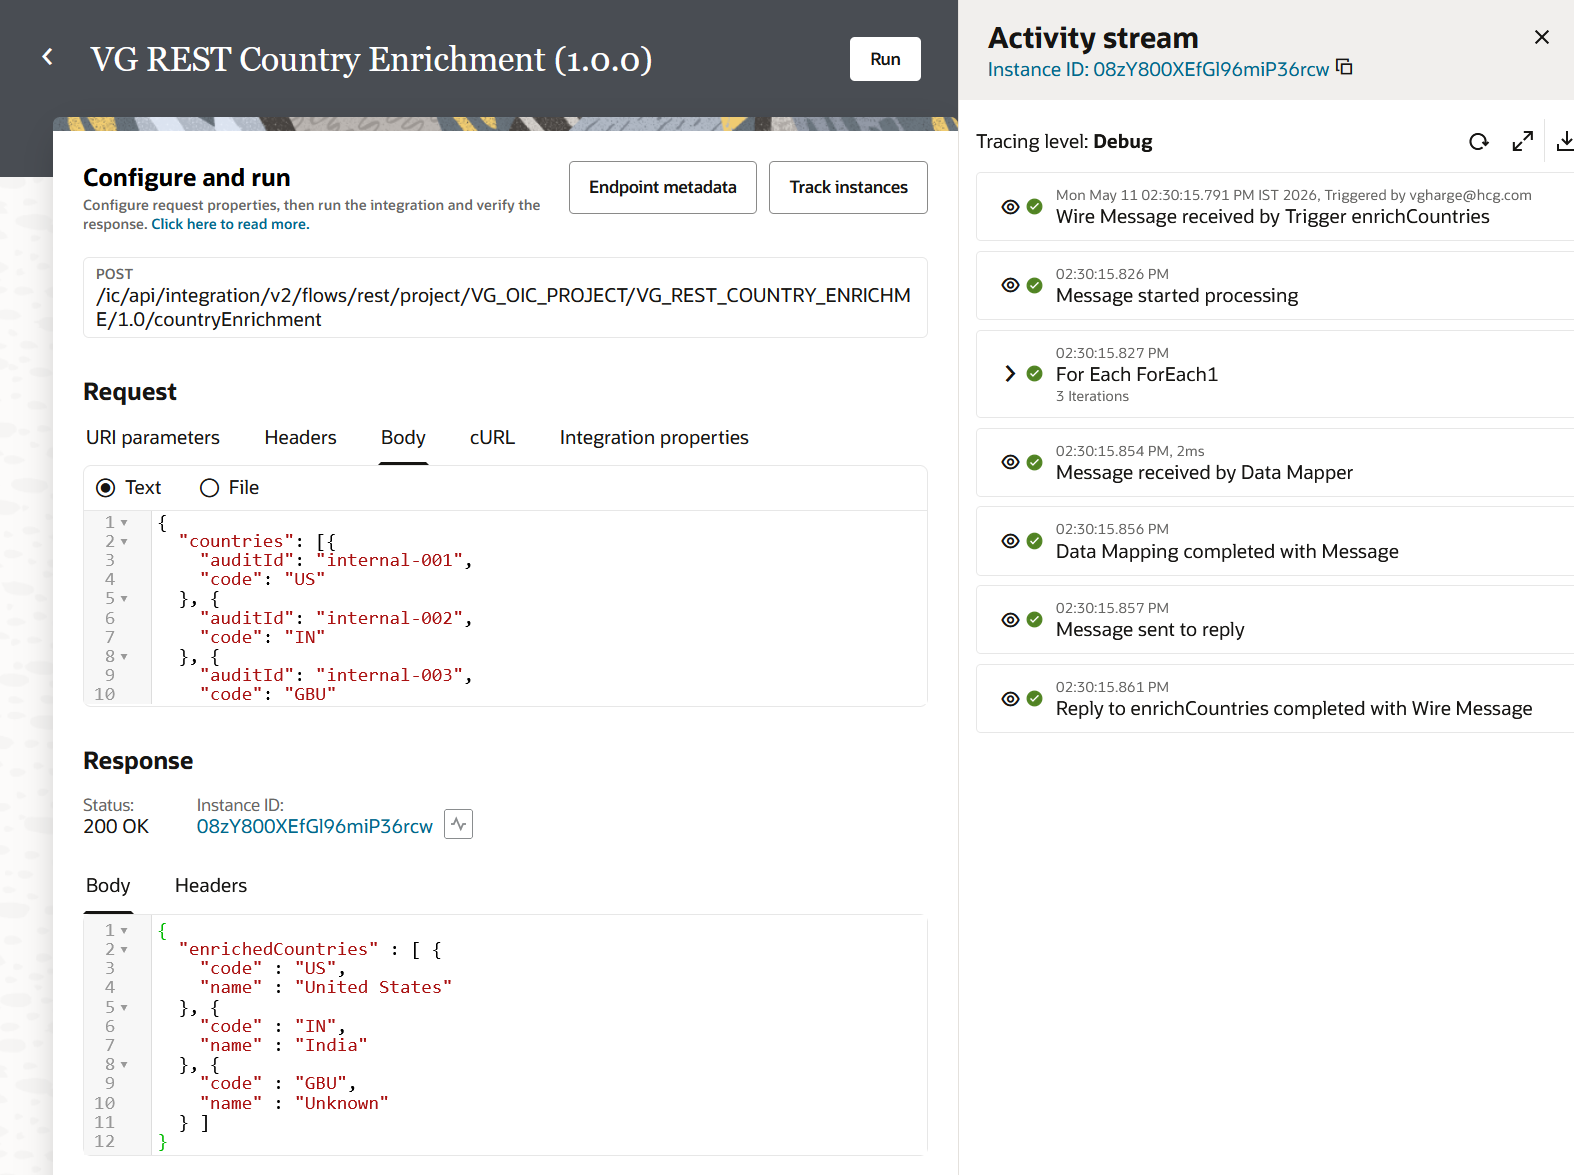
In one integration, you used all three operations: Assign to build each row in gv_tempCountry, Append to add the completed row to the response array, and Remove to clean up before the response goes out. This same pattern works for supplier enrichment, order consolidation, and payment file generation. Anywhere you call more than one endpoint or process more than one row and need to assemble a single response.
Things to Keep in Mind and Limitations
- Message size limits. For structured payloads (JSON, XML), the limit is 100 MB for cloud and private endpoints, 50 MB for SOAP and REST through the connectivity agent, and 10 MB for Database, JMS, MQ, and Kafka. A global variable holding the response counts toward this limit, so a loop adding 100,000 rows of about a kilobyte each will hit the limit and fail.
- Global variables: max 20, not editable. Most integrations need 2 to 5. To rename or change the type of a variable, delete and recreate it, then fix every action that used it. Choose the right type the first time.
- Statement order matters. Statements run top to bottom within a single Stitch action. The walkthrough fills gv_tempCountry with two Assigns first, then Appends it. Reverse the order and Append fires while gv_tempCountry is empty.
Closing Thoughts
If I could give you one word of advice about Data Stitch, it would be this. If you ever have to fight the Mapper to get it to do something it wasn't really meant to do, like add to an array or take a field out of an existing payload, stop and grab Data Stitch. The cleaner answer is generally the correct one.
Once you get the hang of it, the combination of Global Variables and Data Stitch is one of those features that changes how you design integrations without you even realizing it. Eventually, you stop seeing your integration as a big Mapper. Instead, you think of it as a flow that takes time to build up its response. Just watch the size limit on messages as your loops get bigger.
References
- Oracle Integration 3, Build Complex Assignment Statements with a Data Stitch Action. https://docs.oracle.com/en/cloud/paas/application-integration/integrations-user/build-complex-assignments-stitch-action.html
- Oracle Integration 3, Create Global Variables. https://docs.oracle.com/en/cloud/paas/application-integration/integrations-user/create-global-variables.html
- Oracle Integration 3, Service Limits. https://docs.oracle.com/en/cloud/paas/application-integration/oracle-integration-oci/service-limits.html