Sending Custom HTML Emails with the Notification Action in OIC Gen 3

Why Custom HTML Emails in OIC
A few months ago, finance came to me with a familiar ask. Every time a supplier payment failed in the downstream system, send out an alert email. Standard stuff. Then they showed me a mockup. Logo at the top. Failure details in a clean table. Support link in the footer. Not the wall of plain text most OIC notifications end up looking like.
Here is the thing. Almost every OIC developer I have worked with treats the Notification action like a one-line tool. Type a sentence in the Body, map a couple of parameters, done. I have done this myself for years. The Body field, though, accepts full HTML. Inline CSS works. Tables work. Dynamic parameters slot in cleanly. With about thirty minutes of effort you can send something that looks closer to what a marketing platform would push out than to a typical system alert.
I covered the basics of this action in the OIC Gen3 Adapters and OIC Gen3 Connections posts, and built a working integration in Hello World. This blog goes a step further.
We will build an App Driven integration that takes in a JSON payload of supplier payment failure details and emails them out in a formatted HTML table. Same VG OIC Project as the rest of the series. The only piece we need is the VG REST Trigger Conn connection, which we set up in the Connections blog.
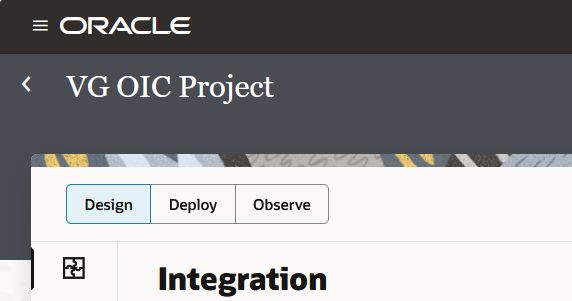
To get started, navigate to ☰ > Projects and open VG OIC Project.
Step 1: Create the App Driven Integration
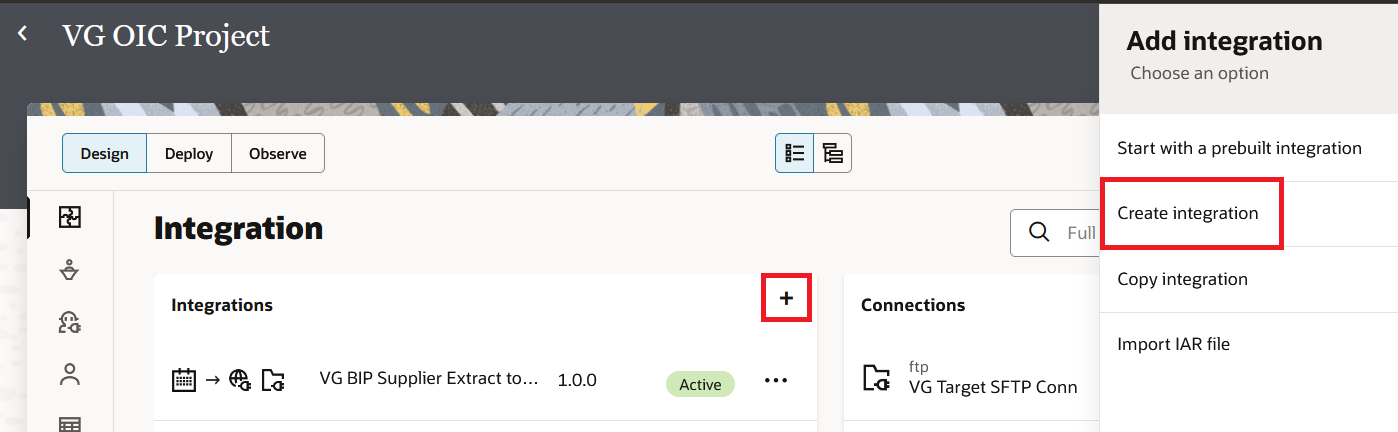
- Inside the project, click the + icon in the Integrations section. Click Create integration.
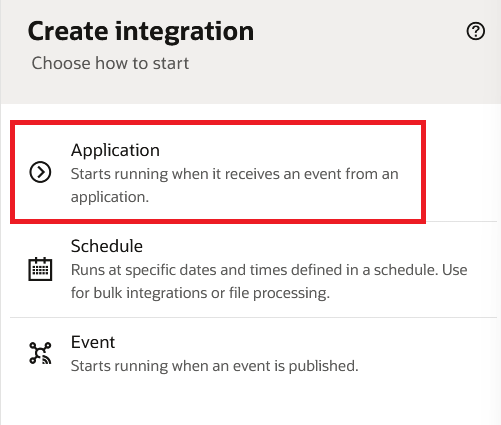
- Select Application as the integration style. We select Application because this integration is triggered by an external system posting a payment failure event, not on a schedule.
- Enter the Name as
VG Payment Failure Notificationand click Create.

Step 2: Configure the REST Trigger
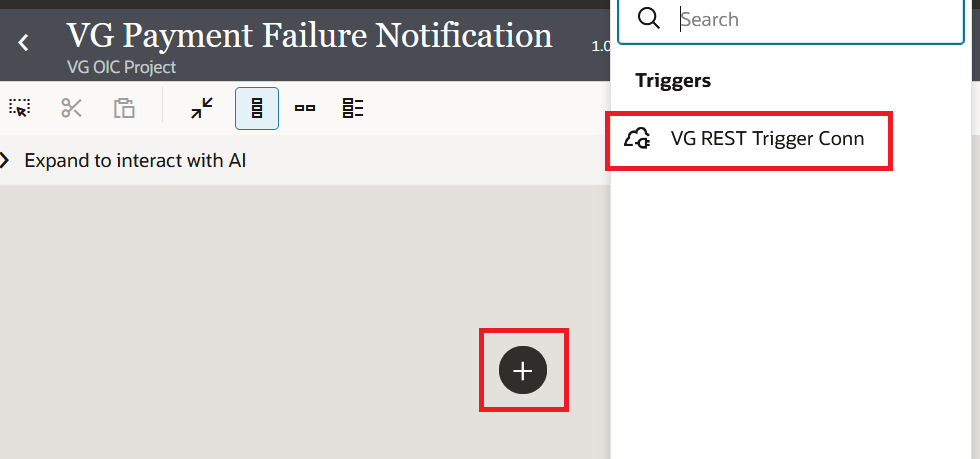
- On the integration canvas, click the + icon on the trigger side of the canvas. Search for
VG REST Trigger Connand select it.
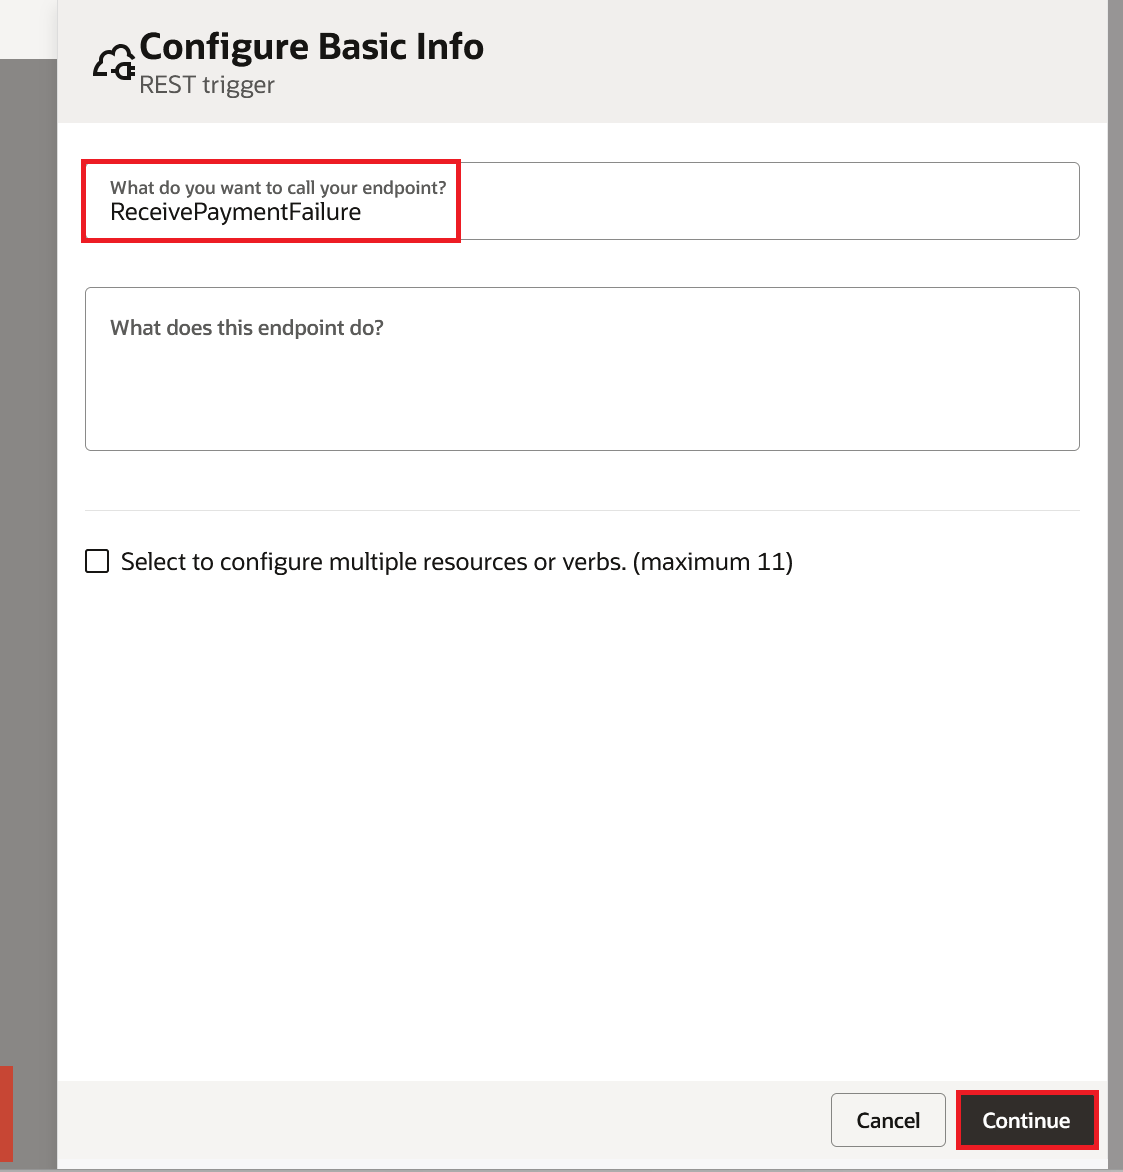
- Enter the endpoint name as
ReceivePaymentFailureand click Continue.
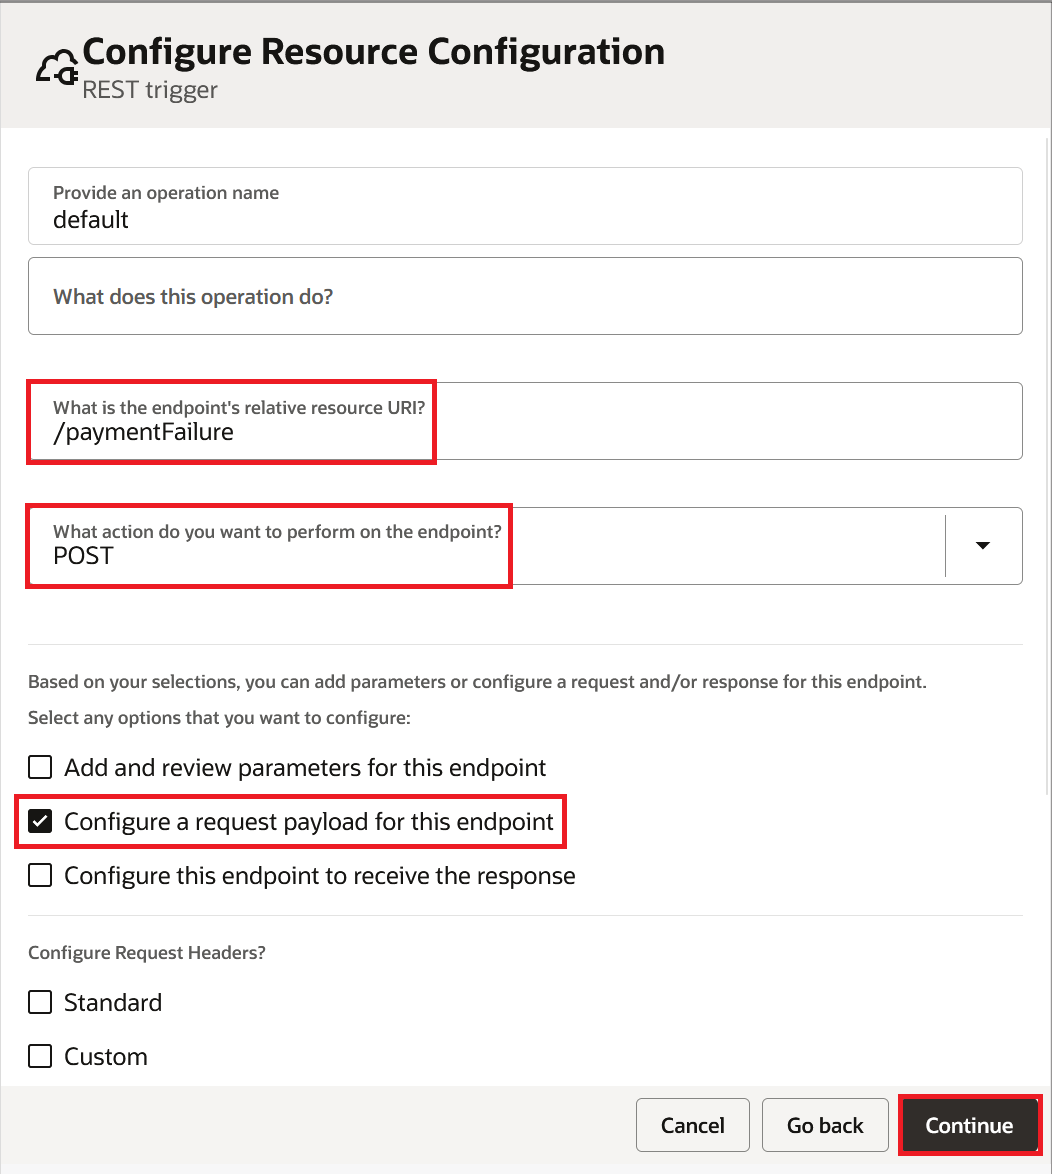
- Enter the Relative Resource URI as
/paymentFailureand select POST as the action. Check the "Configure a request payload for this endpoint" box and click Continue.
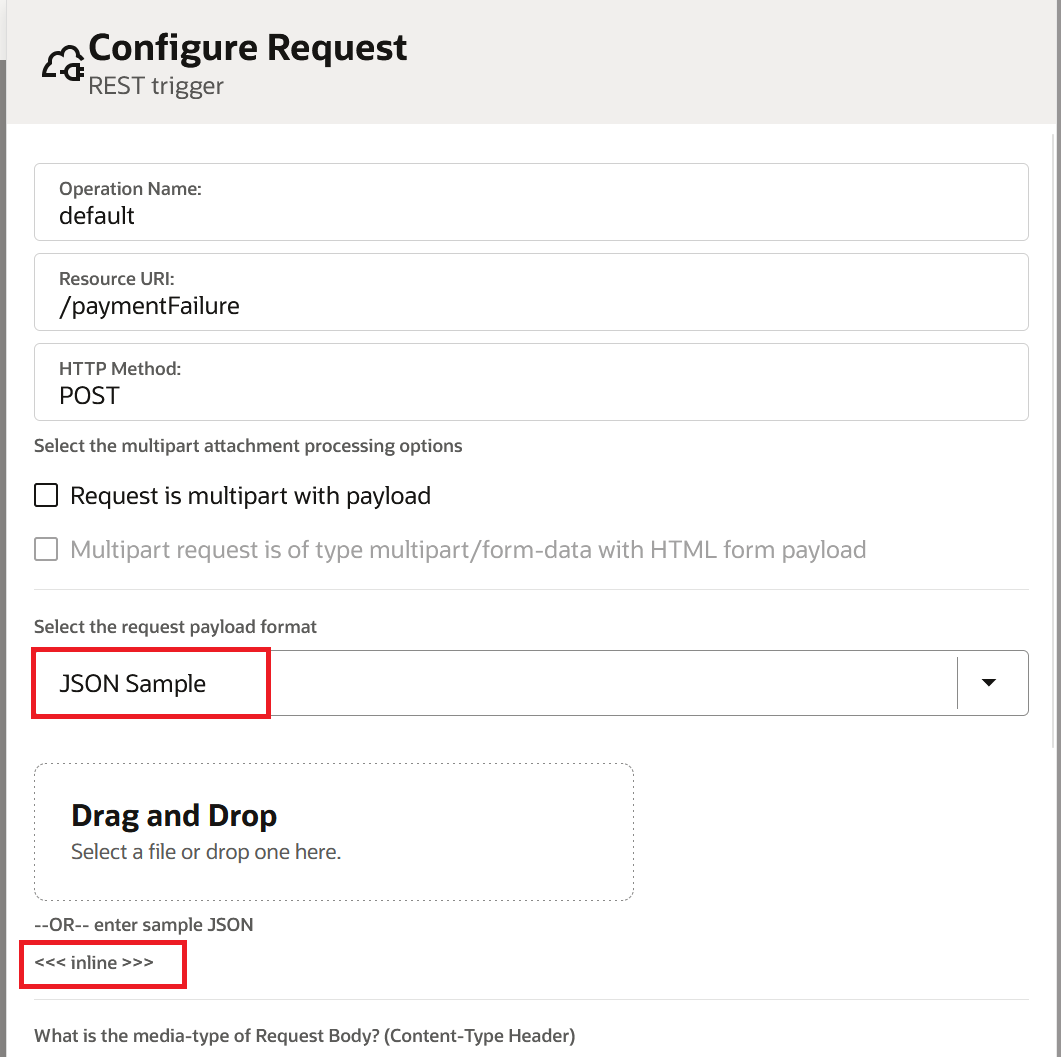
- On the Request page, click on <<<inline>>> as shown below
- Copy the below JSON Sample, paste it in the popup window as shown below, and click Continue:
{
  "supplierName": "ACME Corporation",
  "supplierNumber": "SUP-1001",
  "invoiceNumber": "INV-20250412",
  "amount": "12500.00",
  "currency": "USD",
  "failureReason": "Invalid bank account number",
  "paymentDate": "2026-04-15",
  "recipient": "finance@example.com"
}
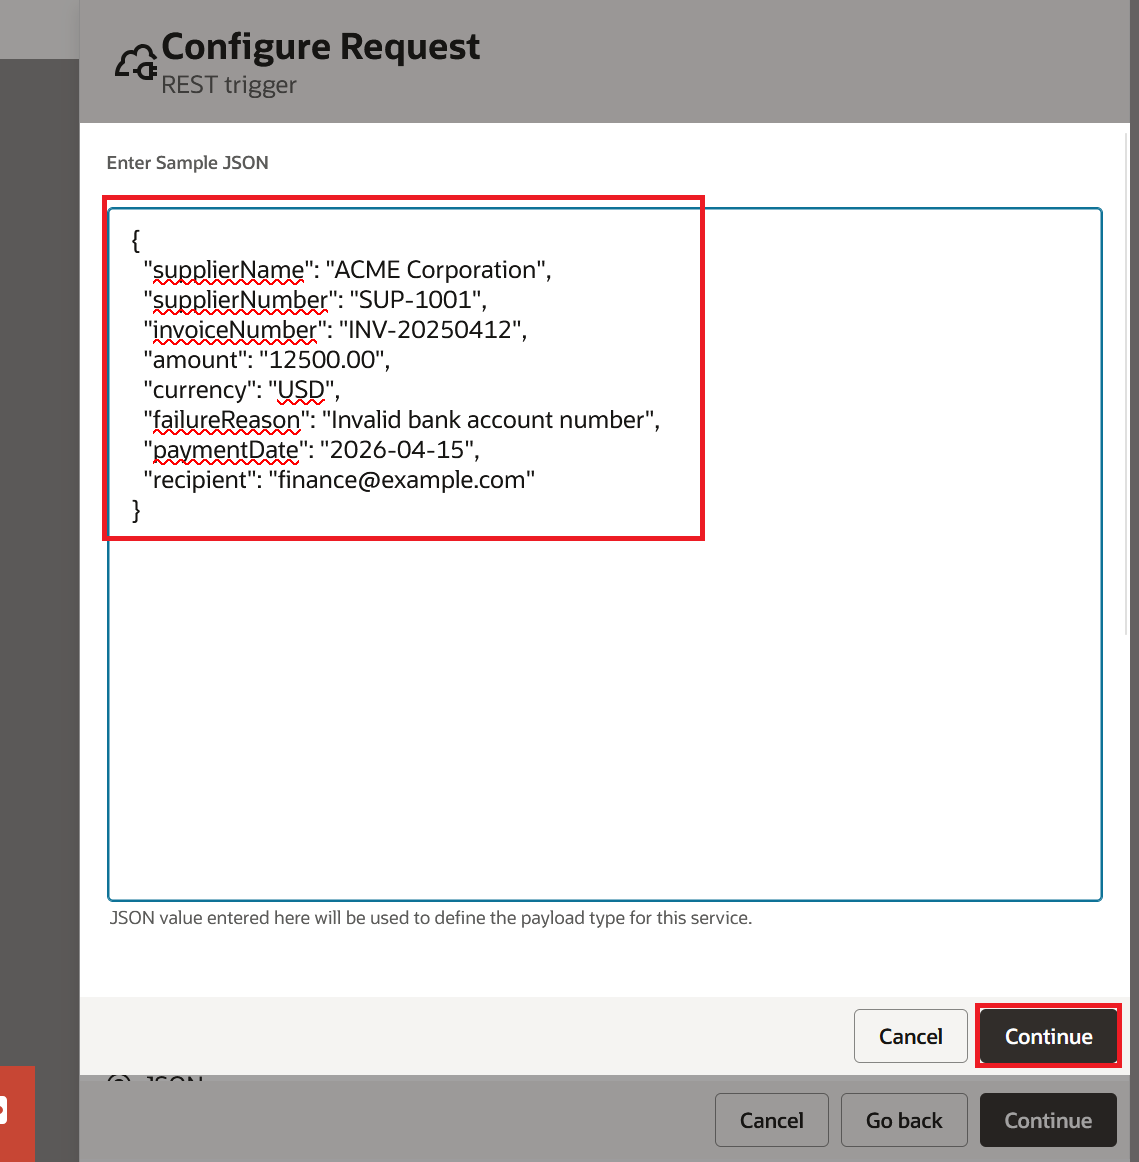
- Click Continue and Finish.
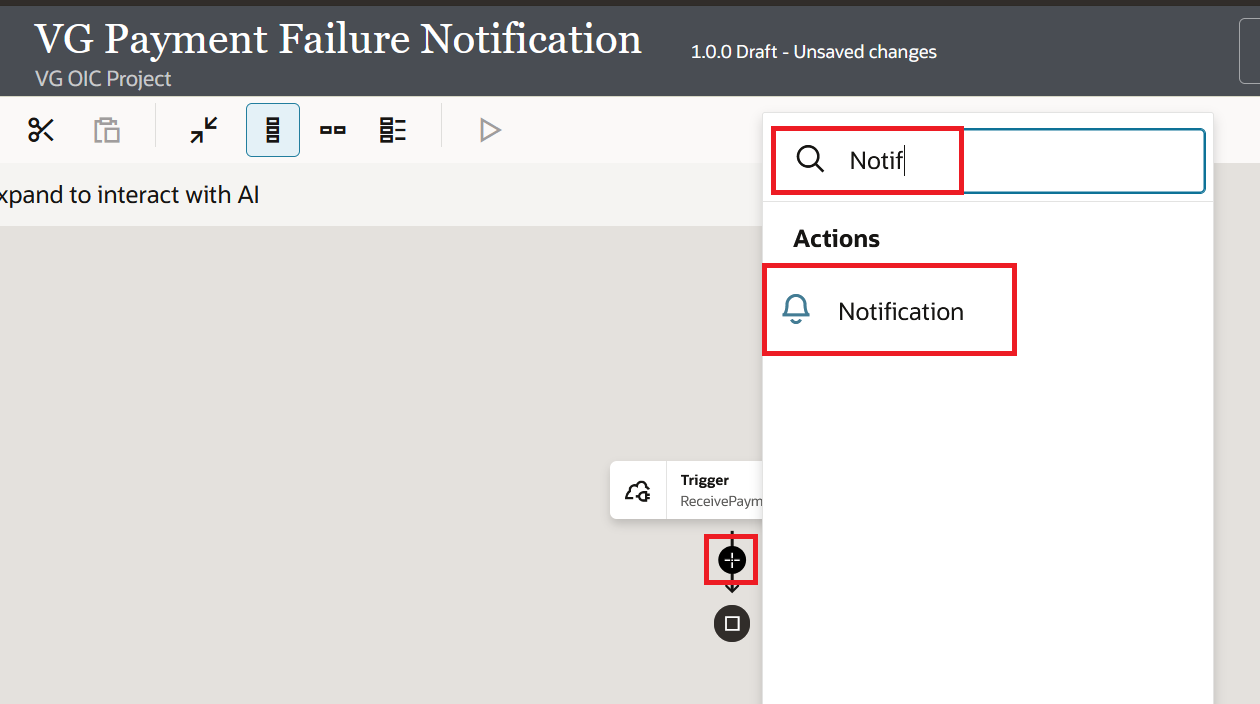
Step 3: Add the Notification Action
- On the canvas, click the + icon after the trigger. Under Actions, search and select Notification.
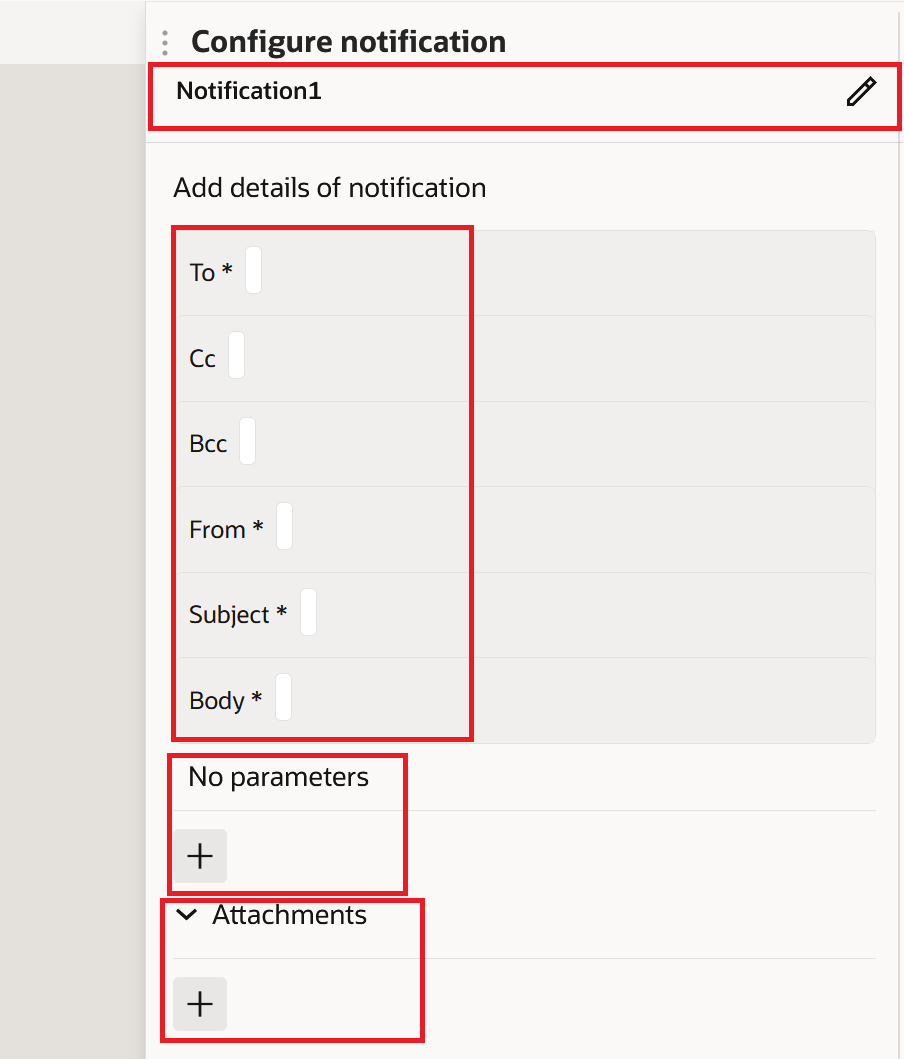
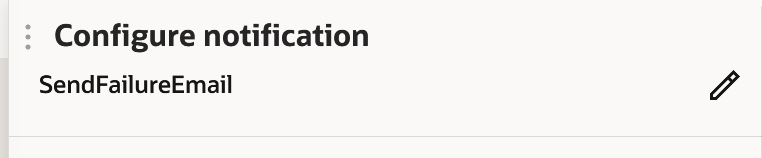
- The Notification configuration page opens with four mandatory fields that we will configure one by one: From, To, Subject, and Body. We can also see some more fields like Cc, Bcc, Attachments, and Parameters. We will cover each one in detail below. For now, click on the Pencil icon next to Notification1, change the name from Notification1 to "SendFailureEmail", and click the Check mark to save:
Step 4: Configure From, To, and Subject
- Click the edit icon next to the From field. Enter the expression below inside quotes:
"no-reply@oracle.com"
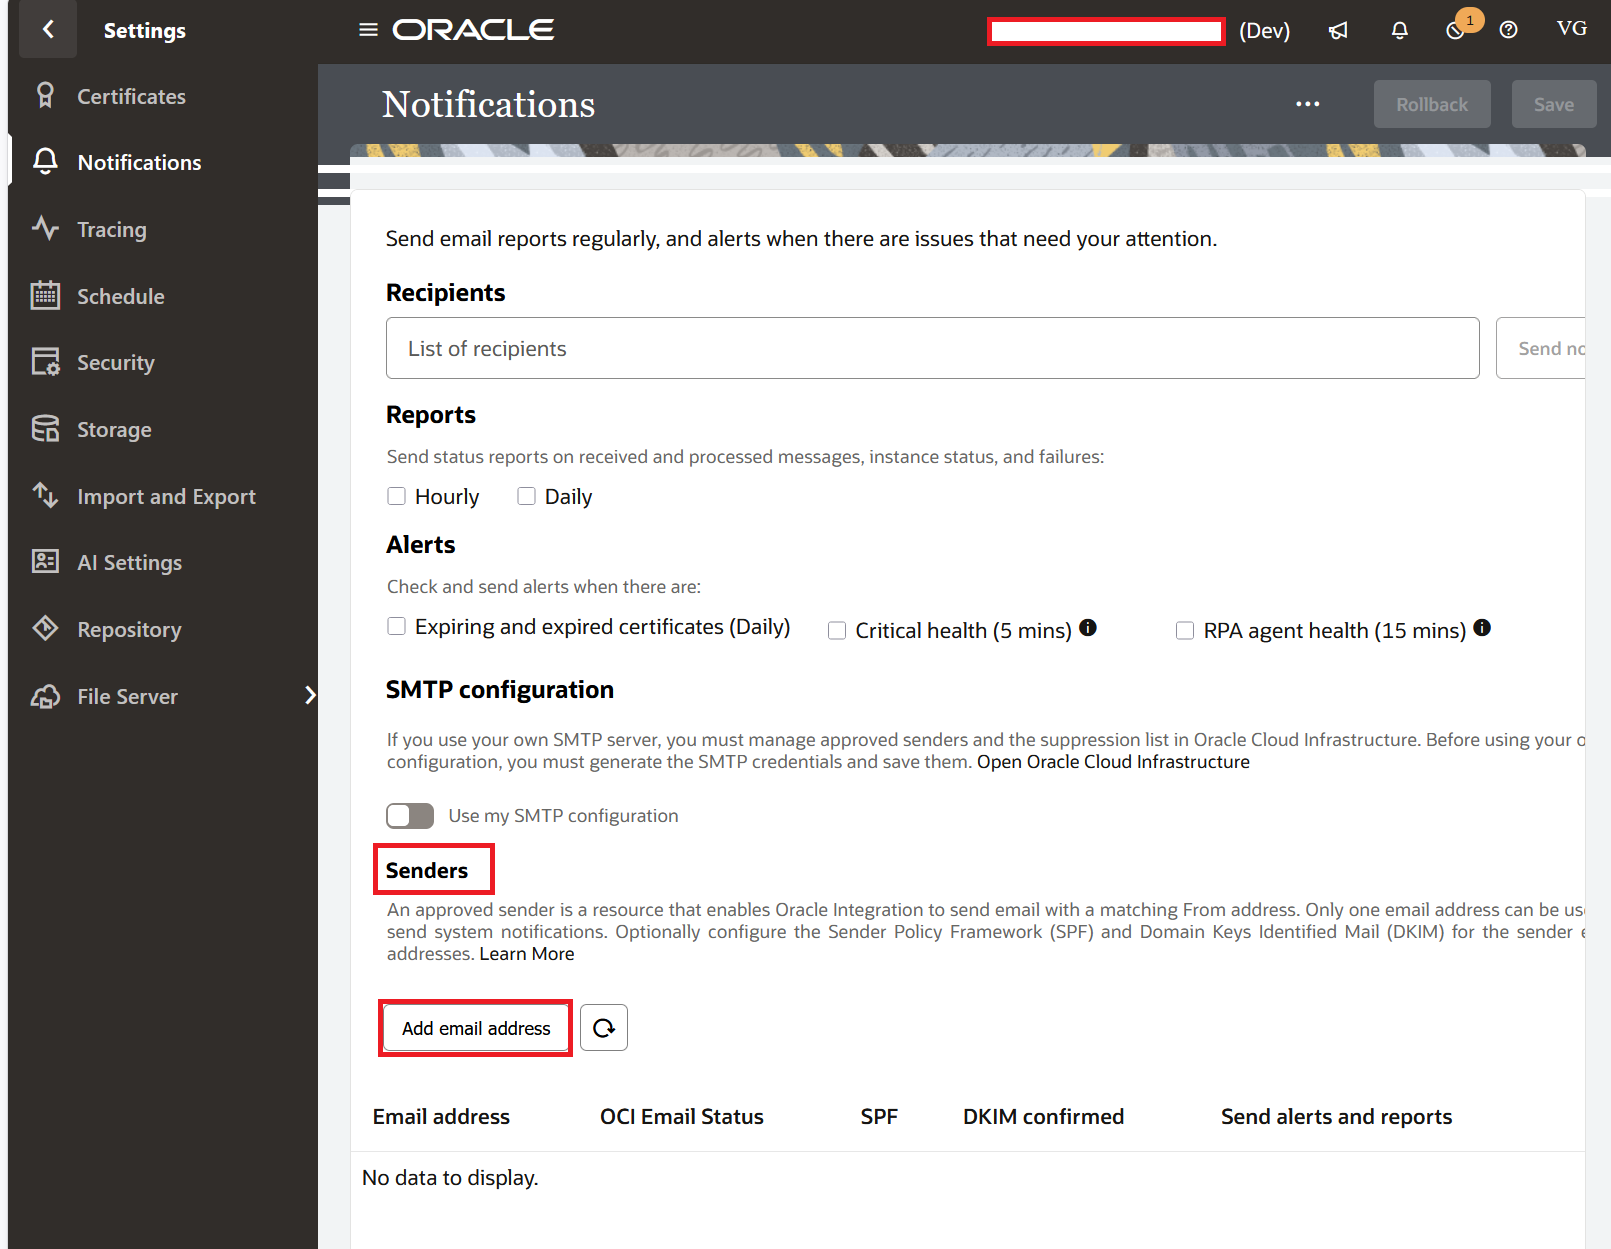
I wish someone had told me this about the From field in Gen 3 on the first day. The address you enter will only be honored if it is on the Approved Senders list. To get there, click on ☰ > Settings > Notifications > Senders. If the address you used isn't on that list, OIC won't give you an error. It changes your From to a regional Oracle one without making a sound. In Ashburn, for example, your no-reply@oracle.com email address changes to no-reply@mail.integration.us-ashburn-1.ocp.oraclecloud.com when the program runs. The instance still changes to "Succeeded." The activity stream looks good. When someone in finance asks why the alert came from mail.integration.something.oraclecloud.com instead of your company, you'll only notice the change.
Want the email to come from the real domain of your business? Two things. First, go to the same Settings path and add the address (or the whole domain) to the list of Approved Senders. Second, tell your DNS team to set up SPF and DKIM records for that domain. If you don't do the SPF and DKIM part, your perfectly good sender will still end up in junk mail on most corporate Outlook accounts.
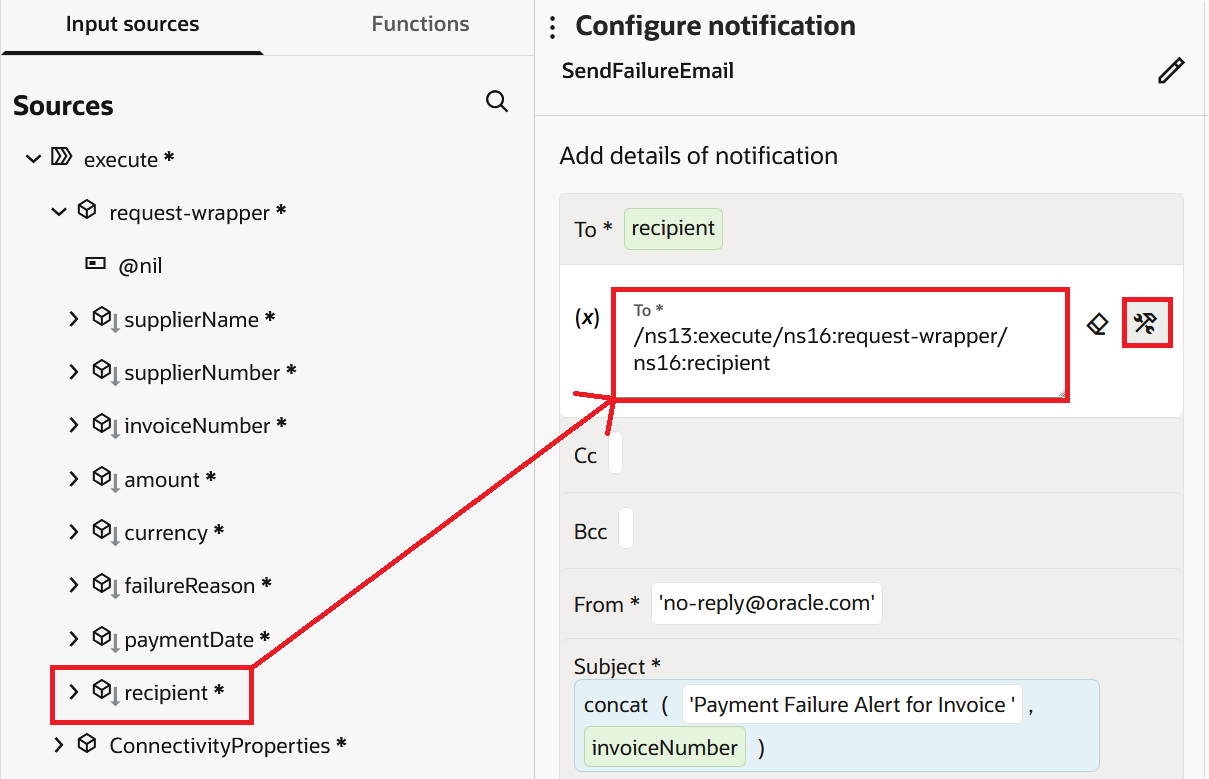
- Click the second icon next to the "To" box. Click the check mark after dragging the recipient field from the trigger payload on the left into the expression builder. Using a field from the payload instead of a hardcoded email makes the integration work in different environments and business units.
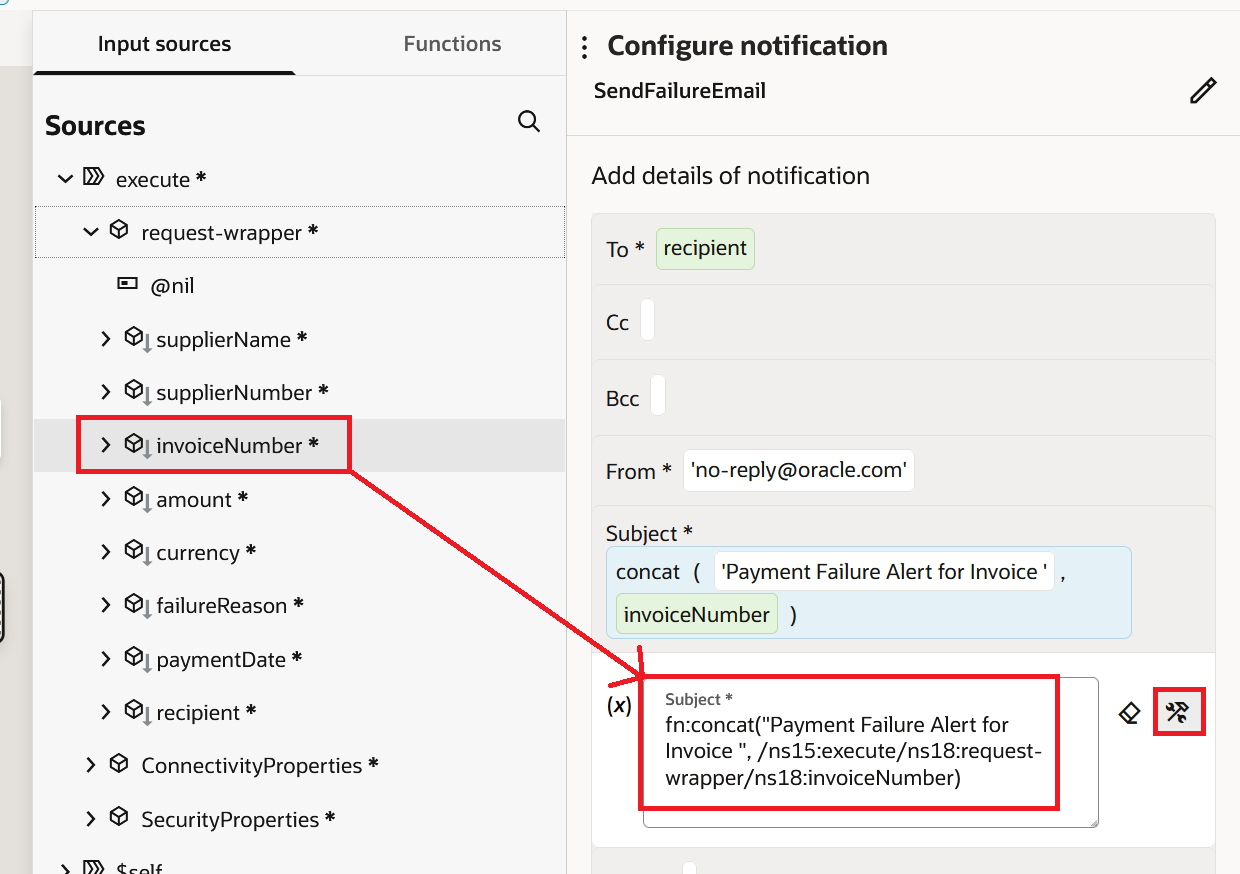
- Click the second icon next to the Subject field. Enter a concat expression that joins static text with the invoice number:
fn:concat("Payment Failure Alert for Invoice ", /ns15:execute/ns18:request-wrapper/ns18:invoiceNumber)
Step 5: Build the HTML Body
This is the main part of the blog. The Body field accepts full HTML. You can write it directly in the Body editor, or, much better, prepare it outside and paste it in. I always prepare the HTML in a separate file so that I can preview the layout in a browser before pasting it into OIC.
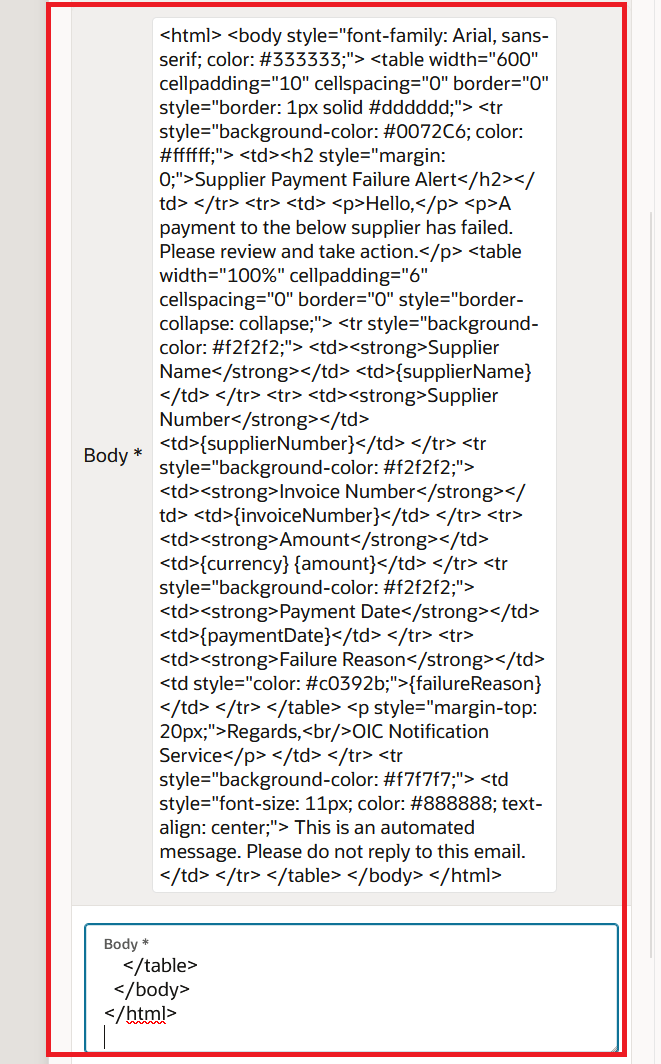
- Click inside the Body field. Paste the following HTML:
<html>
  <body style="font-family: Arial, sans-serif; color: #333333;">
    <table width="600" cellpadding="10" cellspacing="0" border="0" style="border: 1px solid #dddddd;">
      <tr style="background-color: #0072C6; color: #ffffff;">
        <td><h2 style="margin: 0;">Supplier Payment Failure Alert</h2></td>
      </tr>
      <tr>
        <td>
          <p>Hello,</p>
          <p>A payment to the below supplier has failed. Please review and take action.</p>
          <table width="100%" cellpadding="6" cellspacing="0" border="0" style="border-collapse: collapse;">
            <tr style="background-color: #f2f2f2;">
              <td><strong>Supplier Name</strong></td>
              <td>{supplierName}</td>
            </tr>
            <tr>
              <td><strong>Supplier Number</strong></td>
              <td>{supplierNumber}</td>
            </tr>
            <tr style="background-color: #f2f2f2;">
              <td><strong>Invoice Number</strong></td>
              <td>{invoiceNumber}</td>
            </tr>
            <tr>
              <td><strong>Amount</strong></td>
              <td>{currency} {amount}</td>
            </tr>
            <tr style="background-color: #f2f2f2;">
              <td><strong>Payment Date</strong></td>
              <td>{paymentDate}</td>
            </tr>
            <tr>
              <td><strong>Failure Reason</strong></td>
              <td style="color: #c0392b;">{failureReason}</td>
            </tr>
          </table>
          <p style="margin-top: 20px;">Regards,<br/>OIC Notification Service</p>
        </td>
      </tr>
      <tr style="background-color: #f7f7f7;">
        <td style="font-size: 11px; color: #888888; text-align: center;">
          This is an automated message. Please do not reply to this email.
        </td>
      </tr>
    </table>
  </body>
</html>
The values inside curly braces like {supplierName} are placeholders. They will be replaced at runtime with actual values from the trigger payload. We define these in the Parameters section right below the Body field.
Step 6: Define Parameters
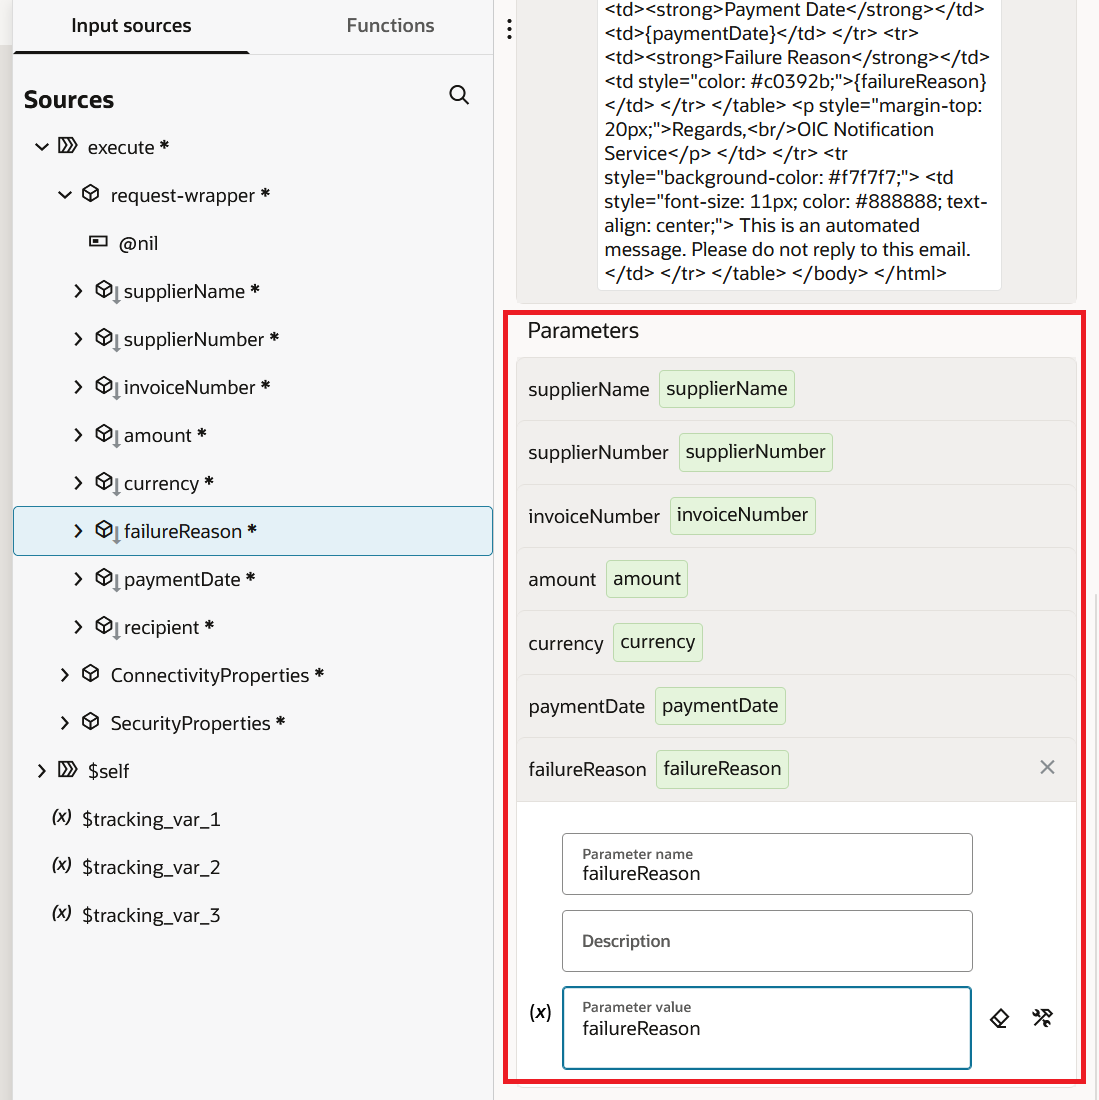
Below the Body field, there is a Parameters section. Every placeholder in the HTML body needs a matching entry here.
- Click the + icon in the Parameters section.
- Enter the parameter name as
supplierName, and drag thesupplierNamefield from the trigger payload on the left. - Repeat the same for each placeholder. The final list should look like this:
supplierNamemapped to/ns15:execute/ns18:request-wrapper/ns18:supplierNamesupplierNumbermapped to/ns15:execute/ns18:request-wrapper/ns18:supplierNumberinvoiceNumbermapped to/ns15:execute/ns18:request-wrapper/ns18:invoiceNumberamountmapped to/ns15:execute/ns18:request-wrapper/ns18:amountcurrencymapped to/ns15:execute/ns18:request-wrapper/ns18:currencypaymentDatemapped to/ns15:execute/ns18:request-wrapper/ns18:paymentDatefailureReasonmapped to/ns15:execute/ns18:request-wrapper/ns18:failureReason
- Click Save.
Note: The parameter name in this Parameters list must match the placeholder name inside the curly braces exactly. It is case sensitive. I have seen teams spend an hour chasing why the email body shows {supplierName} as literal text, and the answer is always a spelling mismatch or a missing parameter entry.Step 7: Activate and Test
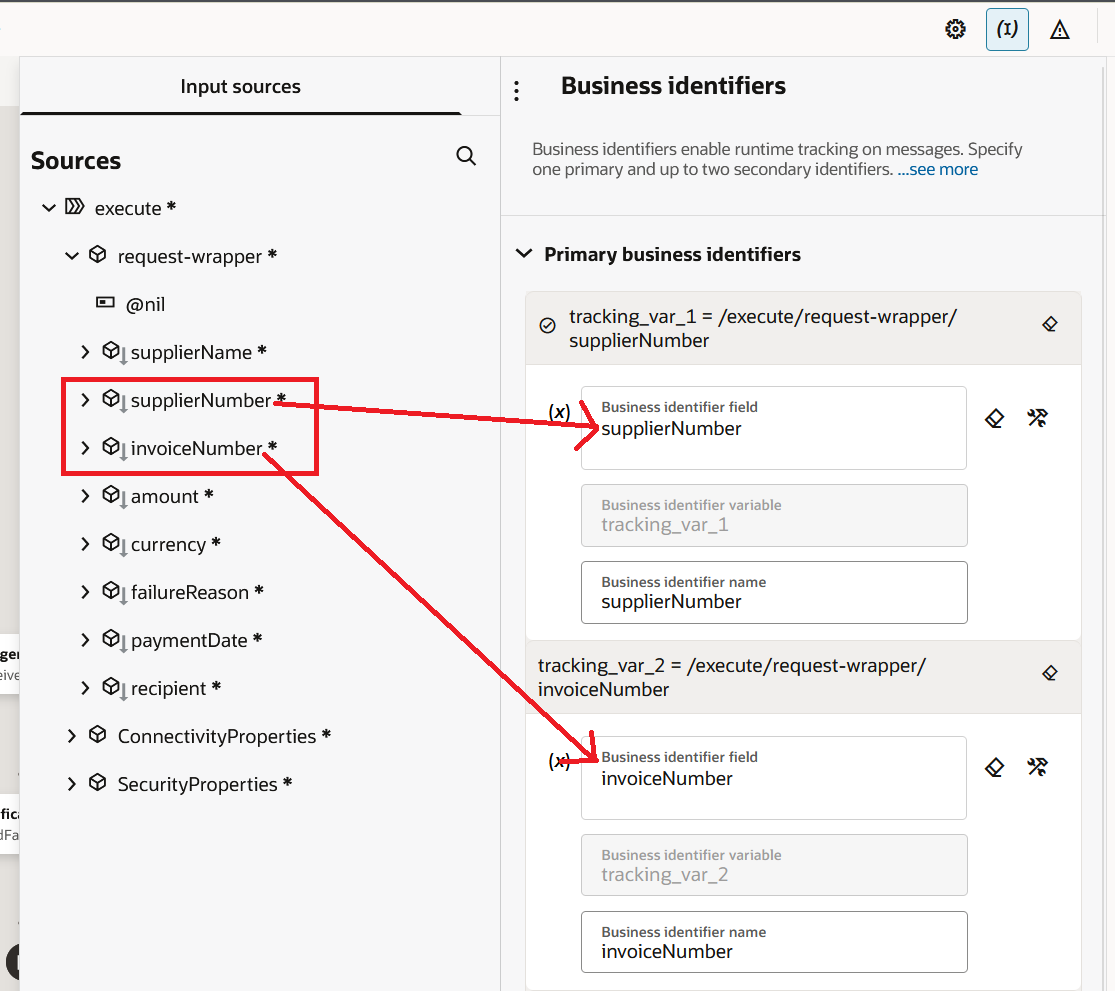
- Set up Business Identifiers for tracking. Click the Business Identifiers icon on the top right toolbar. Drag
invoiceNumberandsupplierNumberinto the Primary business identifiers. Click Save.
- Navigate back to the project. In the Integrations section, click the three dots next to
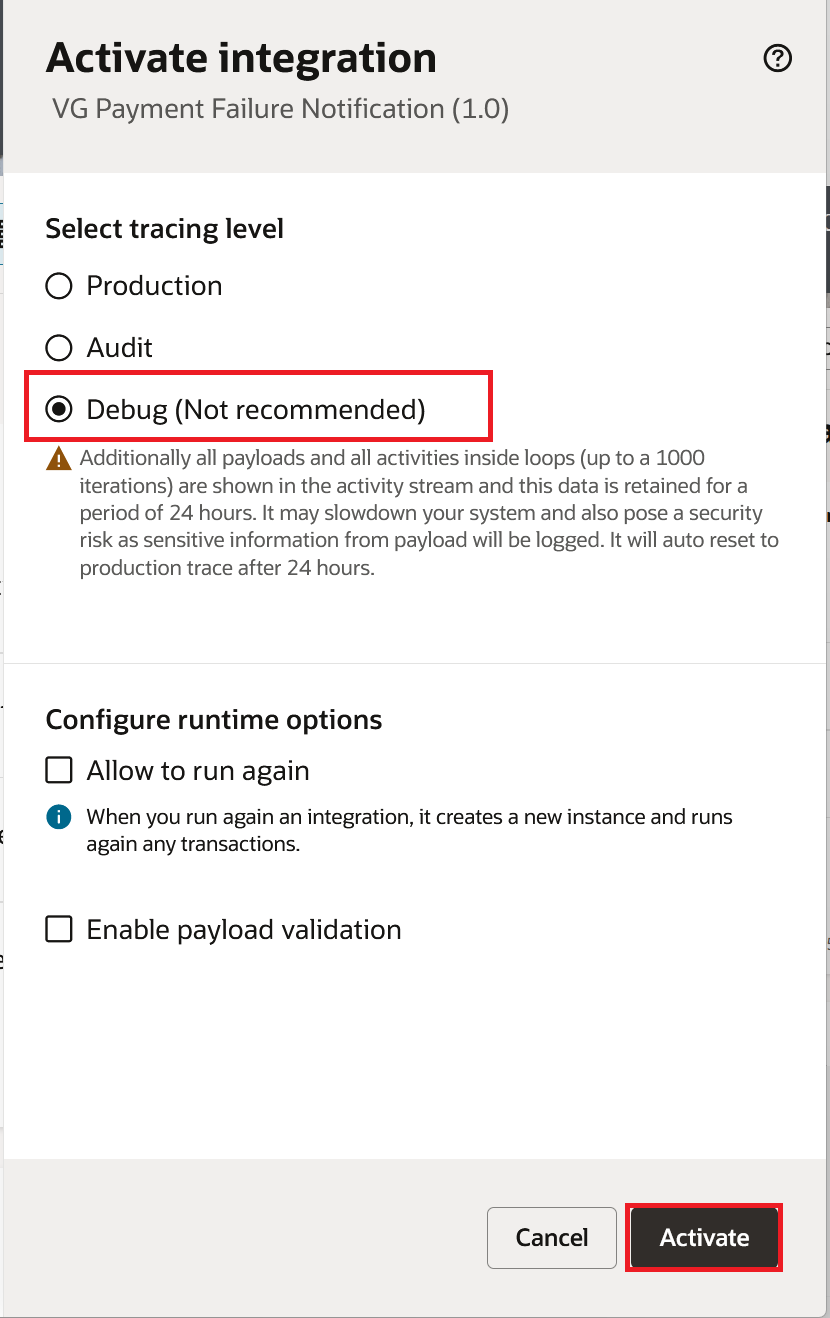
VG Payment Failure Notificationand then click Activate.

- On the Activate integration dialog, select the tracing level as Debug (Not recommended) for initial testing and click Activate.
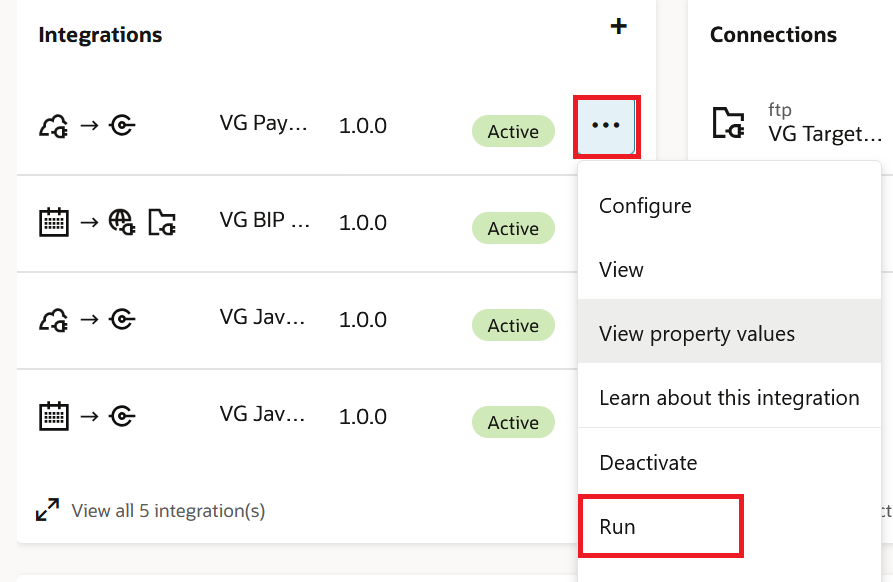
- Once the integration is active, click the three dot menu again and select Run.
- On the Configure and Run page, paste a sample JSON payload with your own email address in the
recipientfield, and click Run.
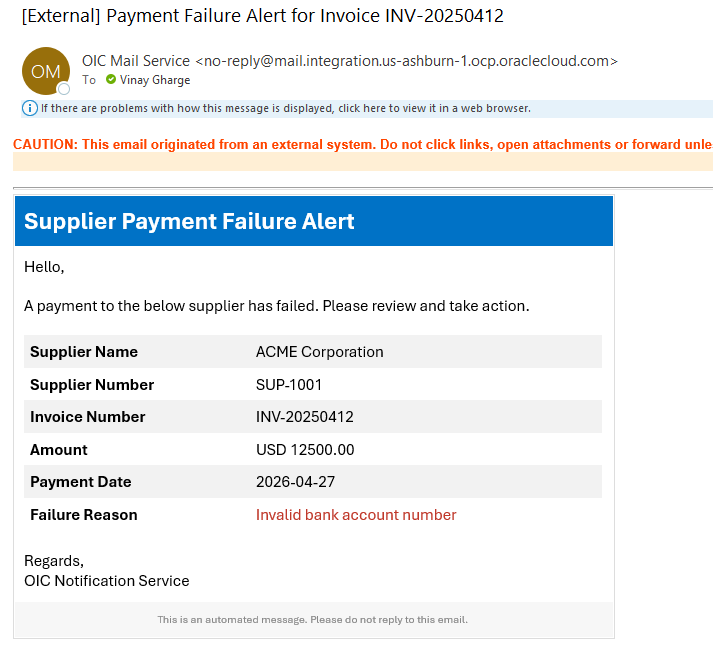
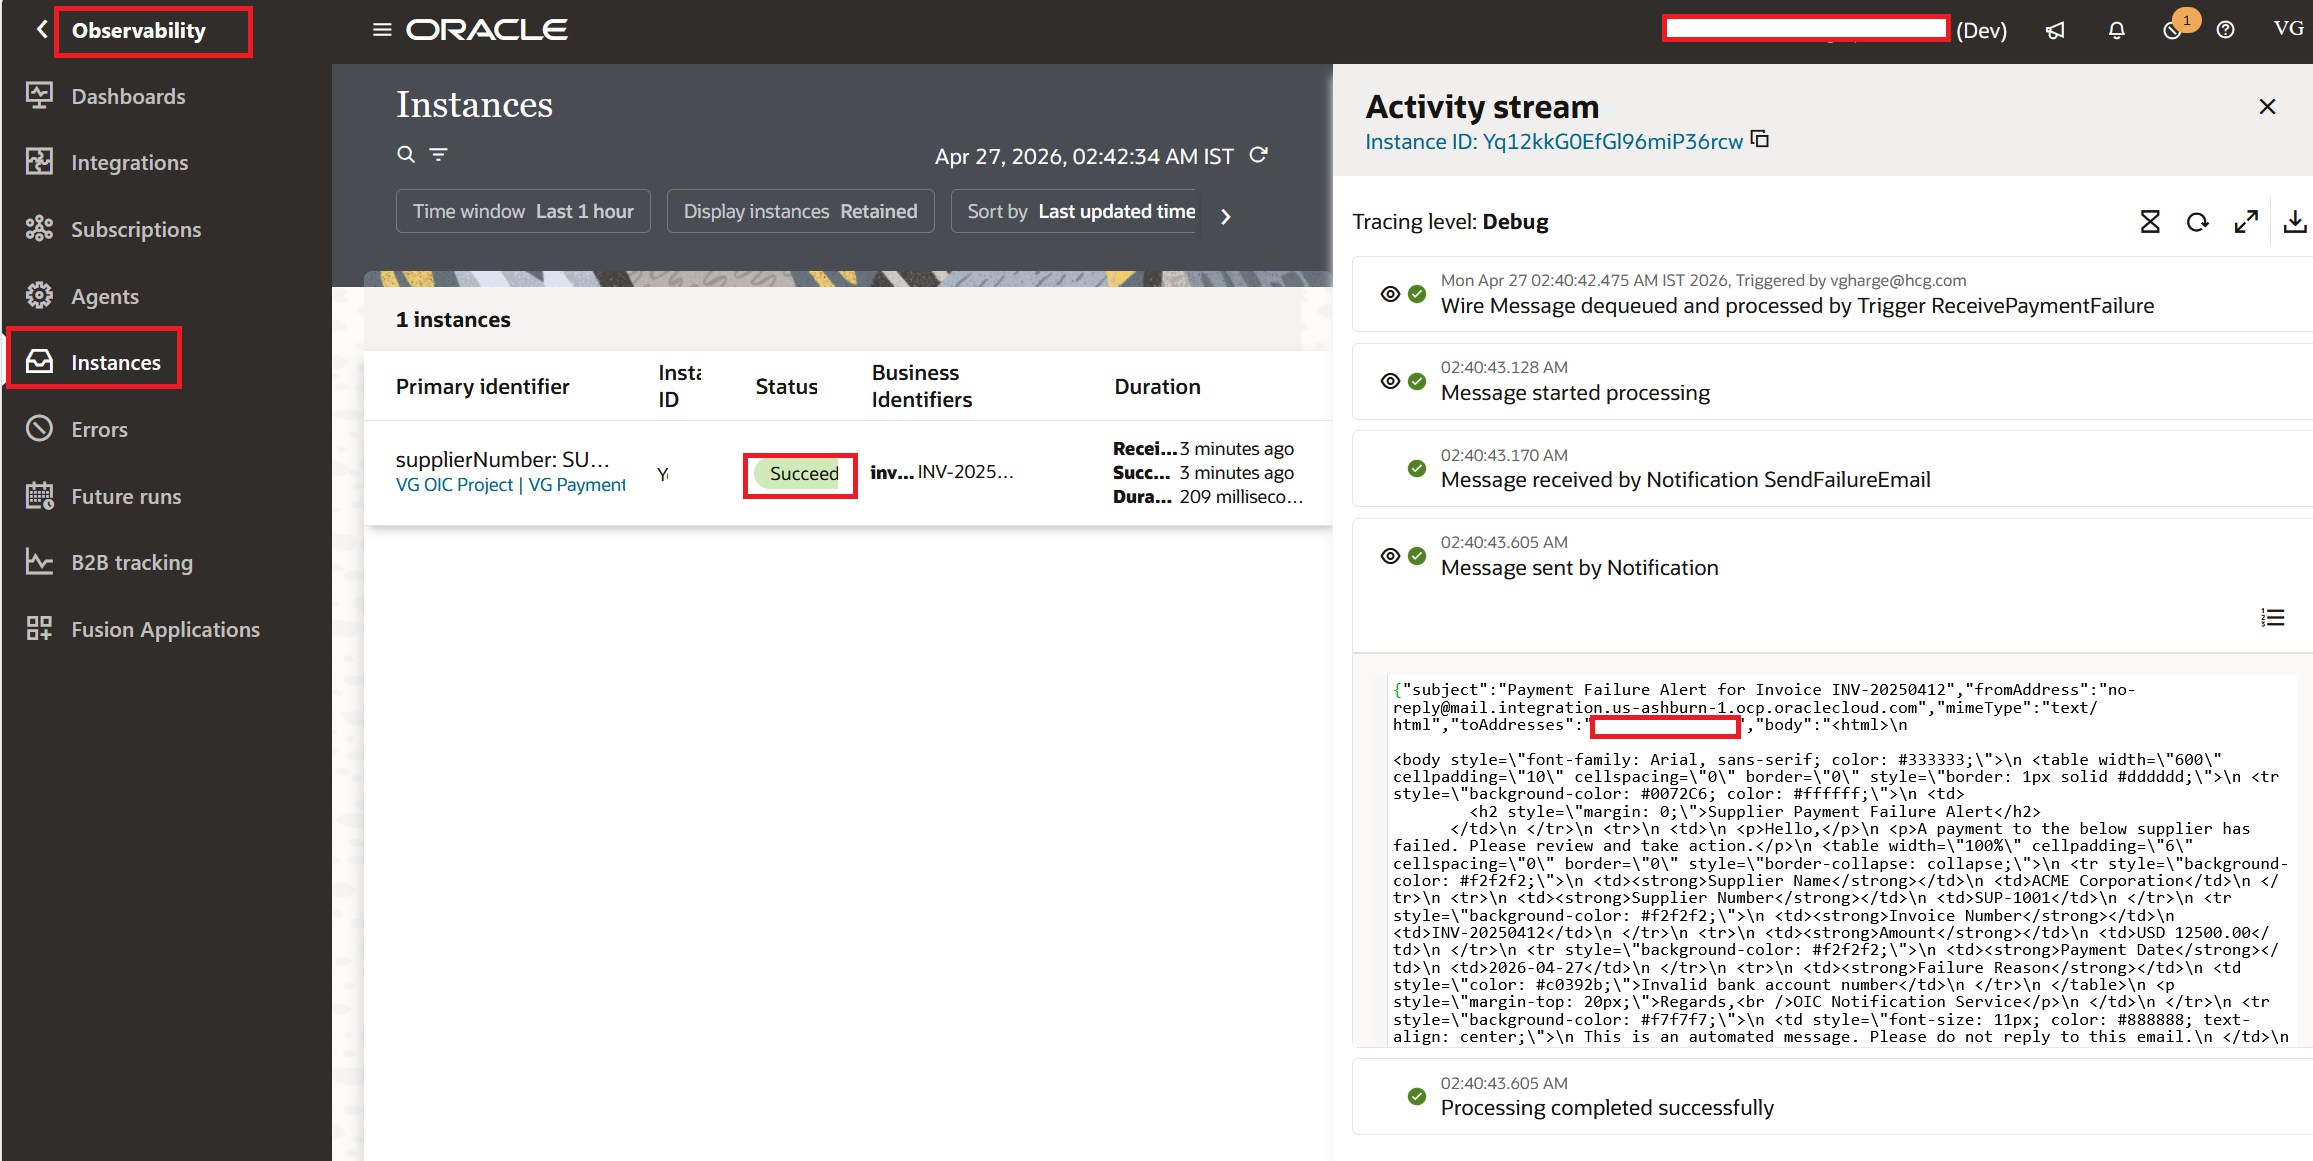
- Check your inbox. You should see the formatted email with the supplier details in a table and the failure reason highlighted in red.
- Open the instance from ☰ > Observability > Instances to see the activity stream. The Notification action shows as completed, with the recipient email, subject, and body captured in the payload.
Some Things to Keep in Mind
Before you get too deep into this, there are a few hard limits you should know. The first one is the most dangerous because it can bite people. The body can only hold 500 KB. That limit stays in place even if you switch to customer tenancy mode for email delivery. It doesn't sound like much. In real life, it's enough. When it is serialized, a clean HTML email with inline CSS and a 50-row data table usually weighs between 40 and 80 KB. When you embed base64 images or make a table with hundreds of rows, you start brushing 500 KB, and then you have a different design problem.
The default OCI email delivery method only lets you send up to 2 MB of body and attachments. If your body is 60 KB, you can attach files that are up to 1.94 MB. Under ☰ > Settings > Notifications, switch to customer tenancy mode. The body cap still doesn't move, but the overall ceiling goes up to whatever OCI Email Delivery allows for your tenancy. My file is about 4 MB. It's important to note that the Notification action documentation page still says the total is 1 MB. The page for Service Limits says 2 MB. The page with the Service Limits wins.
There is also a delivery limit that goes along with all of this. With the default OCI Email Delivery tenancy, you can send 10,000 emails every 24 hours for each instance. The word "rolling" is important. At midnight, it doesn't reset to the next day. If you burn through your quota in one bad hour, you can't get back in for the next 24 hours. Every blocked instance adds "Daily outbound email limit crossed" to its activity stream. The cap is removed in customer tenancy mode.
Now the part that gets everyone. The Notification action happens at the same time as everything else, and it never fails. Read that again. Your integration instance will still show as Succeeded on the Observability page, even if the email doesn't get delivered for any reason. Not an approved address? Worked. Too big of a body? Did it work? Quota reached? It worked. Did SMTP just drop the message? Still Made It. The failure only shows up inside the instance, on the activity stream of the Notification action itself. Put the action in a Scope and add a backup delivery path to the fault handler for anything that is really important to the business, like an alert for a payment failure.
A few notes about rendering, since you will trip over these. Email clients don't load CSS from other sites. Gmail deletes <style> blocks. Outlook shows them on a coin flip. Inline everything, like the body above does. JavaScript is turned off for everyone, so don't bother trying to make the email interactive. Put any interactive elements on a real web page and link to them.
You can't loop inside the Body field for dynamic bodies, like a table where the number of rows changes from run to run. The best way to do this is to use a concat inside a for-each loop to build the HTML in an Assign action, save it to a string variable, and then pass that variable into the Body with a single parameter like {dynamicTable}. Oracle doesn't set a strict limit on the size of string variables right now, but the activity stream will start warning you when a variable gets longer than 10,000 characters. Oracle has said that this might become a hard limit later. I treat anything bigger than 10,000 as a ceiling and send it through a Stage File.
Attachments need a file reference. You can use a Stage File Write, an FTP Adapter Download, or a REST Adapter that returns binary content as sources. The 2 MB total is made up of encoded data, not raw bytes. Base64 adds about 33% more work. When you attach a 1 MB raw CSV file, it becomes about 1.33 MB.
Sometimes 2 MB is just not enough. Three ways I've actually tried.
First, make an SR with Oracle and ask them to raise the attachment limit on your instance. They are able to do it. The catch is on the side that gets it. Most corporate mailboxes have a limit of 10 to 25 MB. If you send a 20 MB attachment to a 10 MB Outlook tenant, it will fail, but OIC will mark it as "Succeeded." Before you spend time on the SR, make sure you know the limits of the receiving inbox.
Second, and this is how I now let people know about errors, I log every error into an ATP table and put a light dashboard on top of it. APEX is working. An OAC workbook or a simple Fusion report page will work too. The integration sends a short message like "12 errors today, click here to review" with a link to the dashboard. The dashboard has all of that: stack traces, full payloads, retry buttons, and more. You can search, filter, and see your history. You never get any of these in your inbox.
Third, push the file to SFTP, UCM, or Object Storage, then put only the path in the email. You have seen this pattern already in the Outbound BIP to SFTP blog. The email stays tiny, the file lives as long as your retention policy keeps it, and the recipient downloads on their schedule. Works especially well for daily and weekly scheduled reports.
Closing Thoughts
A practical tip to end on. When the business asks you to make the email "look nice", do not start inside OIC. Start in a .html file on your laptop. Open it in your browser. Iterate the styling there until it looks right in both Gmail and Outlook. Then, and only then, paste the finished HTML into the Notification Body. The OIC Body editor is not a preview tool. It is a paste target. Treat it as one and you save yourself hours.
I learned this on my first attempt at this. Spent the better part of a day tweaking colors and table widths inside OIC, activating, running, refreshing my inbox, repeat. The next time around I built the HTML standalone, opened it in Chrome, got it the way I wanted, then pasted. Fifteen minutes start to finish.
References
- Oracle Integration 3, Service Limits, Component: Integrations (authoritative for Notification action size limits): https://docs.oracle.com/en/cloud/paas/application-integration/oracle-integration-oci/component-integrations.html
- Oracle Integration 3, Send Notification Emails During Stages of the Integration with a Notification Action: https://docs.oracle.com/en/cloud/paas/application-integration/integrations-user/send-notification-emails-stages-integration-notification-action.html
- Oracle Integration 3, Configure Notification Emails: https://docs.oracle.com/en/cloud/paas/application-integration/integrations-user/configure-notification-emails.html
- Oracle Integration 3, Monitor the Number of Emails Sent from Oracle Integration: https://docs.oracle.com/en/cloud/paas/application-integration/integrations-user/monitor-number-emails-sent-oracle-integration.html