OIC Gen3 Outbound Integration: BIP Report to SFTP

Why BIP Reports for Outbound Integrations
When the data moves from Oracle Fusion to an external system, we call it an Outbound Integration. There are a couple of ways to build one. The downstream system may have a database or a file server where they expect the data in a certain format. BIP Reports work well here in most cases because they let you run a query on the Fusion side joining various tables, get the output as a file, and push it to where the downstream system needs it.
I have seen teams use REST APIs to get data when a BIP report would have been much easier. REST APIs are great when you only need a few records from one business object. But when you need data across multiple tables, BIP reports are the way to go. For example, an AP Invoices REST API gives you the Business Unit ID but not the name. With a BIP report, you write one SQL query that joins invoices with business units, suppliers, and supplier sites, and you get everything in a single file.
In this blog, we will build a Scheduled integration that calls a BIP report to extract Supplier data from Oracle ERP Cloud and pushes the resulting CSV file to an SFTP server. We will build everything inside the same VG OIC Project that we have been using in the Lookups and Libraries blogs. The integration runs on a schedule, calls the BIP report using the ExternalReportWSSService SOAP web service, receives the report data as a base64 encoded string, decodes it using the decodeBase64ToReference function, and then pushes the file to the target SFTP server using the FTP adapter. We need two connections for this integration: a SOAP connection to call the BIP report and an FTP connection to write the file to SFTP. If you have already created these connections in your project, you can skip to Step 3.
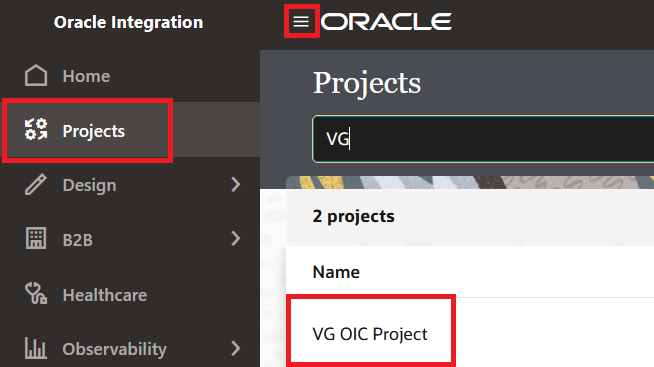
To get started, navigate to ☰ > Projects and open VG OIC Project.
Step 1: Create the SOAP Connection for BIP
We will use the SOAP adapter to create a connection to the ExternalReportWSSService WSDL of Oracle Fusion. It is not available as part of Oracle ERP Cloud Adapter and hence a separate SOAP connection is required for this.
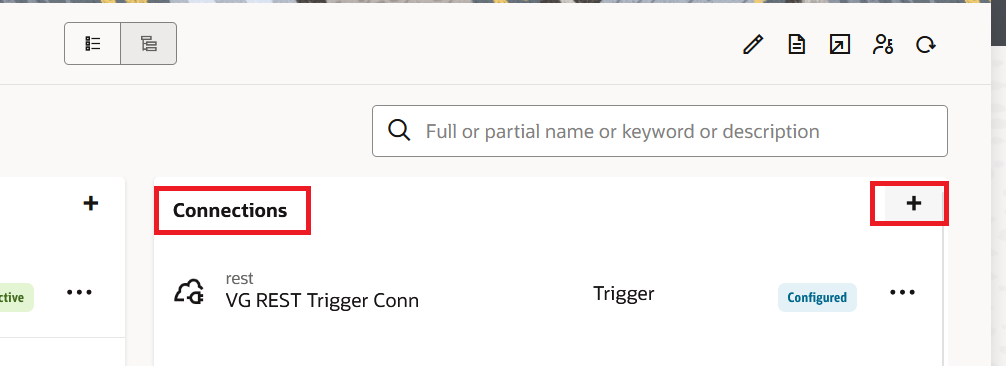
- Inside the project, click the + icon in the Connections section.
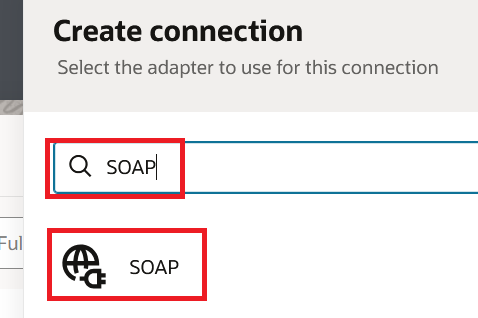
- Click Create. Search for "SOAP" in the search box and click on the SOAP adapter.
- Enter the following details and click Create:
- Name:
VG BIP Report SOAP Conn - Role: Invoke
- Name:

- In the WSDL URL field, enter the ExternalReportWSSService WSDL URL. The format is:
https://<your-fusion-host>/xmlpserver/services/ExternalReportWSSService?wsdl
For example, if your Fusion URL is https://myDomain.fa.us2.oraclecloud.com, then the WSDL URL will be:
https://myDomain.fa.us2.oraclecloud.com/xmlpserver/services/ExternalReportWSSService?wsdl
- Under Security, select OAuth 2.0 and enter the Oracle Fusion OAuth details. If you want to know how to setup and get OAuth details of Oracle Fusion then you can follow this blog.
- Click Test, then Save.
Note: I had to mask some of the details for security purpose in the below screenshot. But I always recommend OAuth 2.0 because it is Recommended by Oracle and is more secure.

Step 2: Create the FTP Connection for SFTP
- Inside the project, click the + icon in the Connections section.
- Click Create. Search for "FTP" and click on the FTP adapter.
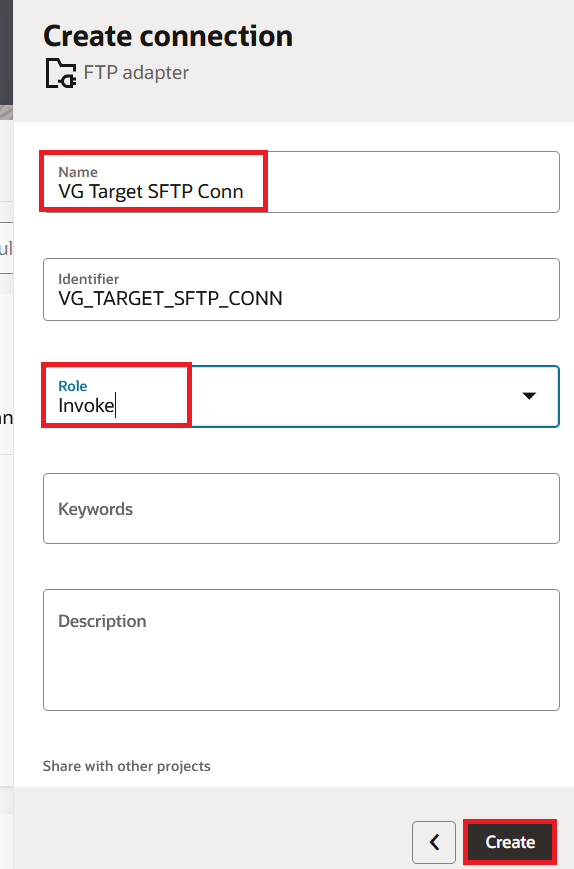
- Enter the following details and click Create:
- Name:
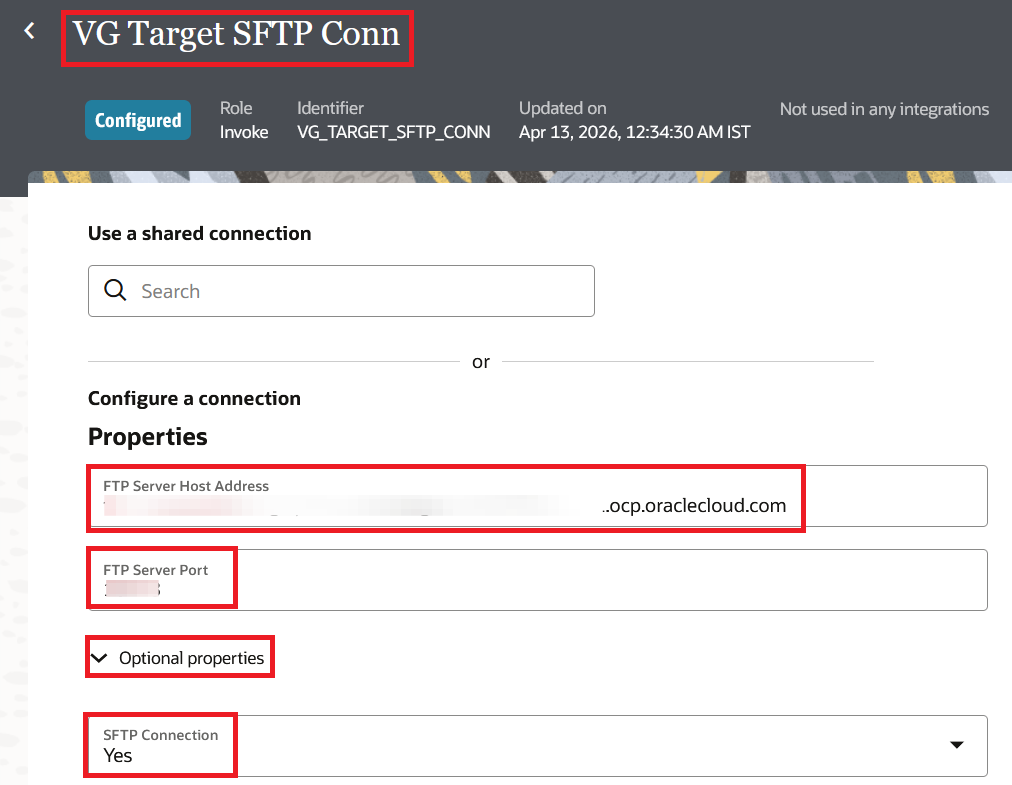
VG Target SFTP Conn - Role: Invoke
- Name:
- In the Properties section, enter the SFTP Host Address, SFTP Port (usually 22), expand "Optional Properties" and set the SFTP Connection to Yes.
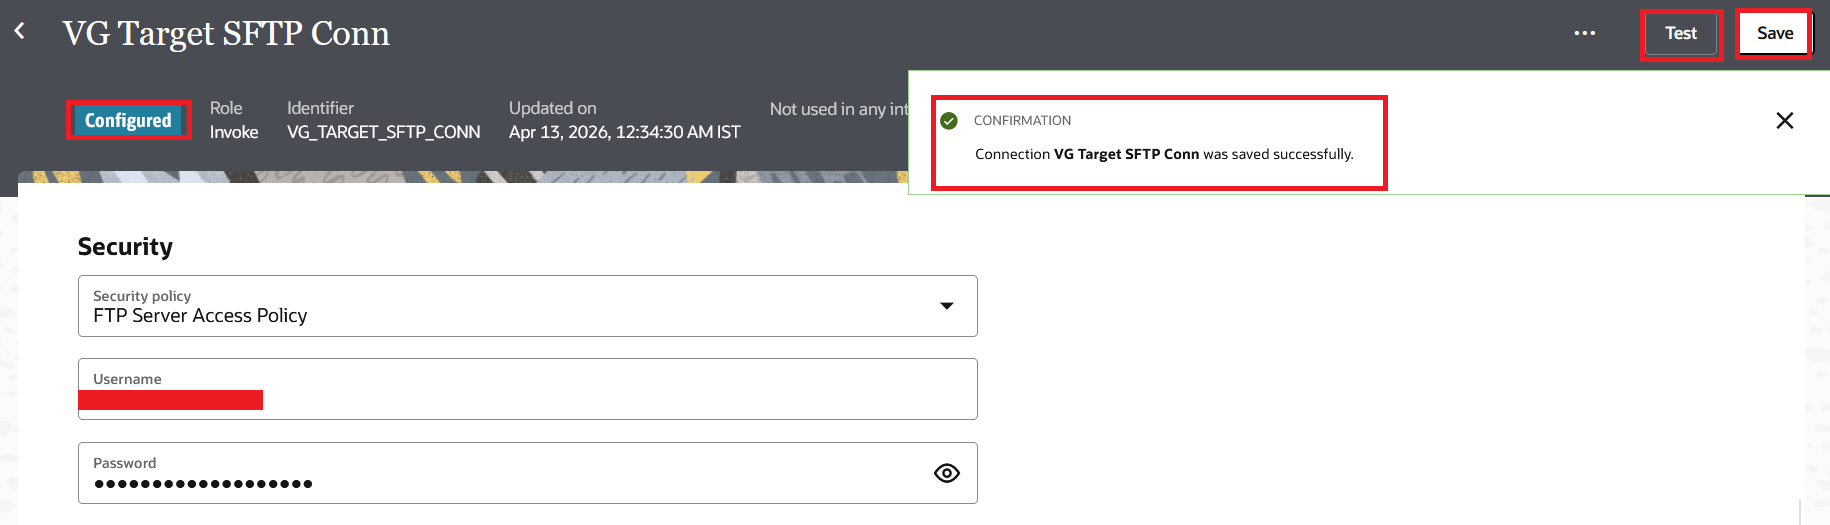
- Under Security, select the security policy based on your SFTP server. Most commonly, it is FTP Server Access Policy with a username and password. If your SFTP server uses SSH keys, select FTP Public Key Authentication instead.
- Click Test, then Save.
If you want to use the OIC embedded File Server instead of an external SFTP server, you can create the FTP connection pointing to the OIC File Server itself. The File Server comes with 500 GB and needs to be enabled from the OCI Console. I covered this briefly in the OIC Gen3 Overview.
Step 3: Create the Scheduled Integration
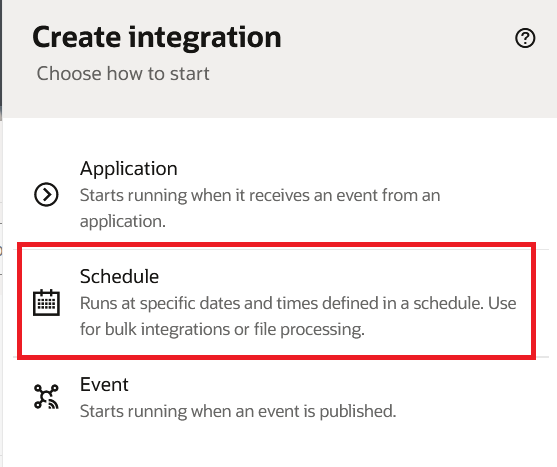
- Inside the project, click the + icon in the Integrations section. Click Create.

- Select Schedule as the integration style. We select Schedule because this integration will run on a timer, not when triggered by an external application or a business event.
- Enter the Name as
VG BIP Supplier Extract to SFTPand click Create.

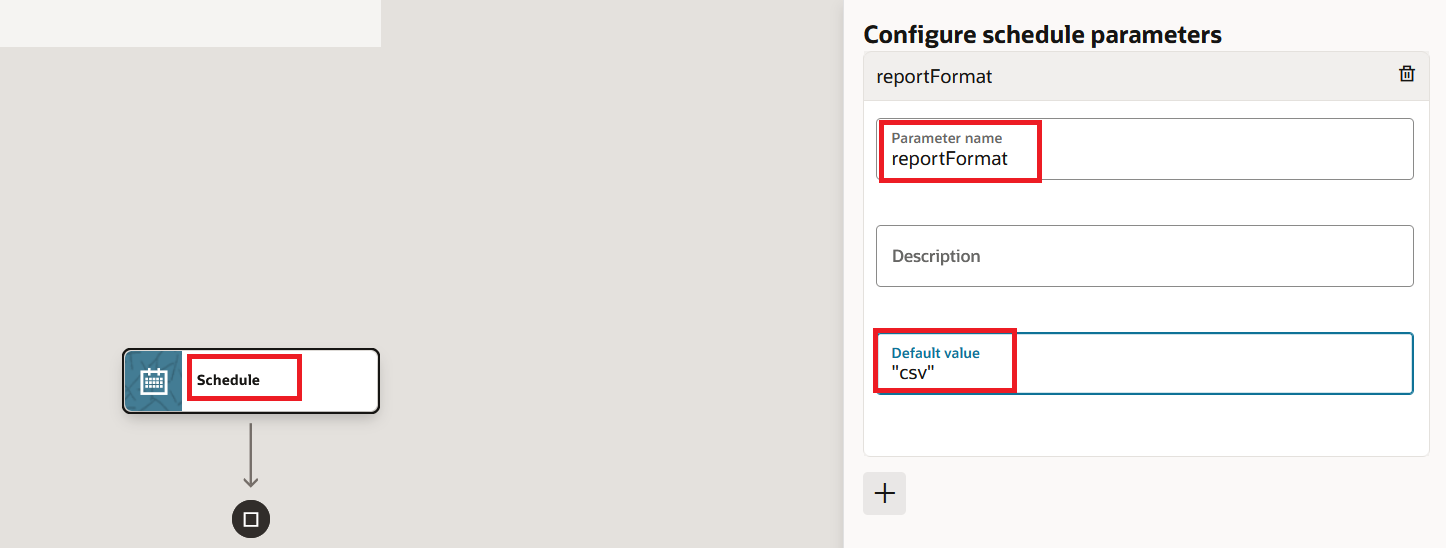
- The integration canvas opens. Before we add any actions, let us define a Scheduled Parameter for the report output format. Double Click the Schedule text at the start of the canvas and click on the + icon to add a parameter:
- Name:
reportFormat - Type: String
- Default Value:
csv
- Name:
This keeps the report format configurable. If the business later wants XML instead of CSV, you change the parameter value without touching the integration logic. I always recommend storing values like this in a Lookup rather than hard coding them, but a scheduled parameter works fine for a simple case. If you do create a lookup for this, make sure you create it inside the same project because project scoped lookups and global lookups are not visible to one another.
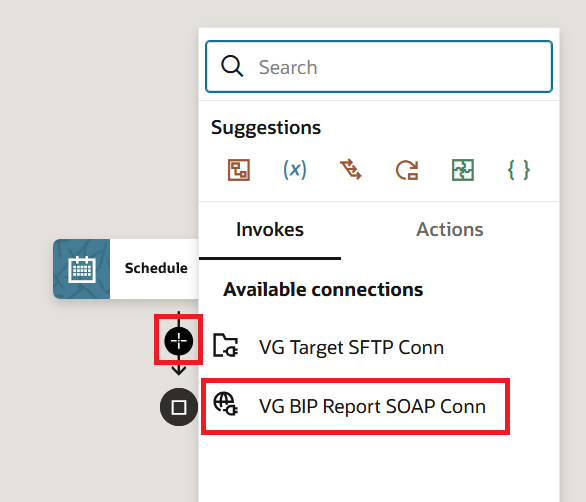
Step 4: Invoke the BIP Report
- On the integration canvas, click the + icon after the Schedule trigger. Search for the SOAP connection we created in Step 1 (
VG BIP Report SOAP Conn) and select it.
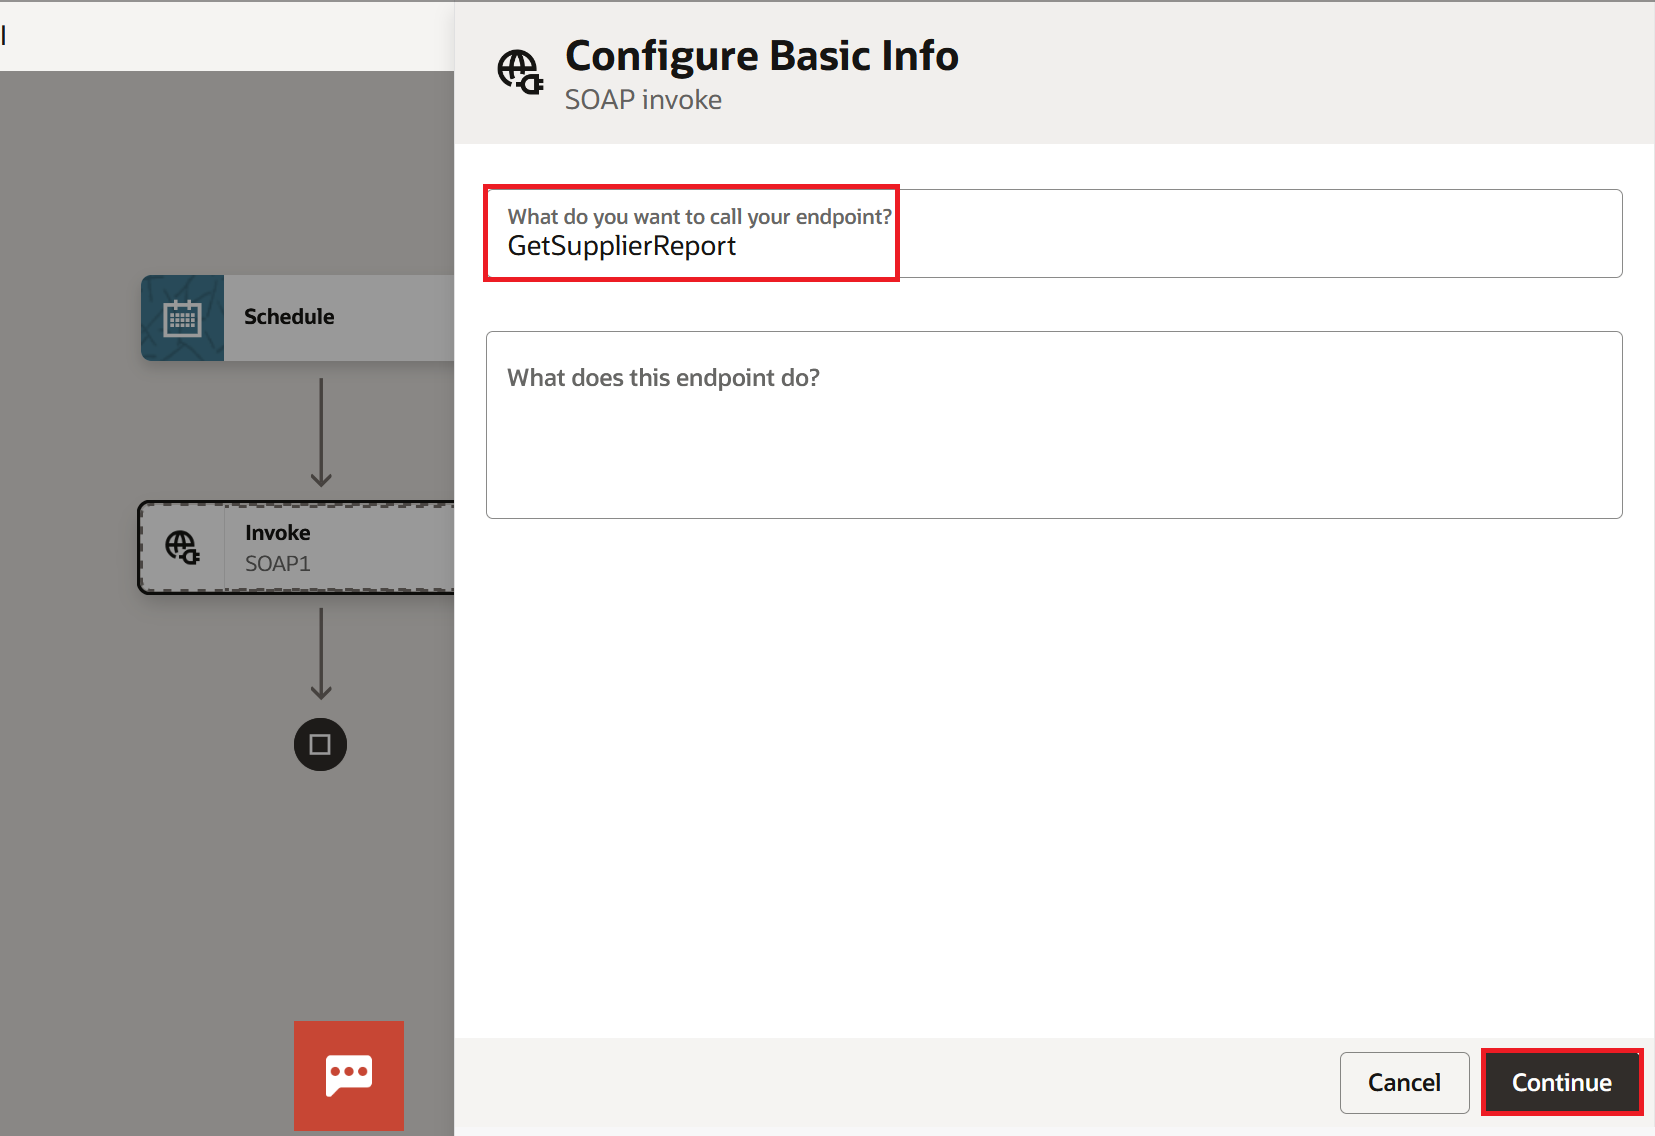
- Enter the endpoint name as
GetSupplierReportand click Continue.
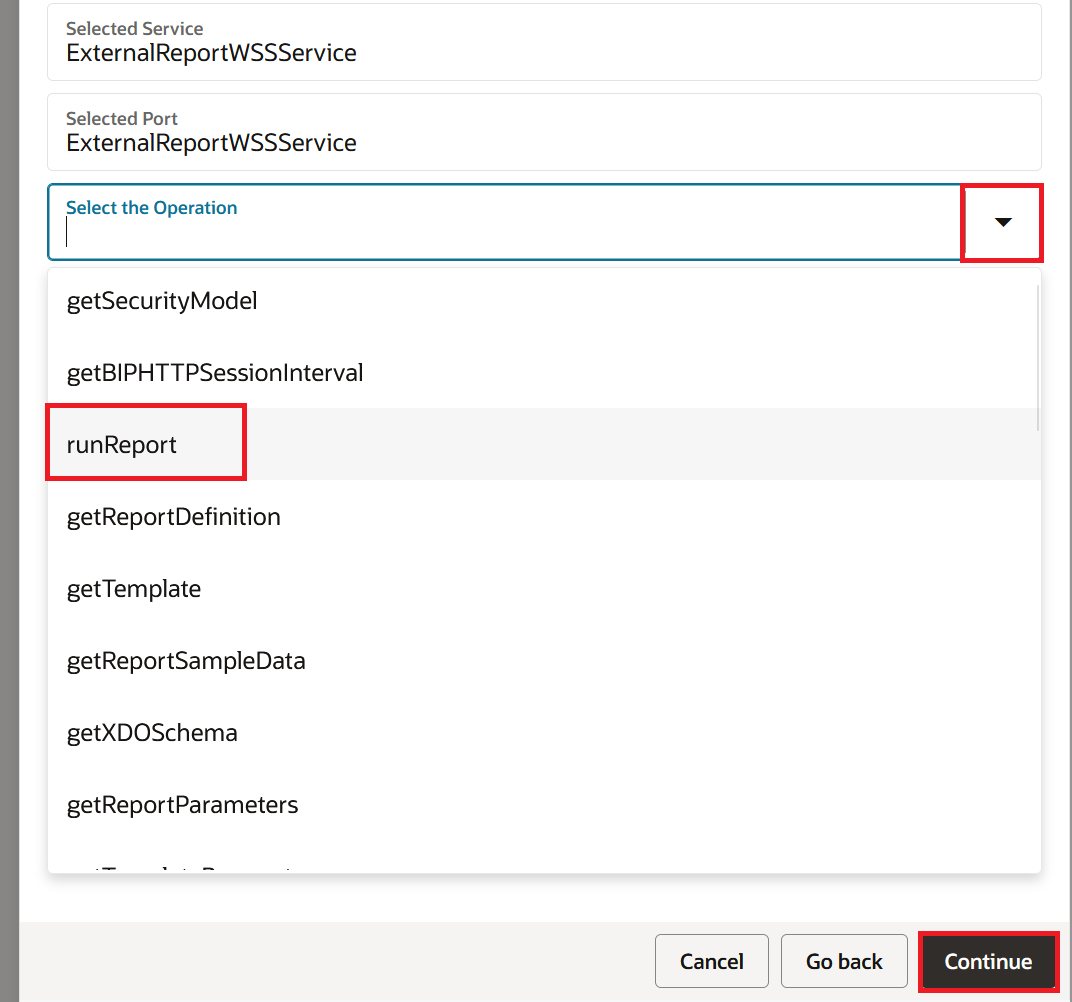
- On the Operations page, select runReport from the operation dropdown. This is the operation that executes the BIP report and returns the data synchronously. Click Continue.
- Click Continue on the Headers page and then Finish on the Summary page. OIC automatically creates a mapper action called "Map to GetSupplierReport".
- Double Click on the mapper and configure the following mappings. Expand the target tree: Body > runReport > reportRequest.
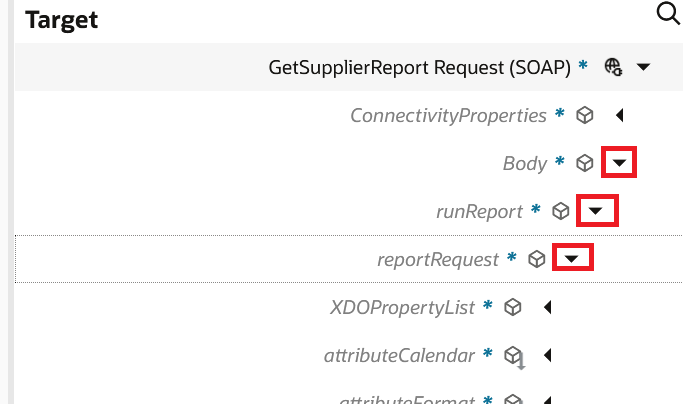
Map the fields as follows:
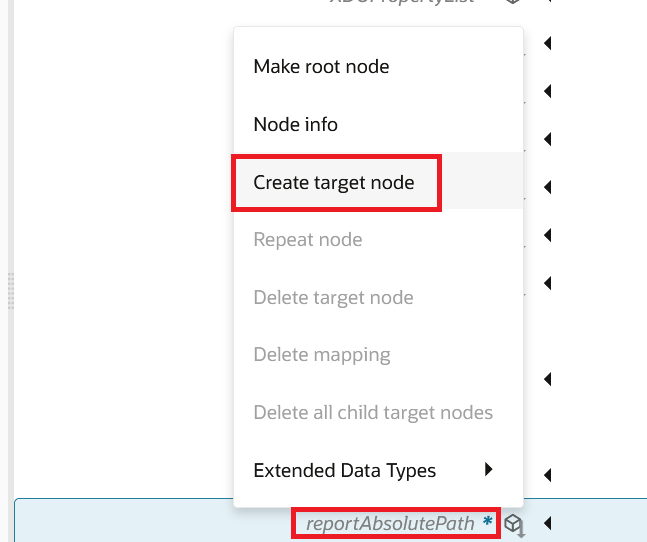
Right click on reportAbsolutePath and select "Create target node":
- reportAbsolutePath: This is the path of your BIP report in the Oracle Fusion BI Catalog. For example:
"/Custom/VG/SupplierExtracts/VG_Suppliers_Lists.xdo"You can find this path by navigating to Tools > Reports and Analytics > Browse Catalog in Oracle Fusion and opening the report properties.
Once you enter the report path, click the check icon. Many developers forget to click this check icon highlighted below and wonder where the mapping they entered went.

- attributeFormat: Map the
reportFormatscheduled parameter here. This tells BIP what output format to produce. For our example, the value will becsv. - sizeOfDataChunkDownload: Set this to
-1. This tells BIP to return all the data in a single response instead of breaking it into chunks.
If your BIP report takes parameters, expand parameterNameValues > item and map them. For example, if the report has a parameter called P_Business_Unit:
name: P_Business_Unit
values > item: US Business Unit
Follow the down arrow clicks as mentioned in the screenshot below:
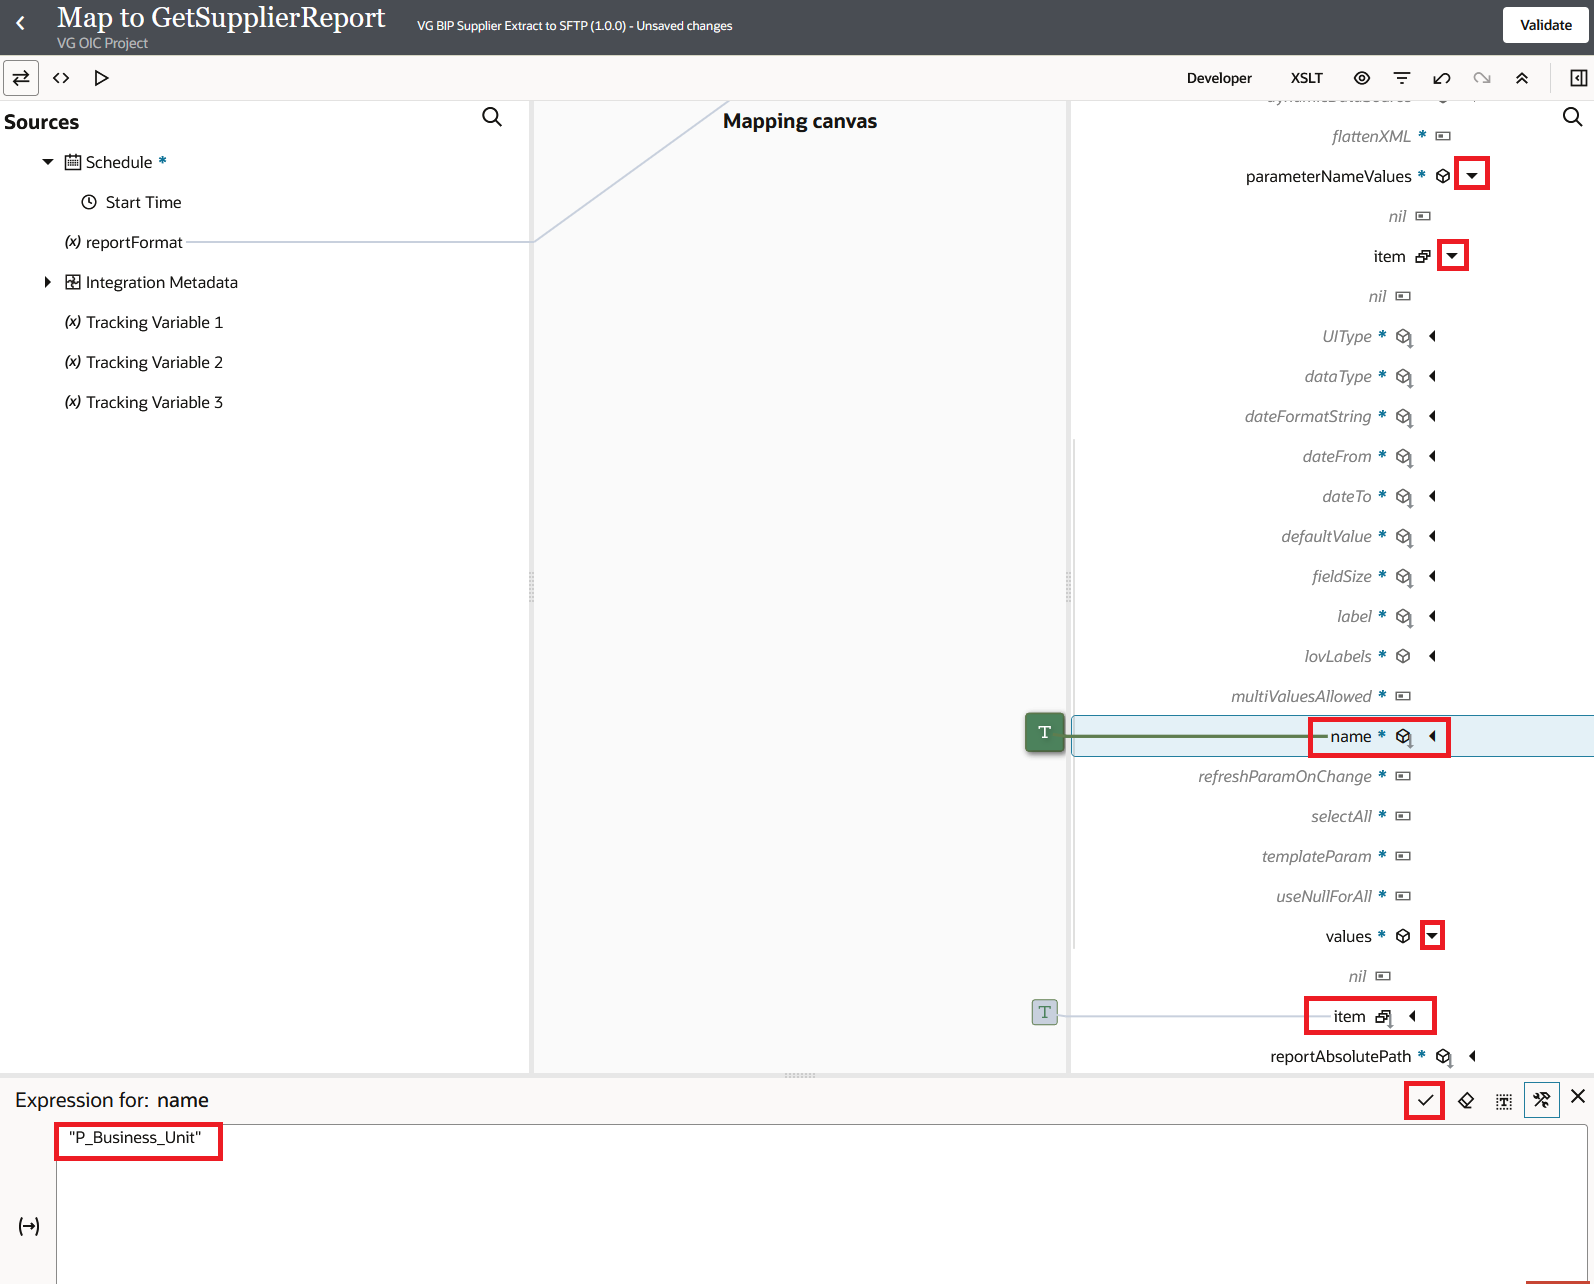
- Click the Check icon, then Validate, and click Back.
Make sure that the output of your BIP report is in a format that OIC can read, like CSV or XML. OIC can still send the file to SFTP if the report makes PDF or Excel files, but you won't be able to read the contents inside the integration.
Step 5: Decode the Response
When the BIP report returns the data, the response contains a field called reportBytes. This field holds the entire report output as a base64 encoded string. We need to decode this to FileReference before pushing it to SFTP.
Decode the Base64 Response
- On the canvas, click the + icon after the GetSupplierReport invoke. Search for Assign under Actions and add it.
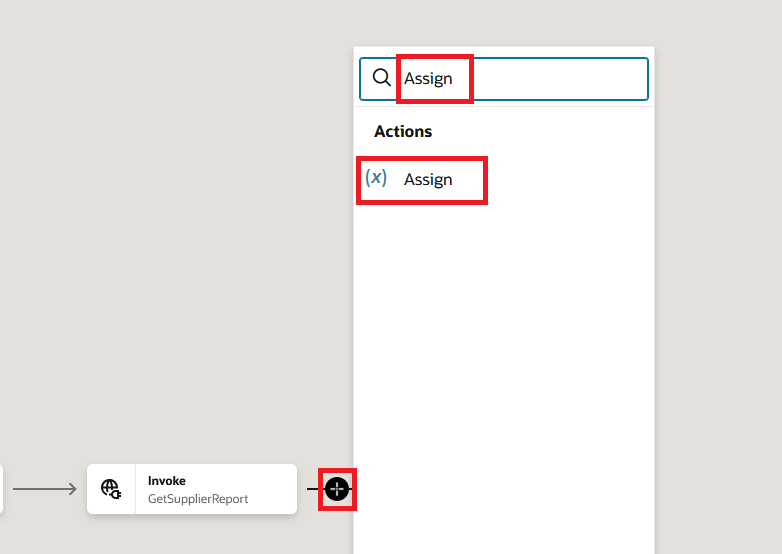
- Name the Assign action
DecodeReportData. - Create a variable, for example
decodedFileRef, and set its expression using thedecodeBase64ToReferencefunction. In the expression builder, search fordecodeBase64ToReferenceunder Functions > Integration Cloud and drag it in.
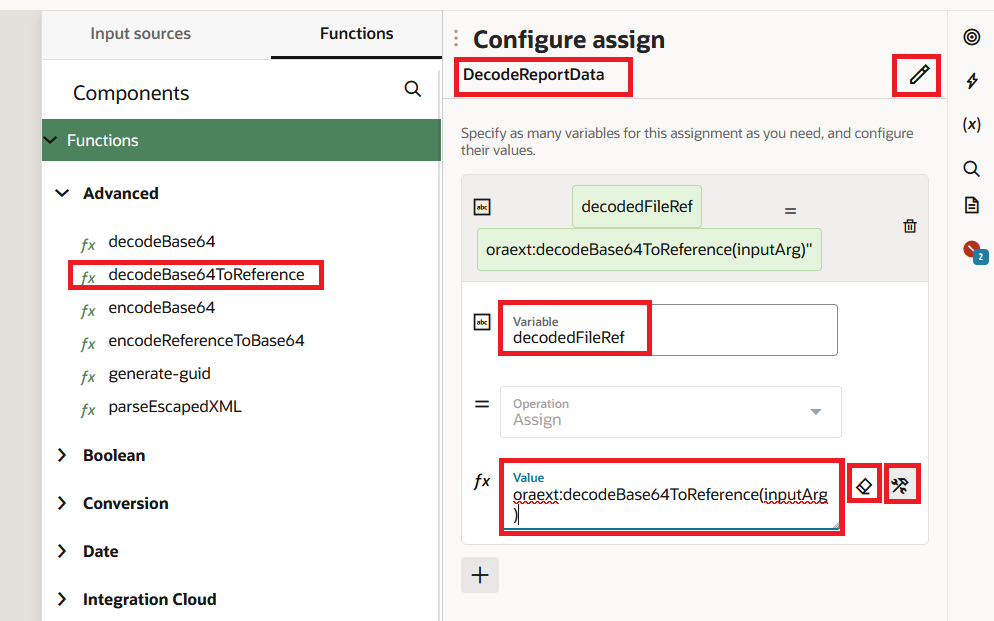
- Then pass the
reportBytesfield from the GetSupplierReport response as the input:
oraext:decodeBase64ToReference($GetSupplierReport/tns:runReportResponse/tns:runReportReturn/tns:reportBytes)
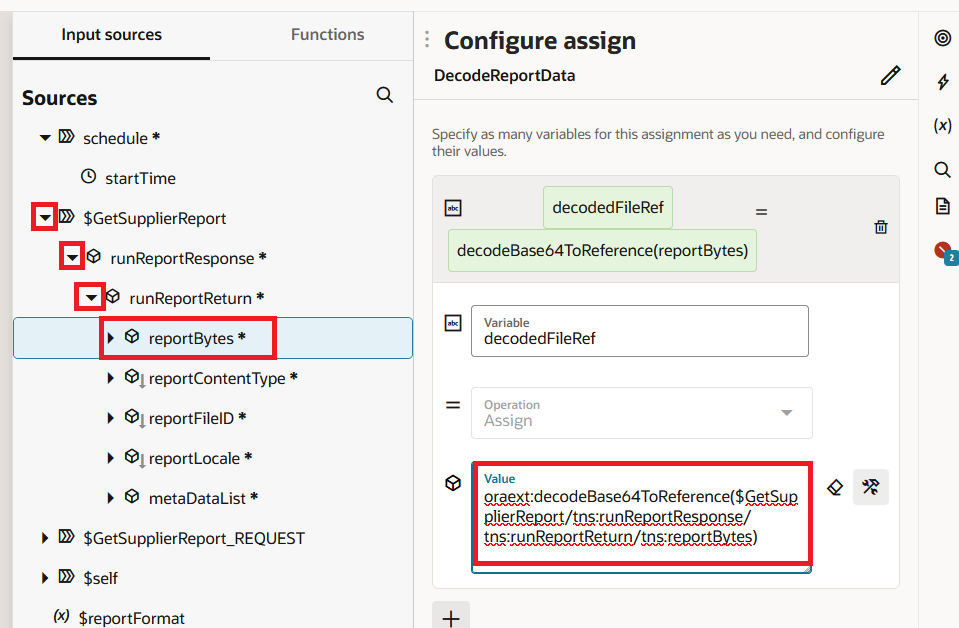
- Click Save.
The decodeBase64ToReference function takes the base64 string, decodes it, writes it to an internal temporary file, and returns a file reference. This file reference is what we pass to the File Write action in the next step. Oracle recommends this approach over writing the raw base64 string with an opaque schema because it is simpler and avoids an extra read step.
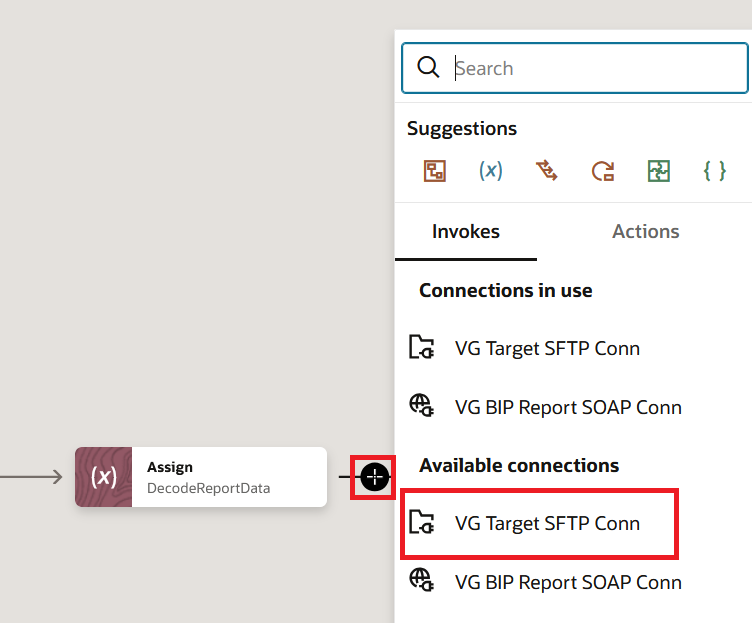
Step 6: Push the File to SFTP
- Click the + icon after the Assign action. Search for the FTP connection we created in Step 2 (
VG Target SFTP Conn) and select it.
- Enter the endpoint name as
WriteFileToSFTPand click Continue and again Continue. - On the Operations page, configure the following:
- Select Write File as the operation.
- Enter the output directory on the SFTP server, for example
/outbound/suppliers/. - Enter the file name pattern. You can make the file name dynamic. For example:
Suppliers_Extract_%SEQ%.csvwhere%SEQ%is auto incremented by OIC to avoid overwriting. - Do NOT check Append to Existing File. We want a fresh file each time. Click Continue
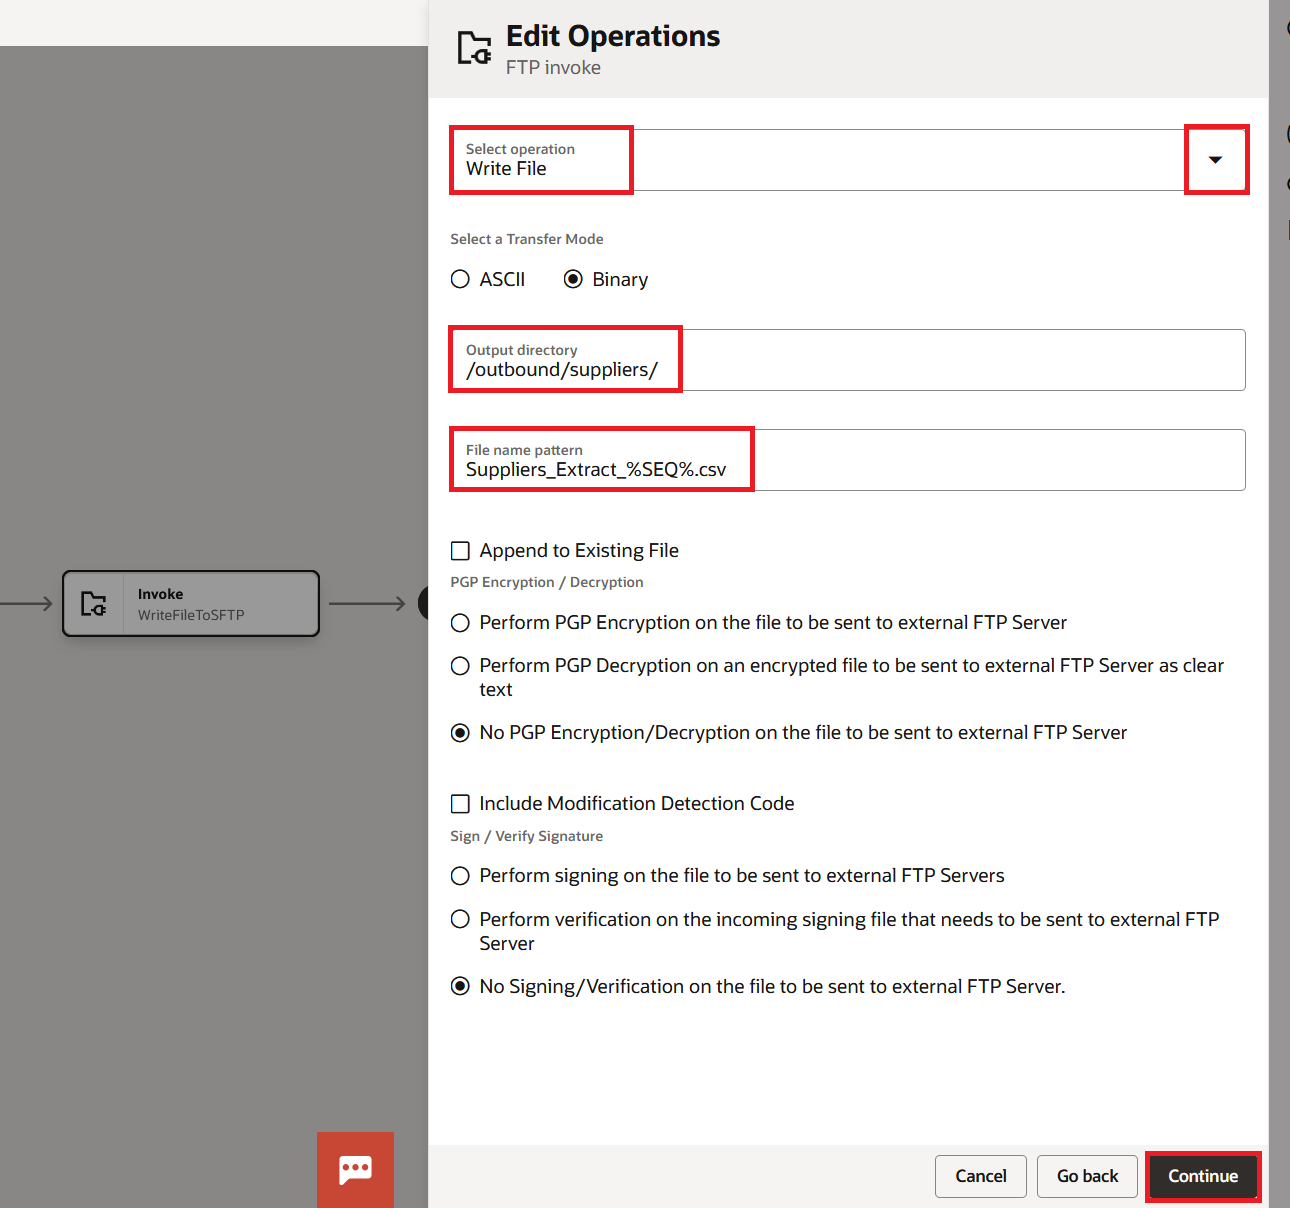
- Click Continue and on the Schema page, select No and click on Continue.
- Click Finish.
- In the mapper for WriteFileToSFTP, map the file reference from the variable to the File Reference in the FTP target.
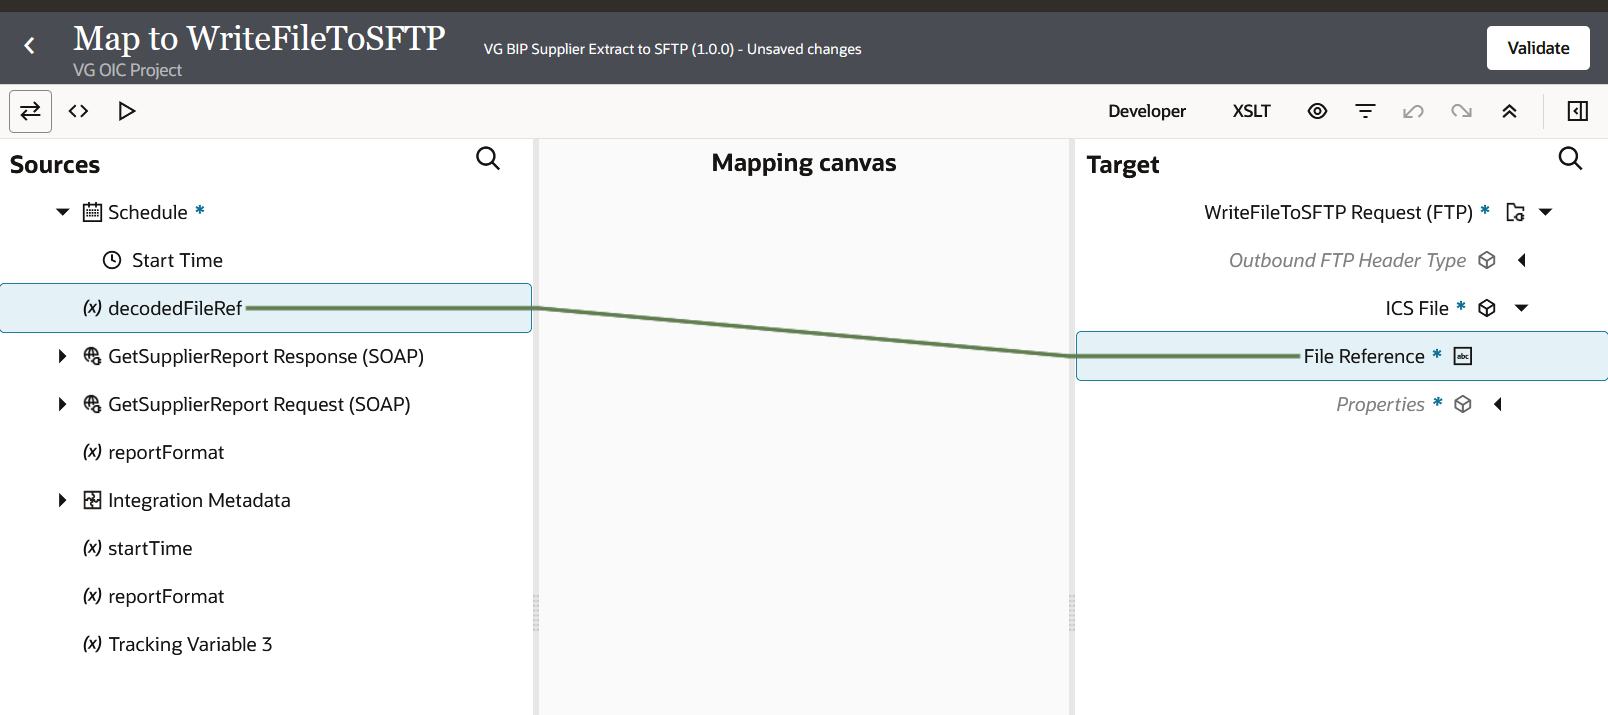
- Click Validate, Back, and Save.
If the downstream system requires PGP encryption, you can enable it during the FTP Write File configuration. The FTP adapter has a built in option for PGP encryption and decryption. You will need to upload the PGP public key in the FTP connection properties. I always recommend encrypting files when sending sensitive data like supplier bank details or employee records.
Step 7: Activate and Test
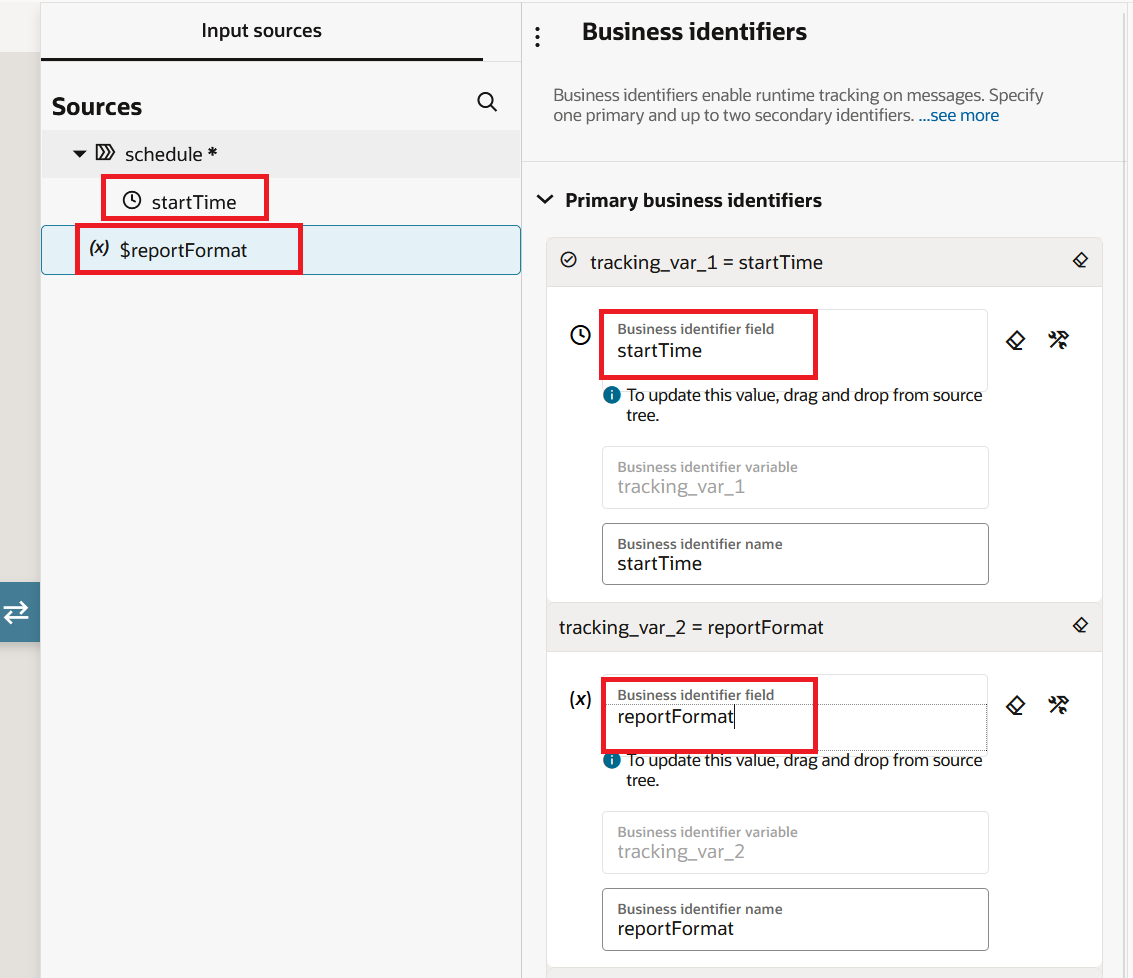
- Set up Business Identifiers for tracking. Click the Business Identifiers icon on the top right toolbar. Drag a field like startTime and reportFormat into the Primary business identifiers. Click Save.
- Navigate back to the project by clicking the back arrow. In the Integrations section, click the three dots next to
VG BIP Supplier Extract to SFTPand then click Activate - On the Activate integration dialog, select the tracing level as Debug (Not recommended) for initial testing and click Activate.

- Once the integration is active, click the three dot menu and select Run.
- On the Configure and Run page, verify the
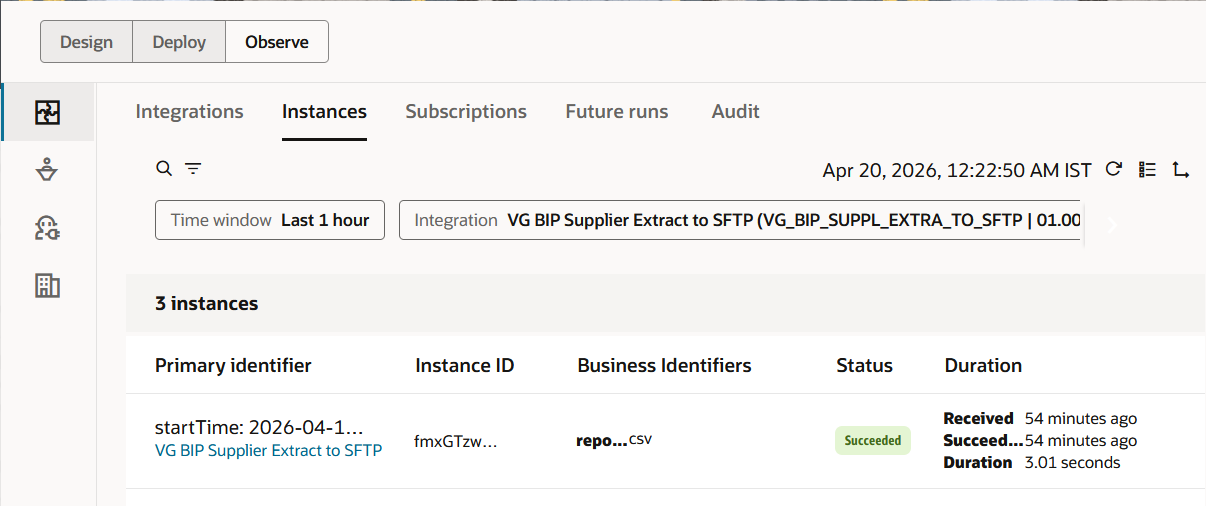
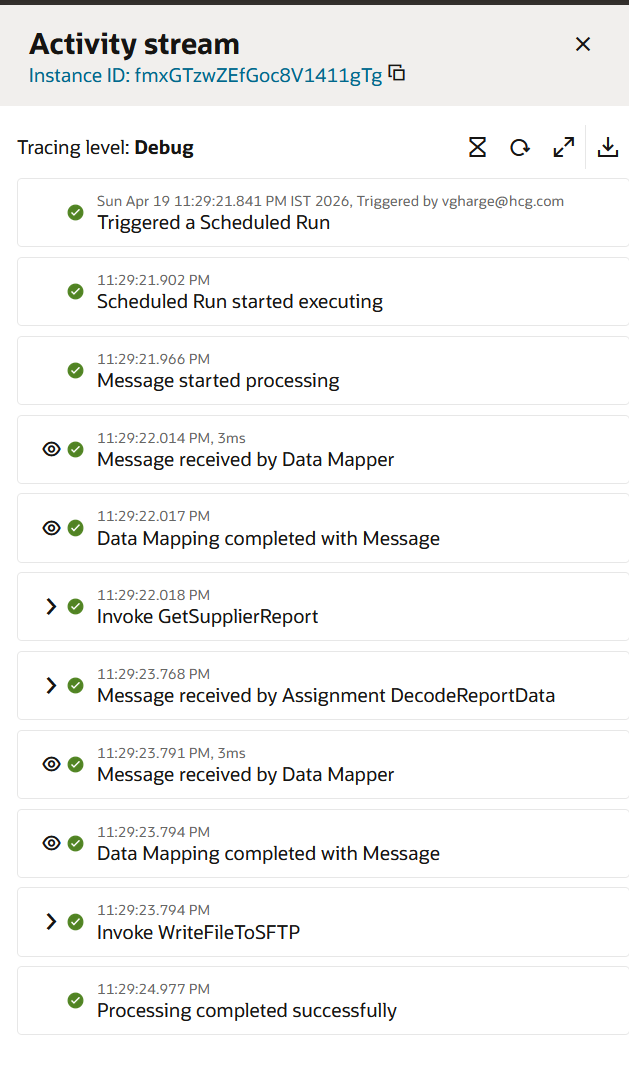
reportFormatparameter is set tocsvand click Run. - You can monitor the execution from the Observe tab inside the project or navigate to ☰ > Observability > Instances. The integration should show as Succeeded. Click on the instance to see the activity stream. You will see the flow from the Schedule trigger through the SOAP invoke, the Assign action, and finally the FTP Write.
- Log in to your SFTP server and verify that the file is present in the
/outbound/suppliers/directory. Open it and confirm the supplier data matches what the BIP report produces in Oracle Fusion.

Some Things to Keep in Mind
The ExternalReportWSSService synchronous BIP call has a limit on the size of the payload. The biggest message payload size in OIC Gen3 is 50 MB. If the payload is too big, OIC will reject the message and send back an error. BIP gives you the report data as a base64 encoded string, which makes the size about 33% bigger. A 50 MB payload limit means that the report data is about 37 MB. You might want to think about an asynchronous approach if your report output is more than this. You can set up the BIP report to send the output directly to UCM or SFTP, submit the report using an ESS job through the ErpIntegrationService, and then get the file from UCM or SFTP in a different integration.
Variables in OIC Gen3 also have a maximum string length of 100,000 characters, which was enforced starting with the 24.06 update. This is important because reportBytes is a base64 string. If you are directly assigning reportBytes to a variable instead of using decodeBase64ToReference, you will hit this limit on reports that are even a little bit big. That's why we use decodeBase64ToReference in this blog. It changes the base64 string into a file reference without storing the whole string in a variable.
The SOAP call to run the report is synchronous, which means that OIC has to wait for the report to finish generating before it can get the response. This is fine for short reports. But if your BIP report takes a long time to run because of a complicated query or a lot of data, it could time out. Make sure your BIP reports are always running at their best. Before connecting the report to OIC, use bind parameters, avoid full table scans, and test how long it takes to run in Oracle Fusion.
If you don't want to hard code the report path and parameters in the mapper, put them in a Lookup. Make a lookup that has columns for the Integration Name, Report Path, and Parameters. Make sure you do the lookup in the same project. You can't see project scoped lookups and global lookups at the same time. I went into great detail about this in the Lookups blog. You update the lookup when the report path changes or a new parameter is added, but you don't change the integration. No stopping. No reactivation. The next run picks up on the change.
I always put error handling around the SOAP call. Put the BIP call and the file operations that follow it inside a Scope action with a Fault Handler. If the BIP report doesn't have any data (reportBytes is empty or null), the integration should send a message instead of sending a blank file to SFTP. You can easily check this by Check the condition with the string-length function on the reportBytes field before moving on.
You will export the whole project file when you export this integration to move it to a different environment because we built everything inside the project. The libraries, lookups, and connections all go together. You import the project into the target environment and change the connection settings, like the SFTP host, credentials, and the Fusion URL for the SOAP connection, so that they match that environment.
Closing Thoughts
I want to leave you with something practical. Whenever you start a new outbound integration that extracts data from Oracle Fusion, ask yourself two questions first. How much data am I pulling? And how often? If the answer is a few hundred records on a daily schedule, the synchronous BIP approach we built here is the simplest and most reliable pattern. If the answer is millions of records or the report takes more than a couple of minutes, look at the asynchronous ESS job approach with UCM or SFTP bursting. Getting this decision right at the start of the project saves you from reworking the entire integration later. I have seen it happen more than once.
References
- Oracle Integration 3, Call Oracle Fusion Applications Business Intelligence Publisher Report Services: https://docs.oracle.com/en/cloud/paas/application-integration/soap-adapter/call-oracle-fusion-applications-business-intelligence-publisher-report-services.html
- Oracle Integration 3, Service Limits: https://docs.oracle.com/en/cloud/paas/application-integration/oracle-integration-oci/service-limits.html
- Oracle Integration 3, Oracle ERP Cloud Adapter Capabilities: https://docs.oracle.com/en/cloud/paas/application-integration/erp-adapter/oracle-erp-cloud-adapter-capabilities.html