OIC Gen3 Mapper - Grouping a Flat CSV with xsl:for-each-group
Why xsl:for-each-group
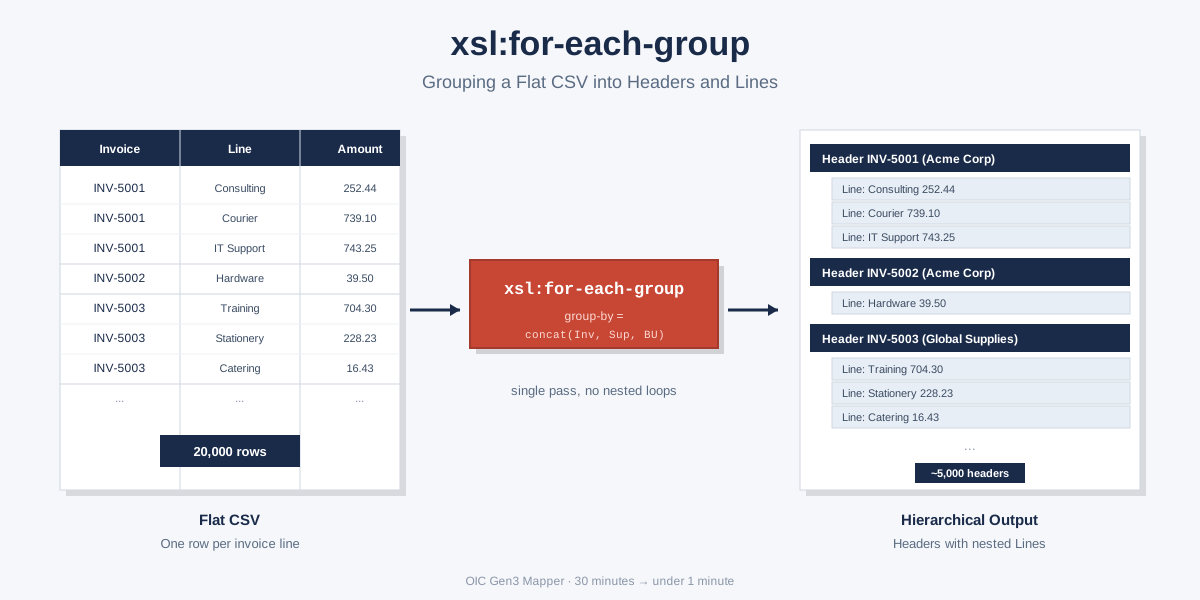
In a recent project, I was given a flat CSV file with around 20,000 rows. Each row was an invoice line, but the target ERP wanted one header with many lines underneath. The shape was wrong and the fix had to happen inside OIC.
If we had ATP, I would have loaded the file into a staging table and let SQL do the grouping. We did not have ATP, so the work had to happen inside the integration. My first attempt was a For-Each loop on the canvas with a Switch action inside. For 100 rows it would have finished in seconds. For 20,000 rows it ran for over 30 minutes before I gave up, because every iteration carries activity stream overhead and orchestration cost on top of the actual work.
When I replaced the loop with a single xsl:for-each-group block in the mapper code view, the same job finished in under a minute. That is when I thought I should write this blog.
xsl:for-each-group does the whole job in one XSLT transformation. The mapper walks the source once, groups the rows by your key, and writes the hierarchical output in a single pass. OIC gives each XSLT execution 120 seconds, which is plenty for invoice files even at the hundred-thousand-row range. OIC also supports xsl:for-each-group natively, so we can drag it from the Functions panel in designer mode or write it straight into code view. The block is small, so we will write it in code view.
In this blog, we will build a small App Driven Orchestration that accepts a CSV file as an attachment, reads it through a Stage File action, groups the rows using xsl:for-each-group, and returns the grouped JSON in the REST response. The sample file has around 100 rows so it is easy to test end to end.
Step 1: Create the Integration
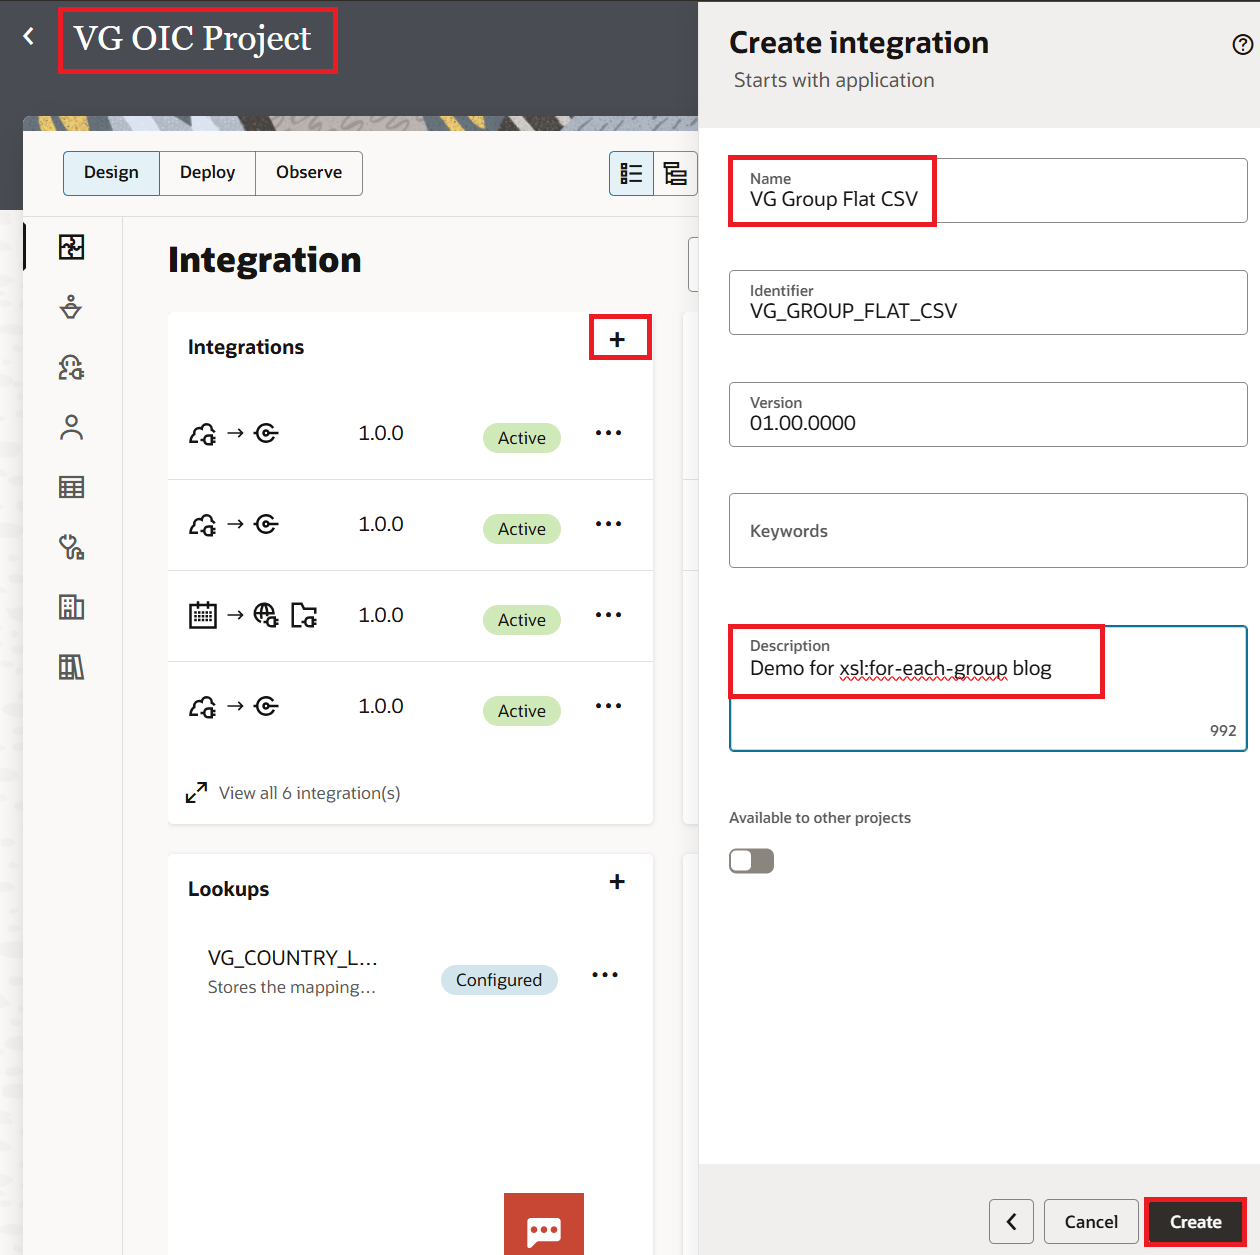
- Open the VG OIC Project from the Projects list.
- Click ☰ > Design > Integrations inside the project.
- Click Add and choose App Driven Orchestration.
- Enter the following details:
- Name: VG Group Flat CSV
- Description: Demo for xsl:for-each-group blog
- Click Create.
Step 2: Configure the REST Trigger
- We need a REST endpoint that accepts the CSV file as a multipart attachment. We use the VG REST Trigger Conn from our project which has the OAuth 2.0 security policy we set up in the Connections - OAuth 2.0 for Same Domain blog.
On the canvas, click the Trigger box on the left and select VG REST Trigger Conn from the connection picker.
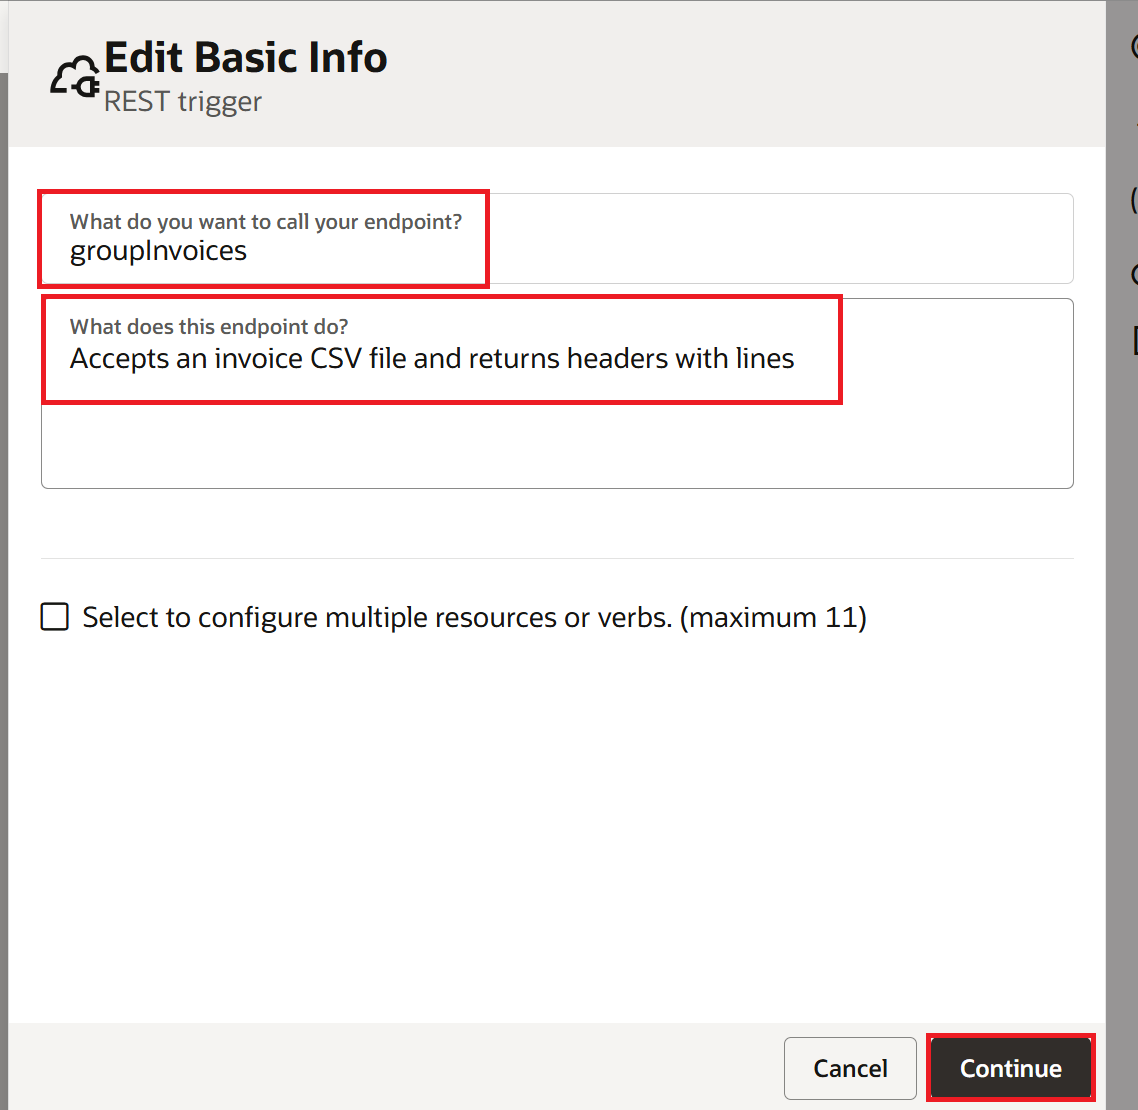
On the Basic Info page, enter the following details and click Continue:
- What do you want to call your endpoint:
groupInvoices - What does this endpoint do:
Accepts an invoice CSV file and returns headers with lines
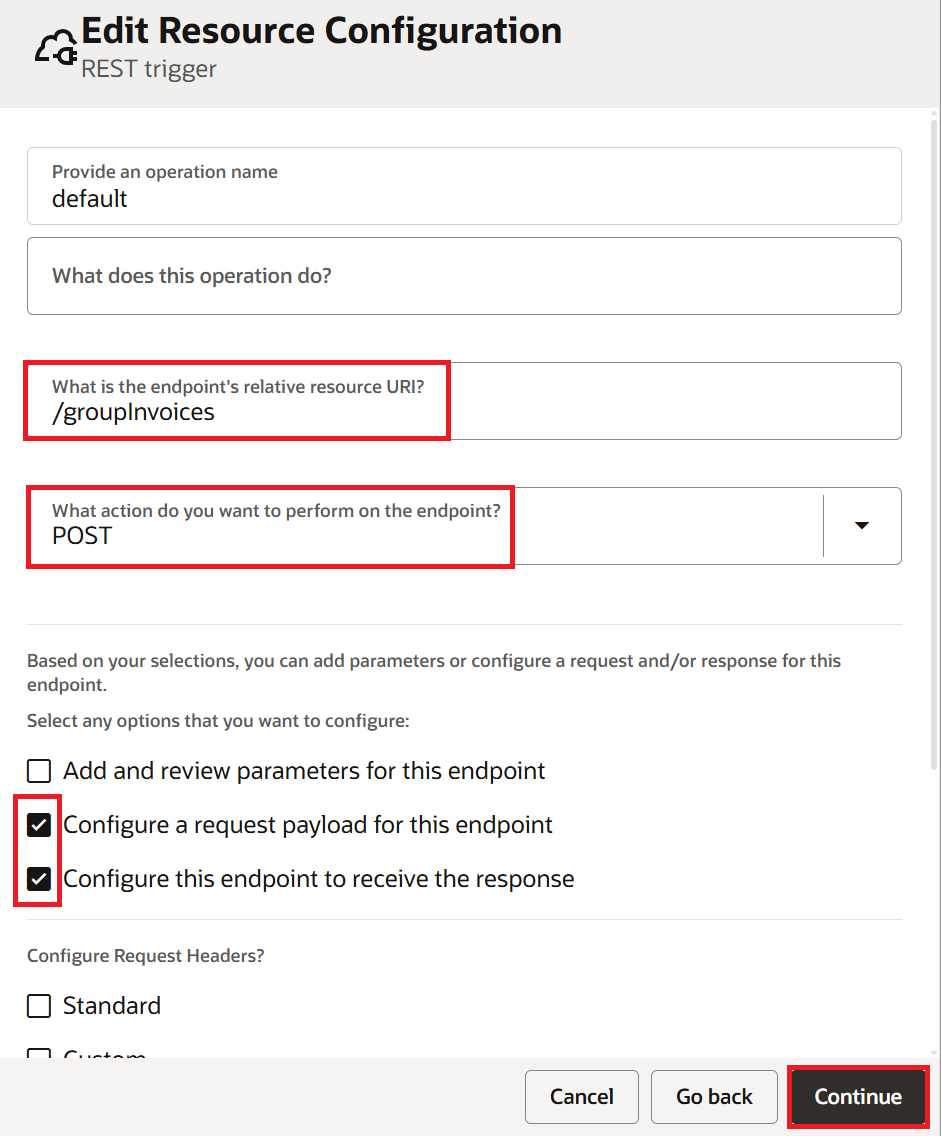
On the Resource page, enter the following details and click Continue:
- Endpoint relative resource URI:
/groupInvoices - Action:
POST - Tick Configure a request payload for this endpoint.
- Tick Configure this endpoint to receive the response.
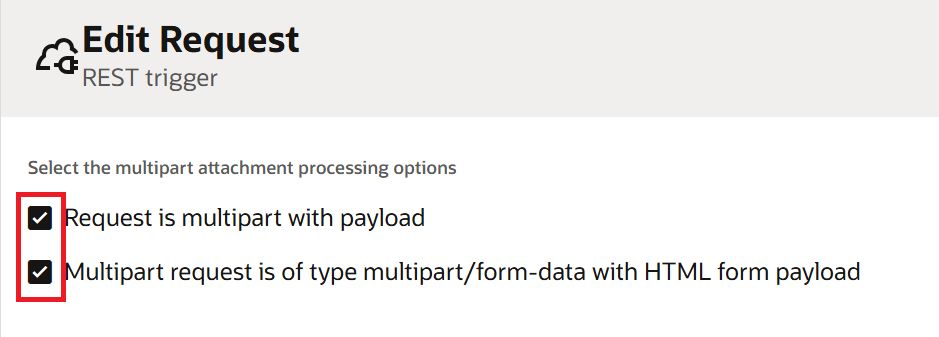
On the Request page, tick both options and click Continue:
- Request is multipart with payload.
- Multipart request is of type multipart/form-data with HTML form payload.
On the Response page, select JSON Sample as the response payload format and paste the following as the sample JSON:
{
  "Headers": [
    {
      "InvoiceNumber": "INV-5001",
      "SupplierNumber": "SUP-1001",
      "SupplierName": "Acme Corp",
      "BUName": "US Business Unit",
      "Lines": [
        {
          "Description": "Consulting Services",
          "Amount": 252.44
        }
      ]
    }
  ]
}
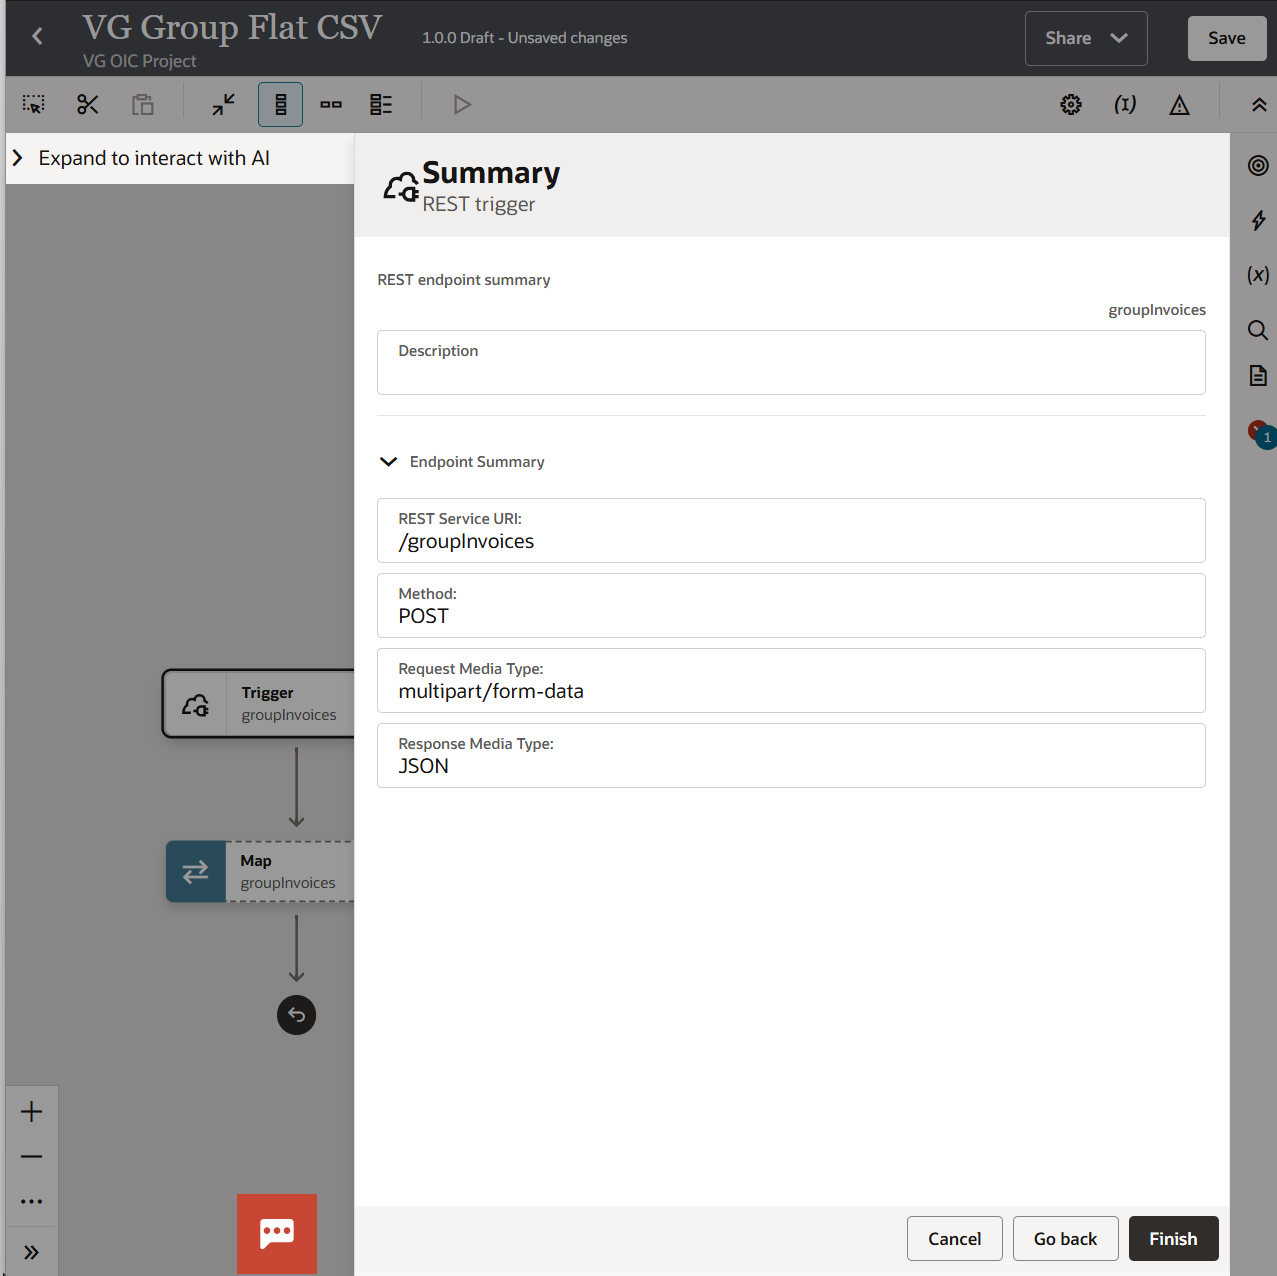
Set Media type to JSON. Click Continue, review the Summary page, and click Finish.
Step 3: Read the CSV with a Stage File Action
The REST trigger receives the CSV as a multipart attachment. The attachment sits in the OIC working file system and the Stage File action reads it back out for us.
From the Actions panel on the right, drag Stage File onto the canvas, right after the trigger.
Note: The picker shows it in lowercase as "Stage file" but the wizard heading says "Stage File action". Both refer to the same action.
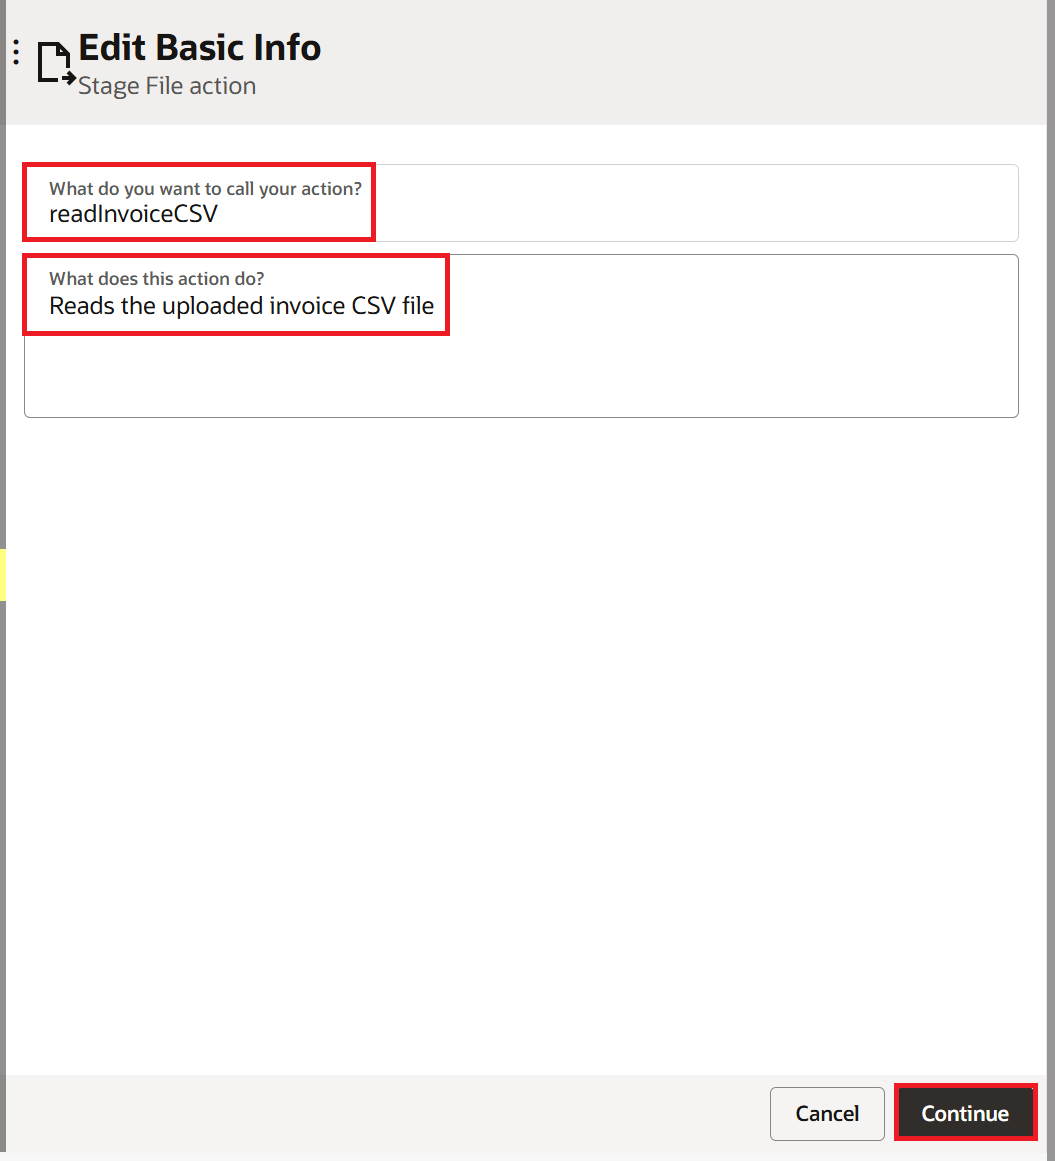
On the Basic Info page, enter the following details and click Continue:
- What do you want to call your action:
readInvoiceCSV - What does this action do:
Reads the uploaded invoice CSV file
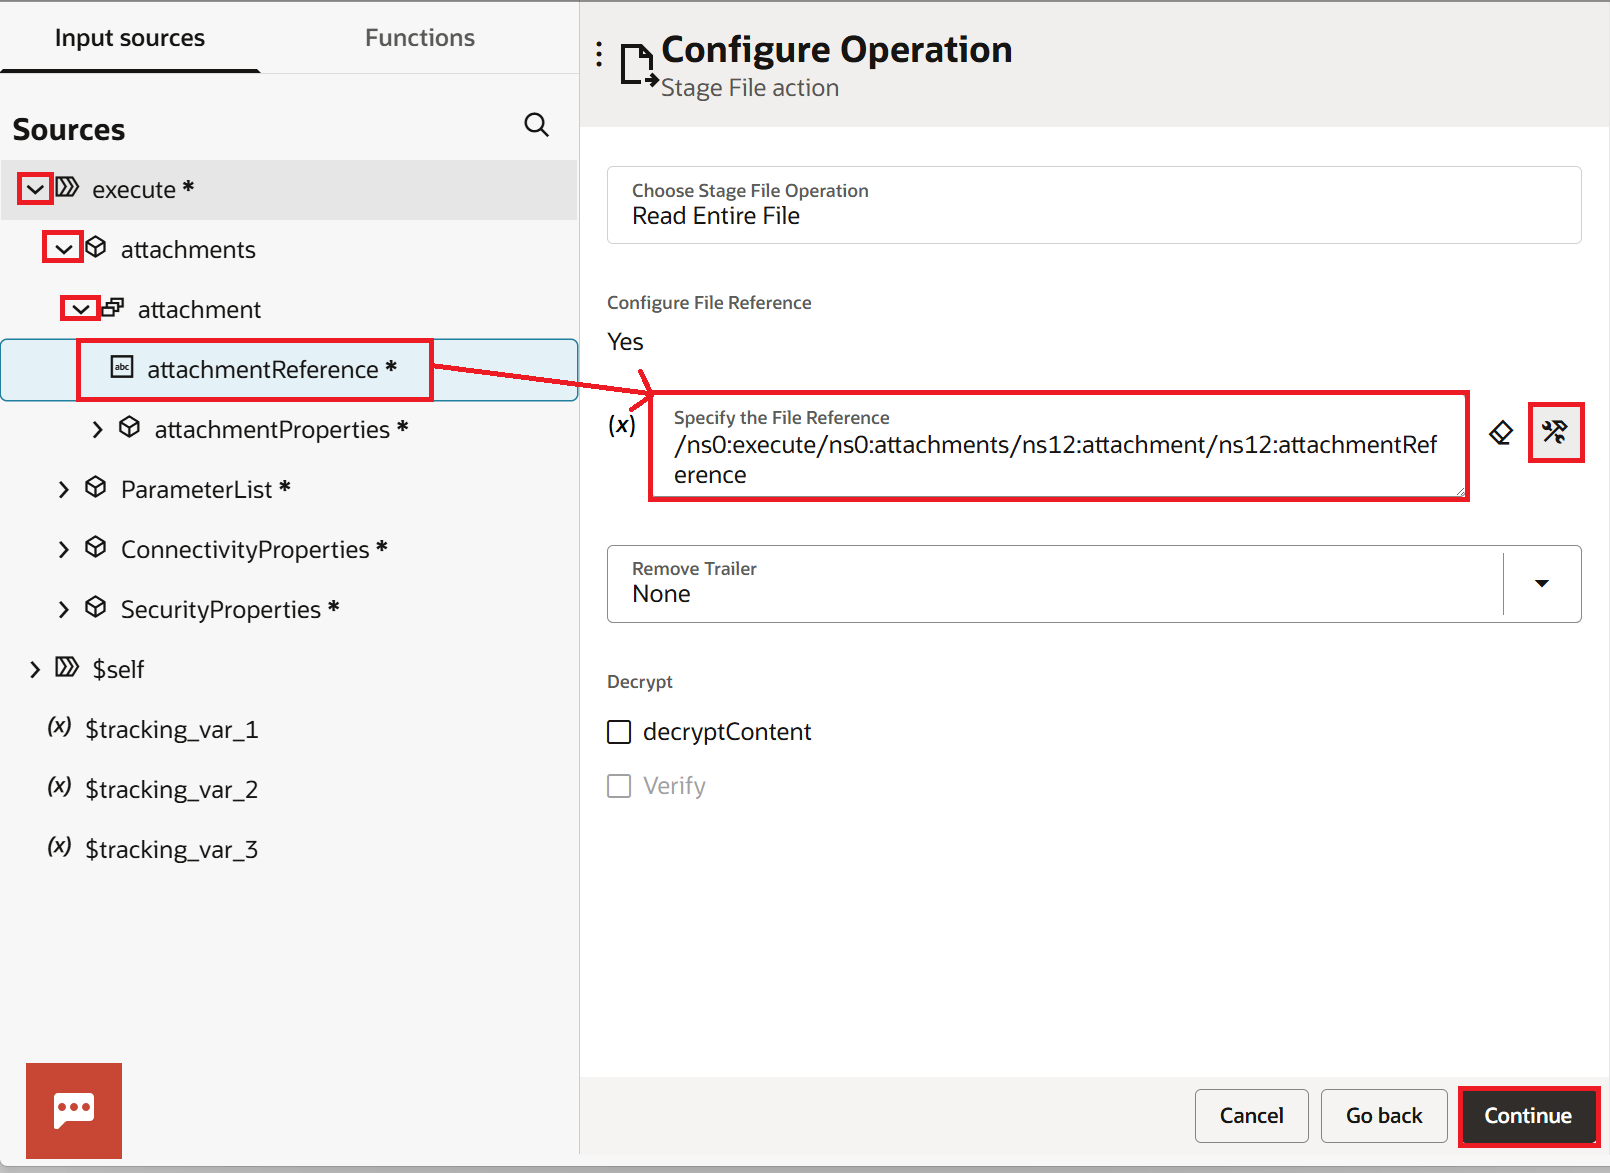
On the Configure Operation page, set the following and click Continue:
- Choose an operation:
Read Entire File - Configure File Reference: select Yes
- Remove Trailer: leave at None
- Decrypt section: leave blank
Note: Read Entire File in OIC Gen 3 supports files up to 100 MB. The 20,000-row file from my production project and the 100-row sample we are using here both fit. For files bigger than 100 MB, use Read File in Segments and apply the same grouping logic per segment.
When we select Yes for Configure File Reference, the File Name and Directory fields disappear and a single File Reference field replaces them. This tells Stage File to read the file from an upstream reference instead of a fixed location on the OIC file system.
Drag the attachmentReference node from the trigger request payload into the File Reference field. The full path looks like /ns0:execute/ns0:attachments/ns12:attachment/ns12:attachmentReference. The namespace prefixes will match whatever your editor shows.
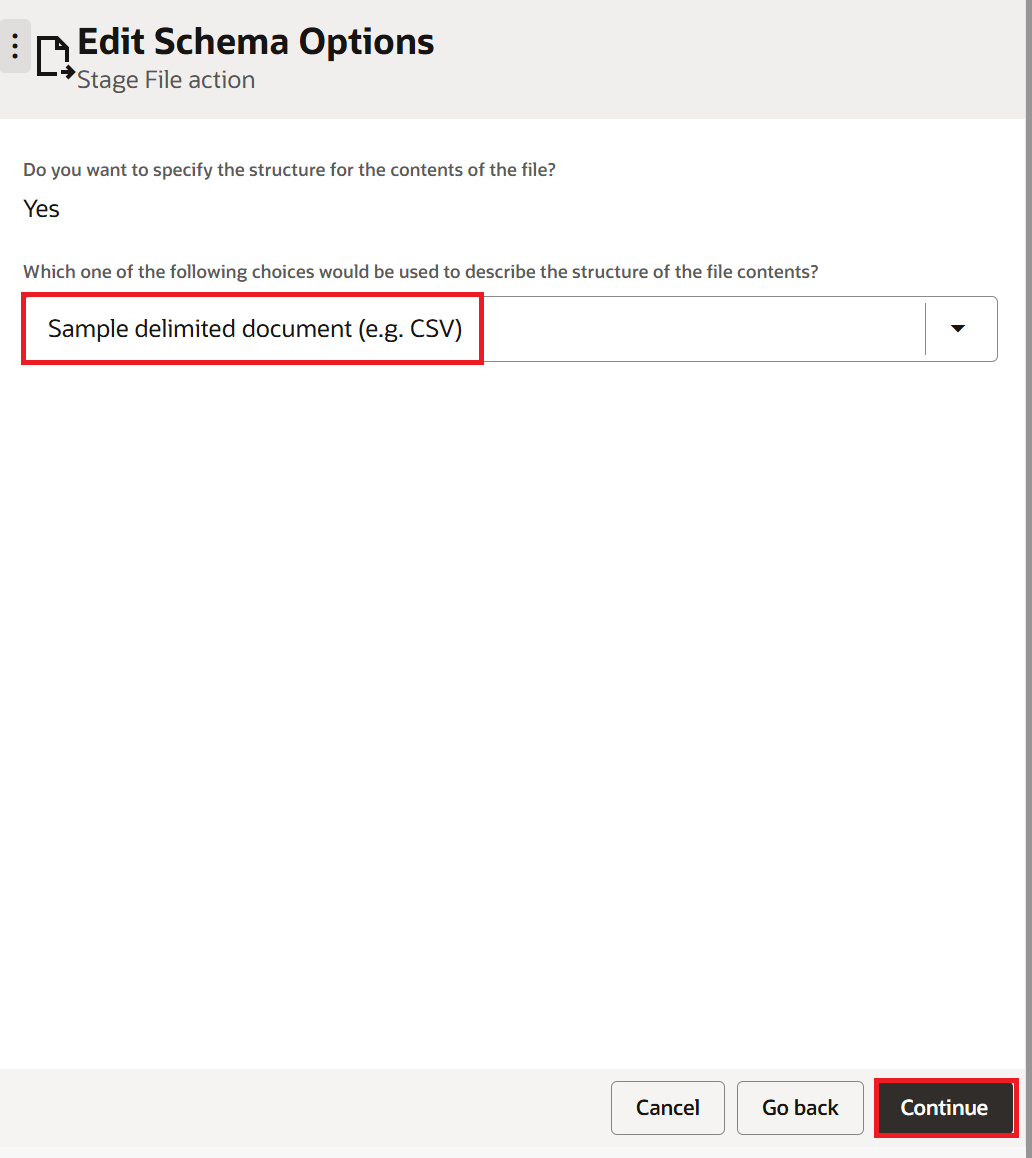
On the Schema Options page, set the following and click Continue:
- Do you want to specify the structure for the contents of the file:
Yes - Which one of the following choices would be used to describe the structure of the file contents:
Sample delimited document (e.g. CSV)
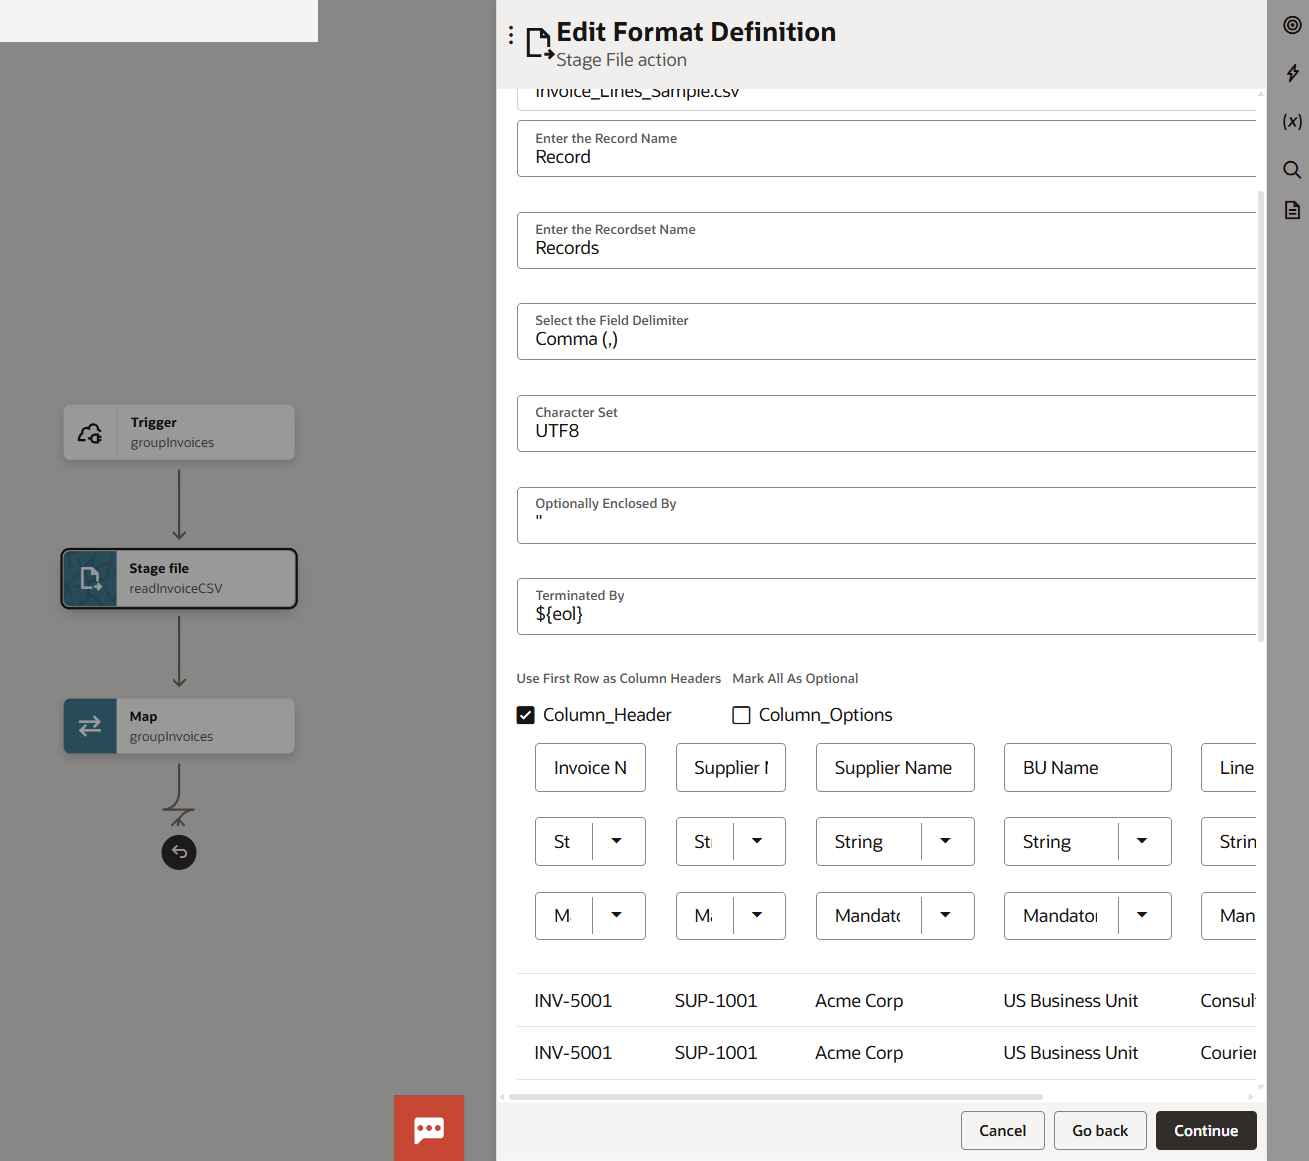
On the Edit Format Definition page, upload Invoice_Lines_Sample.csv as the sample file
and fill in the following details:
- Enter the Record Name:
Record - Enter the Recordset Name:
Records - Select the Field Delimiter:
Comma (,) - Character Set:
UTF8(default, leave as is) - Optionally Enclosed By:
"(default, leave as is) - Terminated By:
${eol}(default, leave as is) - Under Use First Row as Column Headers, tick Column_Header and leave Column_Options unticked.
The six columns from the CSV are detected and displayed across the panel: Invoice Number, Supplier Number, Supplier Name, BU Name, Line Description, Amount. They show with spaces, exactly as they appear in the first row of the CSV. Each column has two small dropdowns under it for data type and required status. Leave them at the defaults of String and Mandatory.
A preview of the first few CSV data rows shows at the bottom of the panel. Use it for a quick sanity check that OIC has read the file correctly.
Click Continue, review the Summary page, and click Finish.
Step 4: Add the Mapper with xsl:for-each-group
The Map action is where we transform the flat CSV records into the hierarchical Headers and Lines structure. The whole grouping happens in one XSLT block which we write in code view.
A Map action should already exist between readInvoiceCSV and the integration response. If it is missing, drag a Map action onto the line that returns the response to the REST trigger. Click the Map icon to open the Mapper.
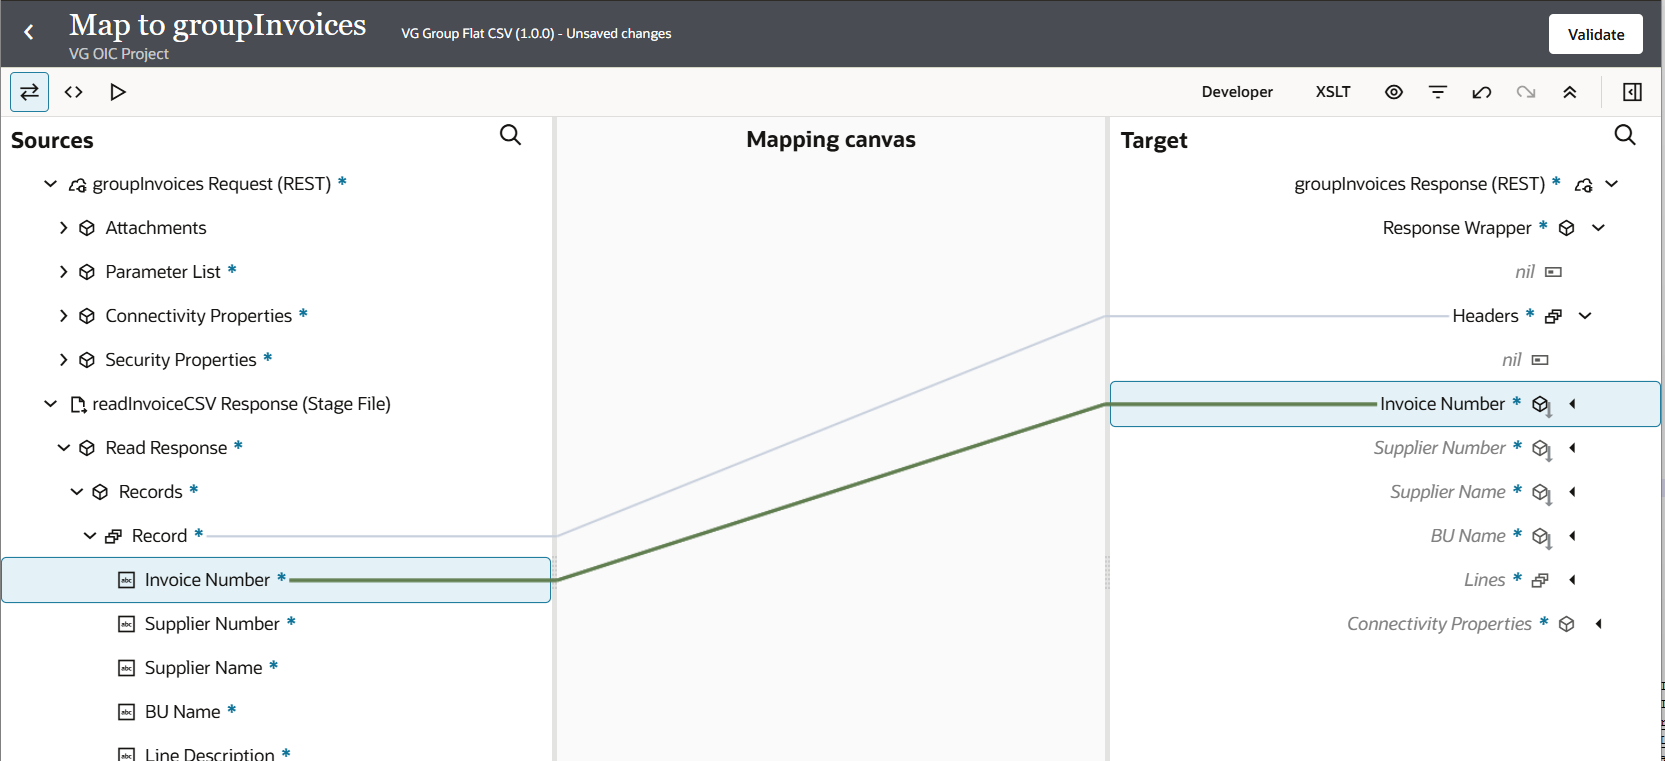
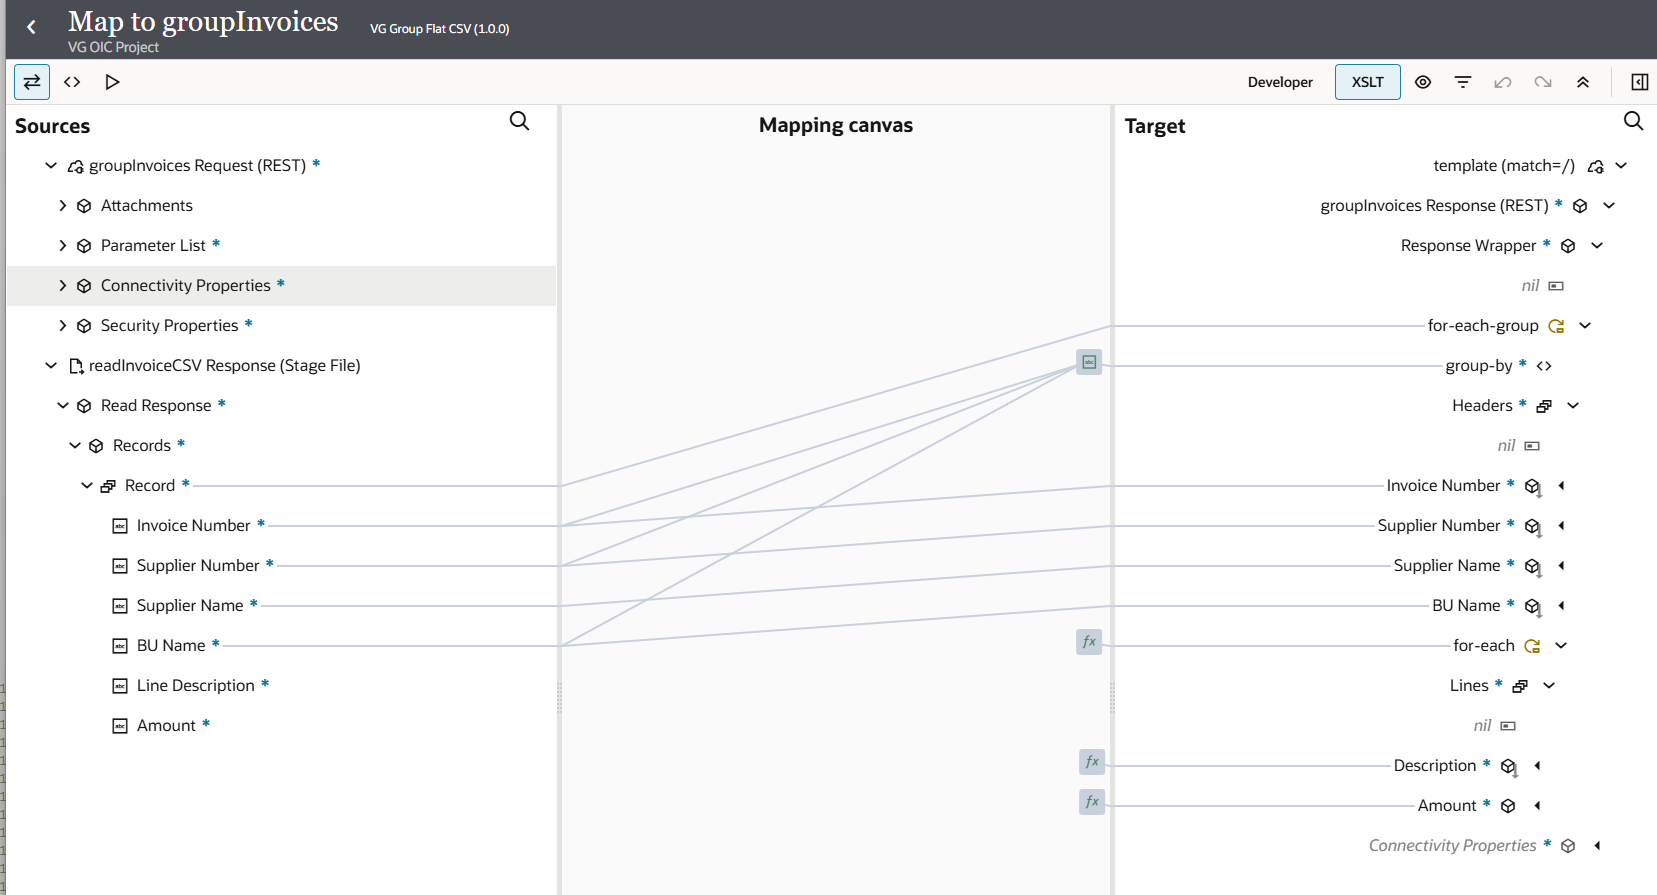
Map the Record Array with the Header Array and Invoice Number from the left to the Invoice Number from the right as shown below in the Visual Mapper to get a rough idea of where to make the changes in the code section
Click the Code icon, the angle-brackets </> icon, second from the left in the mapper toolbar, to switch to the XSLT editor.
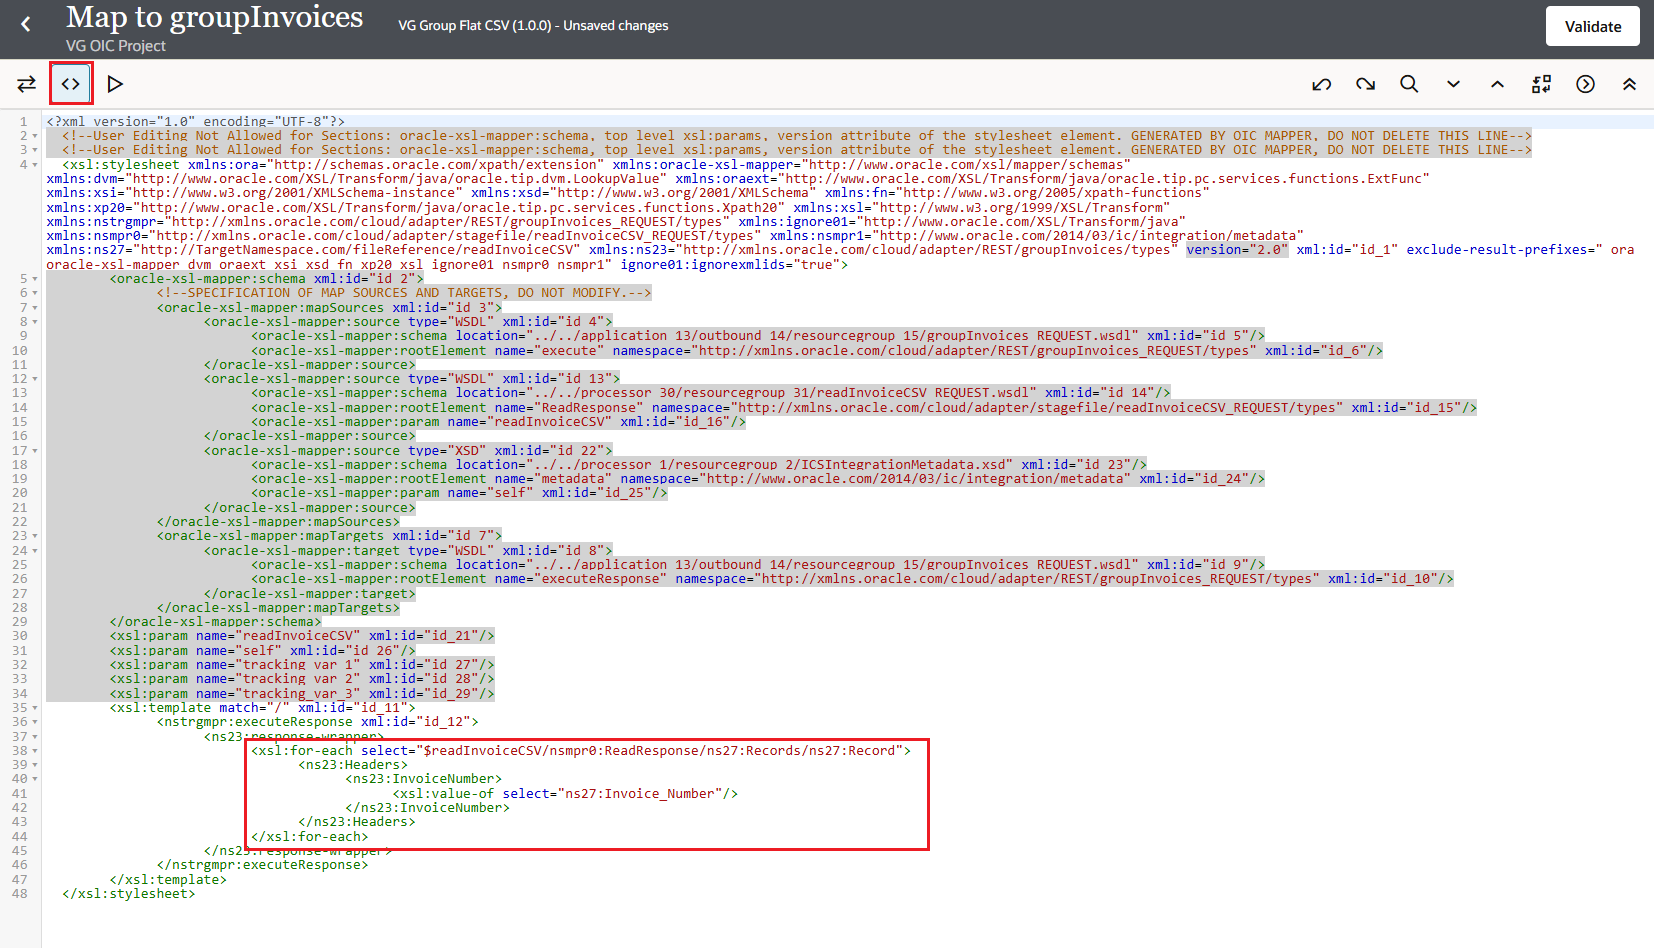
Scroll to the point in the target where the Headers element should be created. Replace the default for-each (or the empty target block) with this:
<xsl:for-each-group select="$readInvoiceCSV/nsmpr1:ReadResponse/ns26:Records/ns26:Record"
                    group-by="concat(Invoice_Number, '|', Supplier_Number, '|', BU_Name)">
  <Headers>
    <InvoiceNumber>
      <xsl:value-of select="Invoice_Number"/>
    </InvoiceNumber>
    <SupplierNumber>
      <xsl:value-of select="Supplier_Number"/>
    </SupplierNumber>
    <SupplierName>
      <xsl:value-of select="Supplier_Name"/>
    </SupplierName>
    <BUName>
      <xsl:value-of select="BU_Name"/>
    </BUName>

    <xsl:for-each select="current-group()">
      <Lines>
        <Description>
          <xsl:value-of select="Line_Description"/>
        </Description>
        <Amount>
          <xsl:value-of select="Amount"/>
        </Amount>
      </Lines>
    </xsl:for-each>
  </Headers>
</xsl:for-each-group>
The group-by attribute uses a concat of three fields. Invoice Number alone is rarely unique across suppliers and business units, so most flat file scenarios need a composite key. Pick whichever set of fields together identify a single header in your data.
current-group() returns every source row that fell into the same group. We loop through it like any other node set, and inside the loop the context is the line row. That is where the line level fields get mapped, such as Description, Amount, and anything else that lives at line level in your CSV.
Note: The variable name$readInvoiceCSVmust match the name we gave the Stage File action in Step 3. The prefixesnsmpr0,ns27,ns23are from a real generated mapping. Yours will look similar but the numbers are auto assigned per integration, so they will differ. Copy them from the surrounding XSLT in your editor. Every source field reference needs thens27prefix and every target element needs thens23prefix. Bare element names will not resolve.
Click Validate at the top right of the code editor. Once the XSLT is well formed and the paths resolve, validation passes. Click Designer to return to the visual view.
Note: By default the for-each-group block does not show in Designer view, and the target tree only lists the business elements. Click the XSLT toggle in the toolbar, next to Developer, and the XSL constructs come back. With the toggle on, for-each-group, group-by, and the inner for-each show up as nodes in the target alongside Headers, InvoiceNumber, Lines, and the rest. Mappings stay editable, so there is no need to drop back to Code view just to look at the grouping.
Step 5: Validate and Activate
Business identifiers enable runtime tracking on messages. We use them to search and filter integration instances in the Observability section. For this integration, we use the filename of the uploaded CSV so each run can be identified by the file that triggered it.
On the integration canvas, click the Business Identifiers icon, the one that looks like parentheses, on the top right toolbar. Drag partName from execute > attachments > attachment > attachmentProperties and drop it onto the Primary business identifier slot. Click Save.
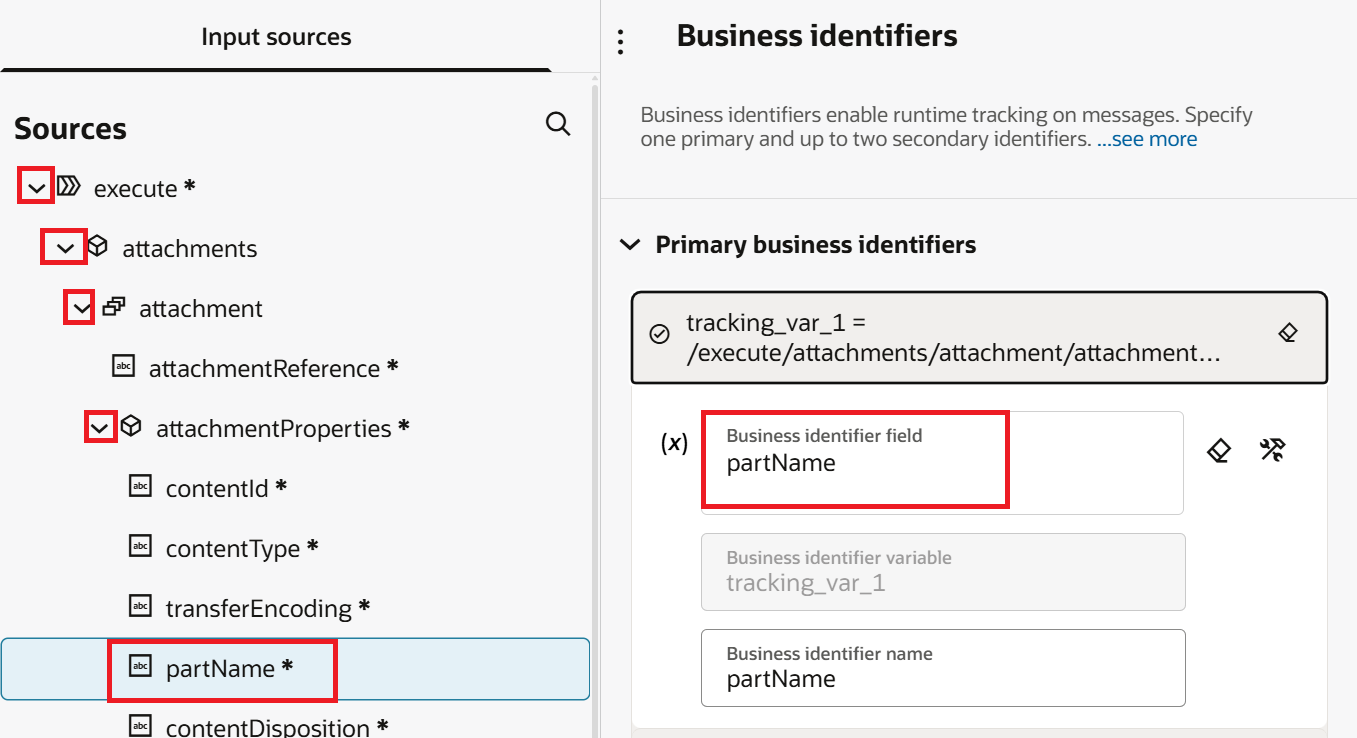
Note: Business Identifiers must come from data visible at the trigger such as URI parameters, query parameters, headers, attachment metadata, or body fields. The Invoice Number we are grouping by lives inside the CSV which only gets read downstream by the Stage File action, so it cannot be used here. partName is the most meaningful trigger level value we have available in this integration.Click Validate at the top of the integration canvas. Validation should pass.
Note: If you click Validate before assigning a Primary Business Identifier, OIC reports Missing primary business identifier and blocks activation. That is why we assigned the Business Identifier first in Step 5.Click Save, then Close. From the Integrations list, click the More menu next to VG Group Flat CSV and choose Activate. On the Activate integration dialog, select the tracing level as Debug (Not recommended) and click Activate.
Note: We select Debug tracing only for development and testing. It logs all payloads and activity details but auto resets to Production tracing after 24 hours. Do not use Debug in production environments because it slows down the system and logs sensitive payload data.
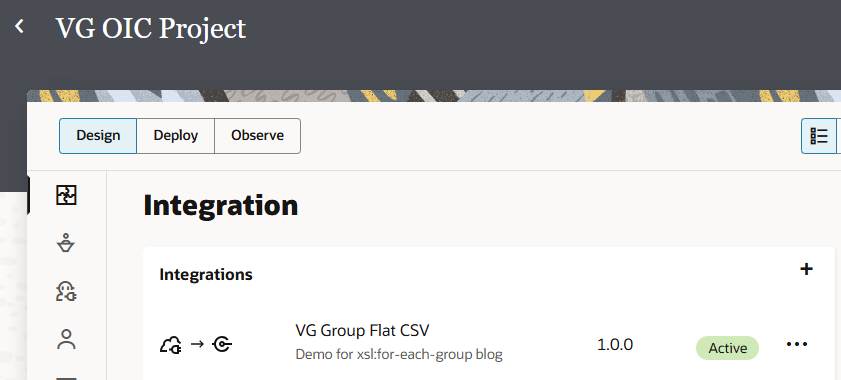
Refresh the Integrations page. The status of VG Group Flat CSV should now show Active.
Step 6: Test the Integration
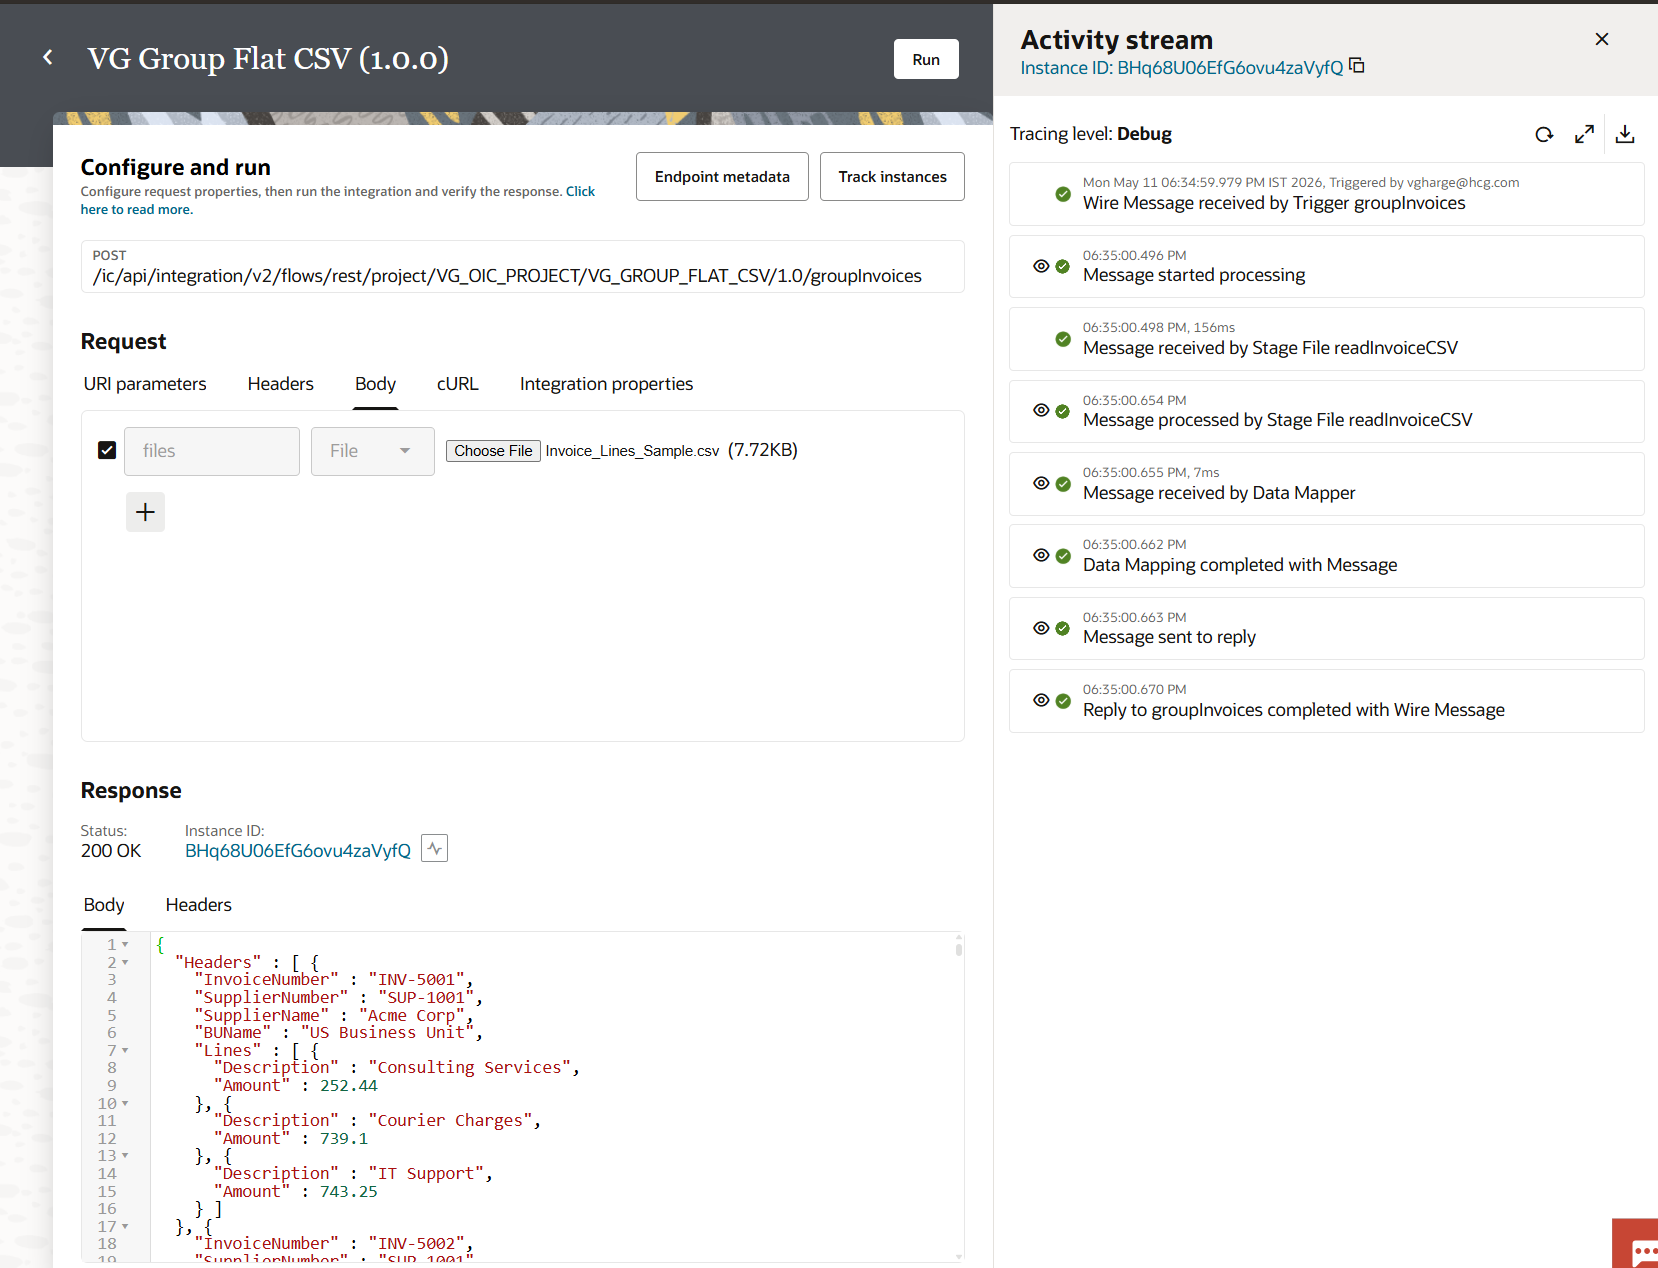
- From the Integrations list, click the More menu and choose Run.
- Switch to the Multipart Form-Data tab on the test page.
- Click Choose File and select Invoice_Lines_Sample.csv.
- Click Run.
- Inspect the response. The Headers array should contain one entry per unique combination of Invoice Number, Supplier Number, and BU Name. For the sample file of 100 rows the response should contain around 32 headers, each with its own Lines array.
Closing Thoughts
So, we have built an OIC Gen3 integration that takes a flat CSV with invoice lines and groups it into a hierarchical Headers and Lines structure using xsl:for-each-group. We created the integration inside the VG OIC Project, configured the REST trigger to accept a multipart attachment, and defined the JSON response shape. Next, we added a Stage File action to read and parse the CSV. The heart of the work happened in the mapper with a single for-each-group block. We assigned partName as the Primary Business Identifier so each run can be tracked on the Monitoring page, then activated and tested the integration with our sample file.
Grouping flat data into a hierarchy is a pattern that comes up over and over in real integrations such as Finance system exports, HCM extracts, logistics CSVs, and payment files from banks. The same xsl:for-each-group block we used here works for all of them. The 30 minutes I lost on my first attempt was the lesson; the one minute on the second was the payoff.
References
- Oracle Integration 3, Iterate Across Groups with a for-each-group Constructor. https://docs.oracle.com/en/cloud/paas/application-integration/mapper-user/use-each-group-construct.html
- Oracle Integration 3, Service Limits - Component: Integrations. https://docs.oracle.com/en/cloud/paas/application-integration/oracle-integration-oci/component-integrations.html
- Oracle Integration 3, Multipart Attachment Support for Trigger and Invoke Connections. https://docs.oracle.com/en/cloud/paas/application-integration/rest-adapter/multipart-attachment-support-trigger-and-invoke-connections.html
- Oracle Integration 3, Process Files in Schedule Integrations with a Stage File Action. https://docs.oracle.com/en/cloud/paas/application-integration/integrations-user/process-files-scheduled-integrations-stage-file-action.html