OIC Gen3 Lookups

Why Lookups Matter in OIC
When we connect two systems, the source and target values for all the fields may not be the same. In OIC, we can use Switch Case or, even better, save the mappings in a lookup. You will have to turn off Integration, make the changes, and then turn it back on if you use Switch in OIC. There will also be too many switch case conditions to keep track of. The best way to keep these mappings is through lookups. I also suggest that you keep the Integration Metadata fields or any value you are hard-coding for each integration in a common OIC Lookup, like Report Path, Parameters, and Email Address, so you don't have to reactivate the Integration.
When you update a lookup, you don't have to reactivate the integrations that use it. This is one of the best things about lookups, and I always tell teams to do this at the start of the project.
Under the covers, OIC loads the lookup into internal memory like a read-only table. So when your integration runs, it is not making a database call to fetch the value. It reads from memory. That is why lookups are fast even when you have hundreds of rows.
If you haven't read the earlier blogs in this series, check out the OIC Gen3 Overview, Adapters, and Connections.
Creating a Lookup Outside a Project
You can create lookups at two levels in OIC Gen3: outside a project (globally accessible) or inside a project (scoped to that project only). Let us first walk through how to create a lookup outside a project.
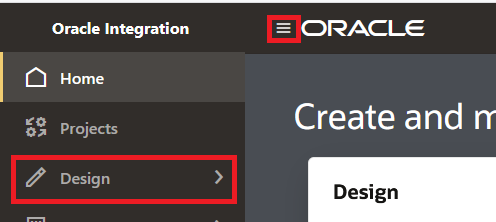
- Navigate to ☰ > Design.
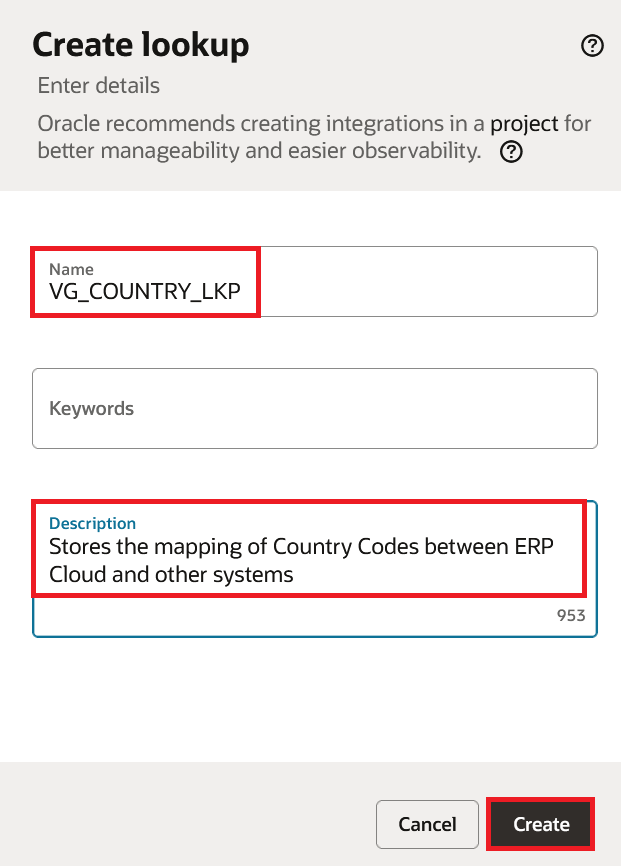
- Click Lookups > Create.

- Enter a name and an optional description for the lookup. > Click Create.
Creating a Lookup Inside a Project
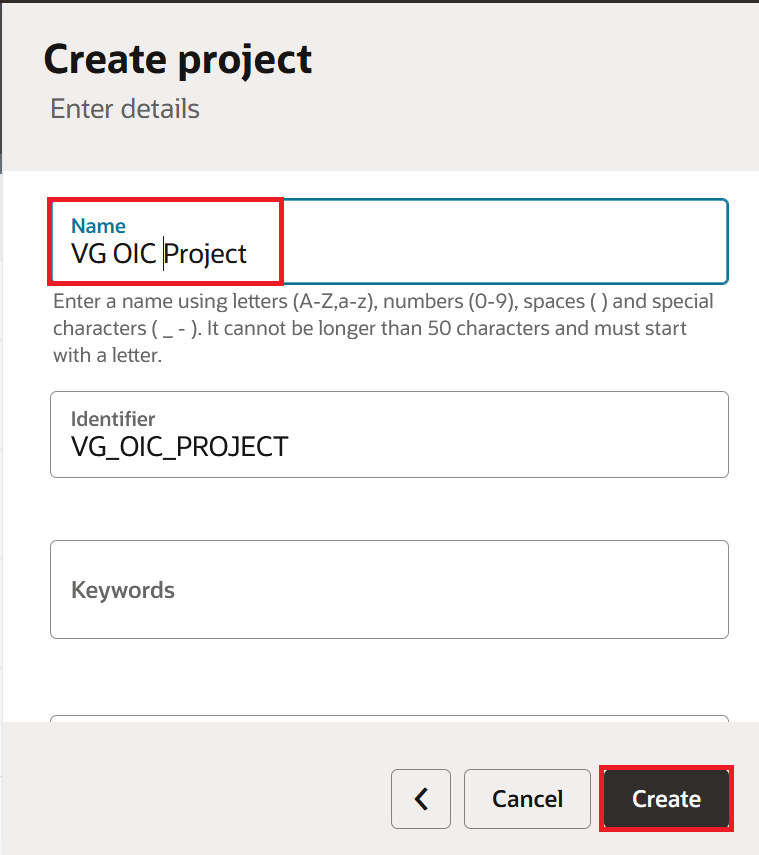
- Navigate to ☰ > Projects > Click on "Add":

- Click on "Create
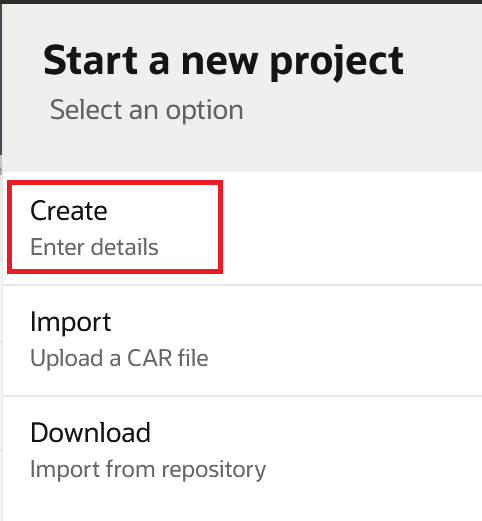
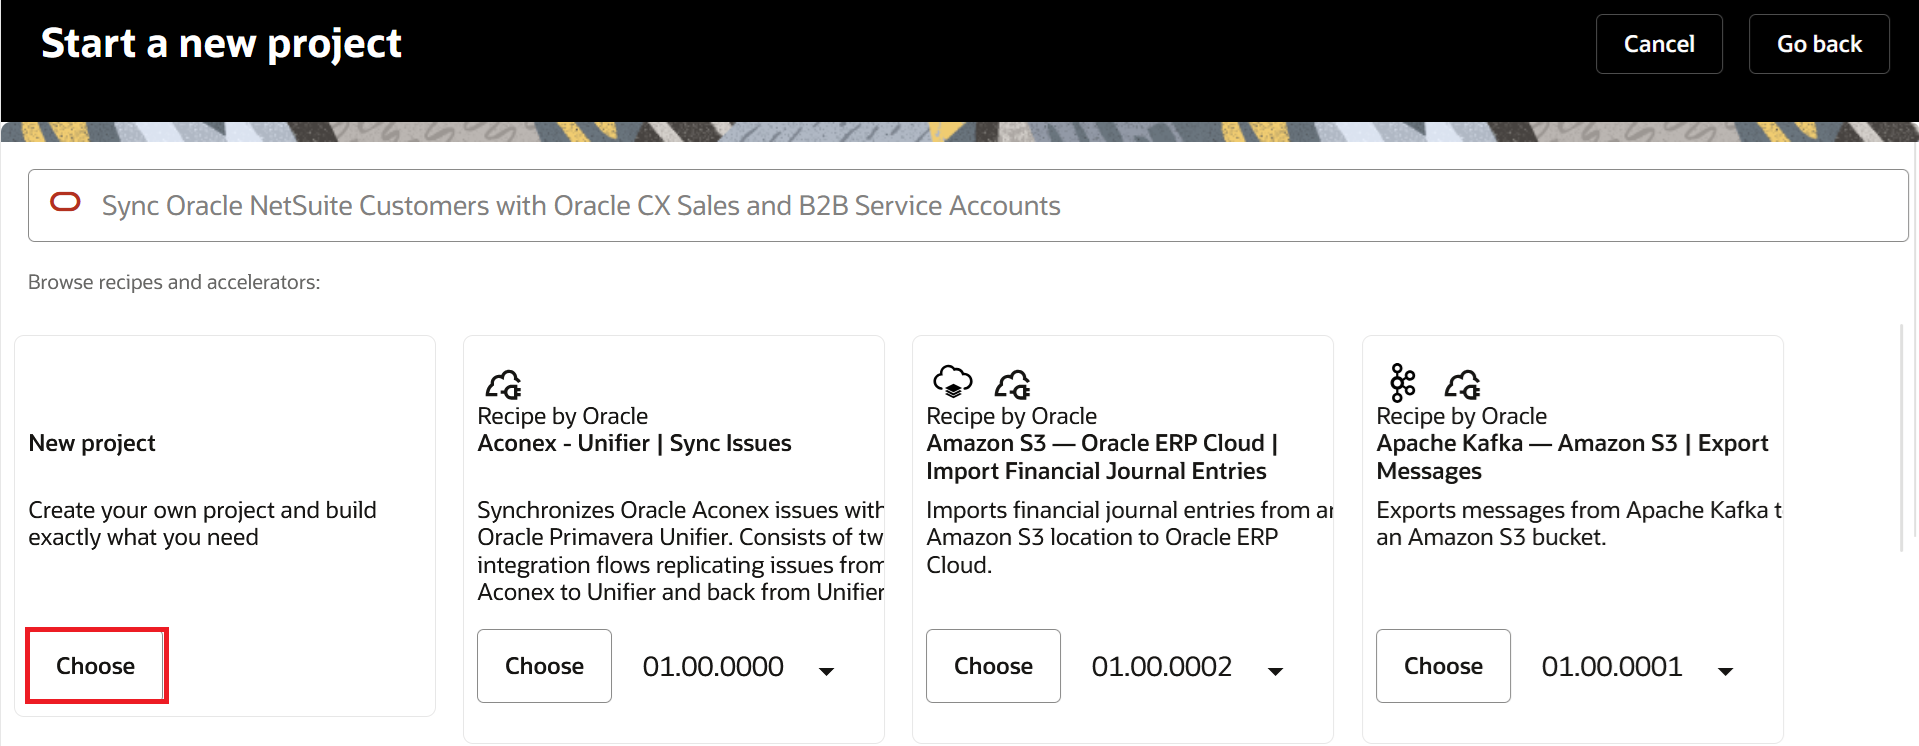
- Click on "Choose" under "New project"
- Enter Project Name and click on Create (Identifier gets auto-generated)
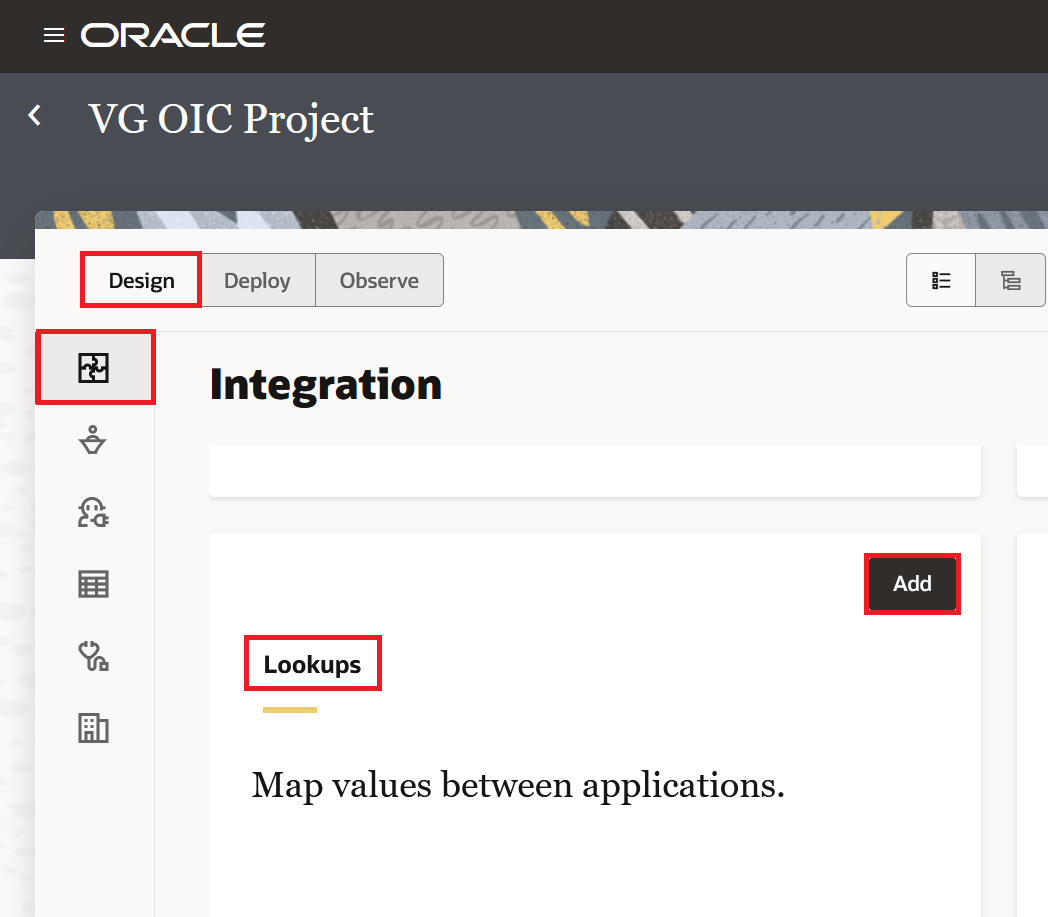
- Scroll down till the Lookups section, click Add. By Default when any project is created, it opens in Design Tab and Integration section of the Project.
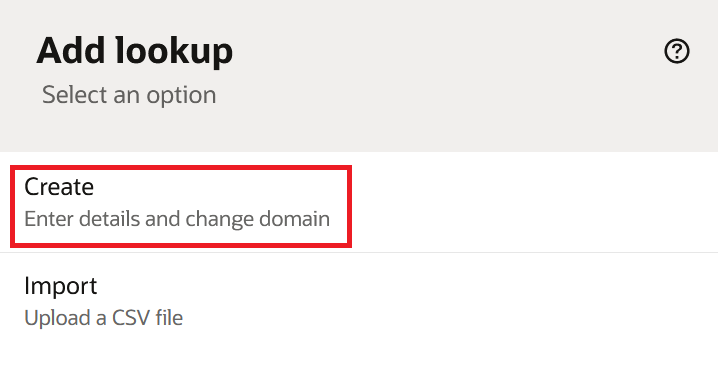
- Click Create. You can import the Lookup CSV file as well but the format of the CSV file is a bit tricky. The CSV format has the table name in the first row, column names in the second row, and data from the third row onwards. I recommend exporting an existing lookup first and using that as a template. The import will fail without a useful error message if the format is off. Also, while importing a CSV file, if a lookup with the same name exists, OIC will ask if you want to overwrite it. It will replace your entire lookup.
- Enter a name and an optional description for the lookup > Click Create.
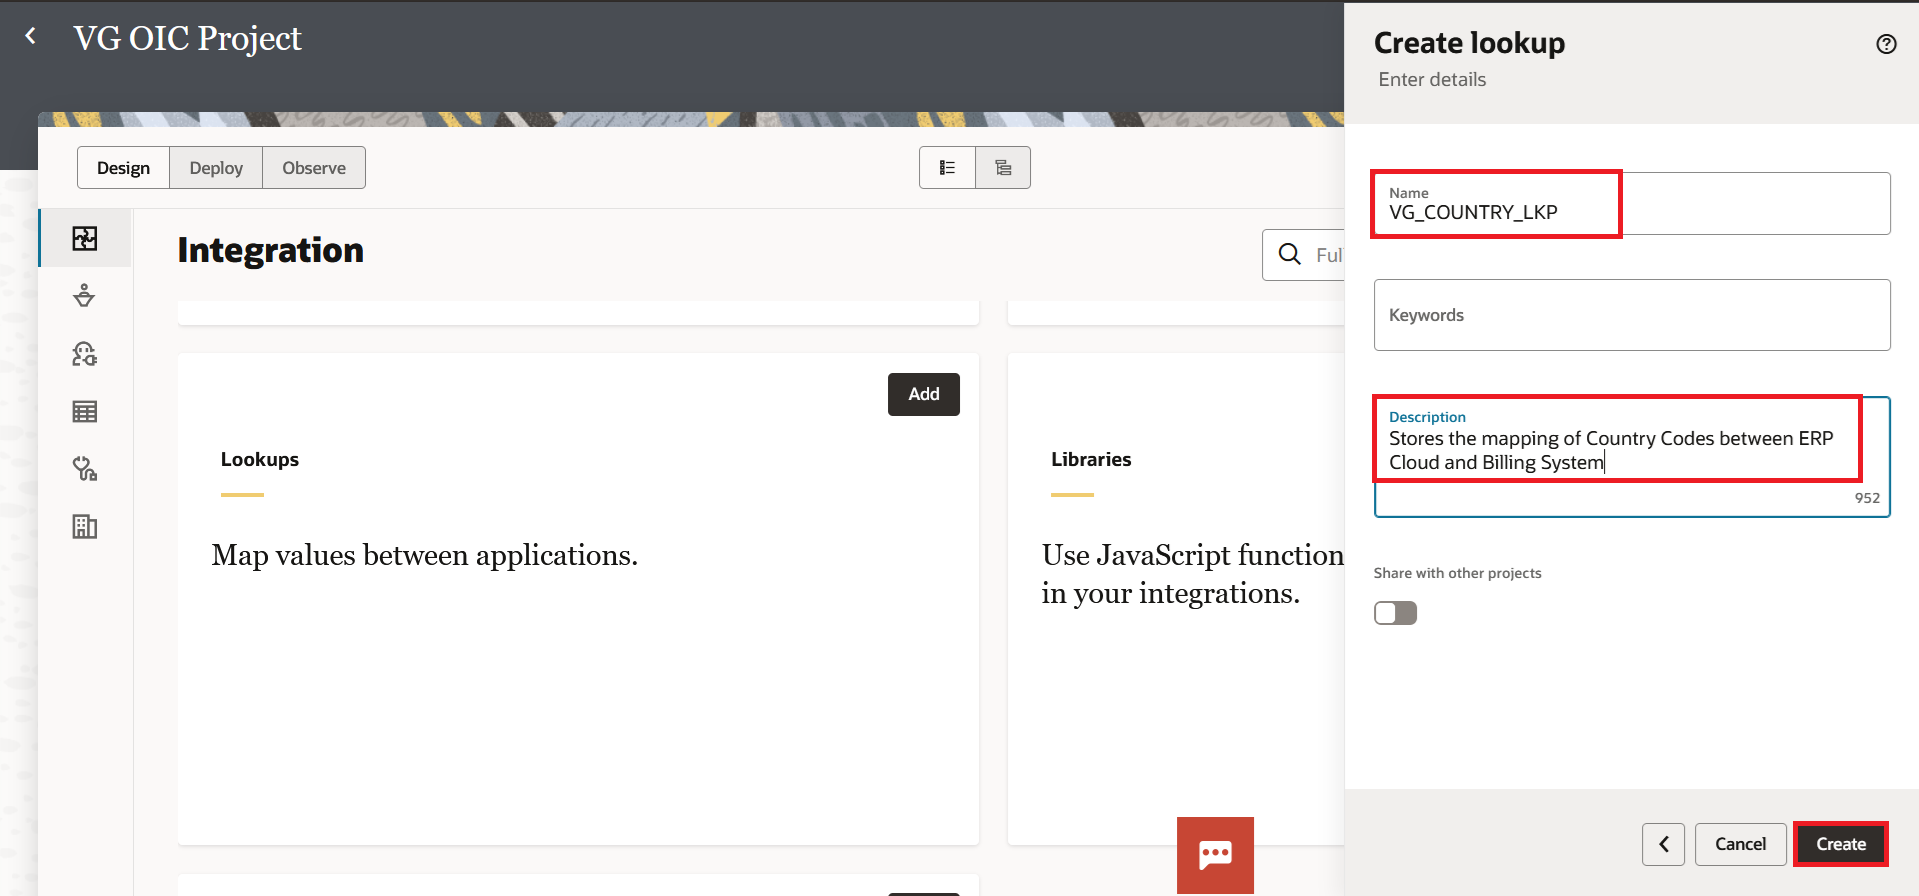
Lookups created inside a project are only visible and usable within that project. If you need the same lookup across multiple projects, we have the toggle button "Share with other projects" shown in the above screenshot.
Adding Values to the Lookup
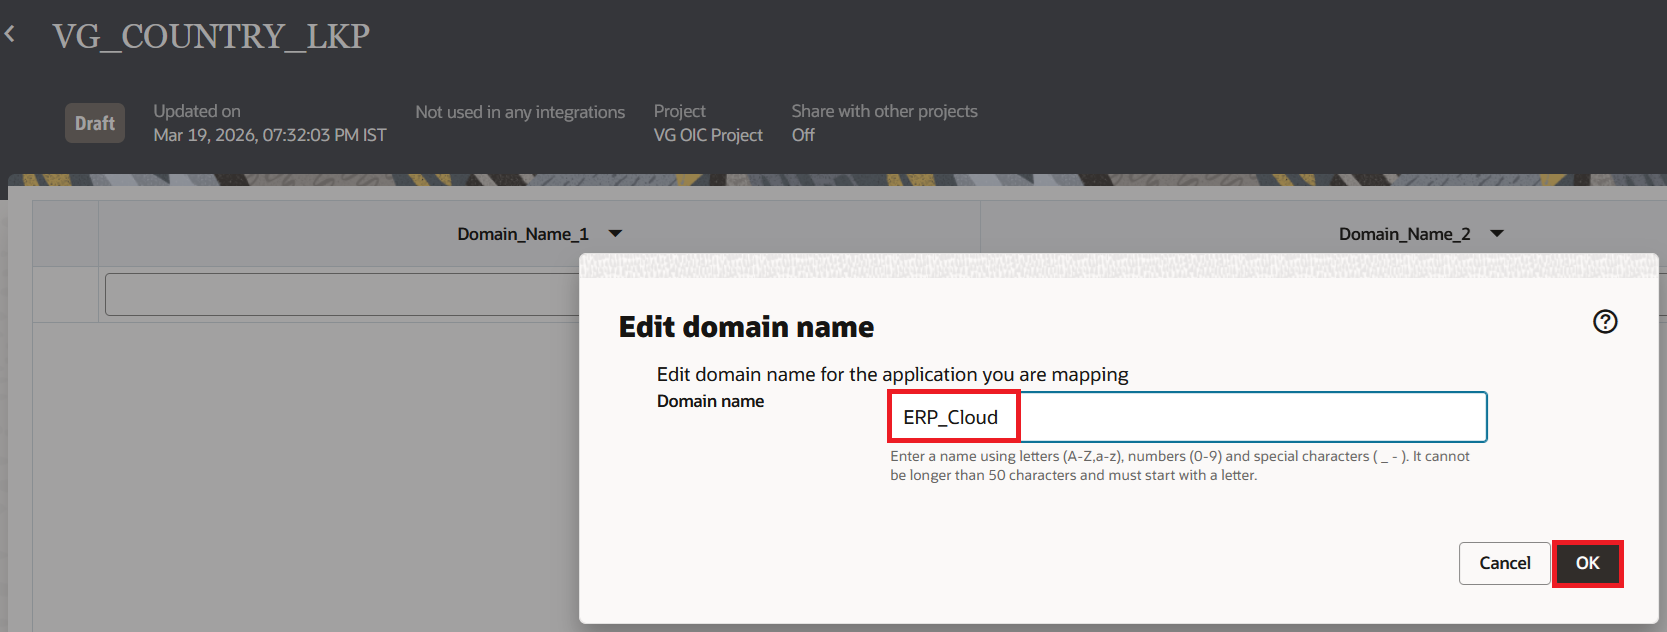
In this blog, we will take an example of storing the source and target values for country codes. Oracle ERP Cloud sends two-letter country codes like US, IN, FR but the target billing system expects three-letter codes like USA, IND, FRA. We will also add a third column for the full country name which can be useful for reports or notifications. Once the lookup is created, it will show two columns with default names. We can either rename them or replace them with the actual adapter.
- Click on Domain_Name_1 and select Edit domain name or Replace with adapter.
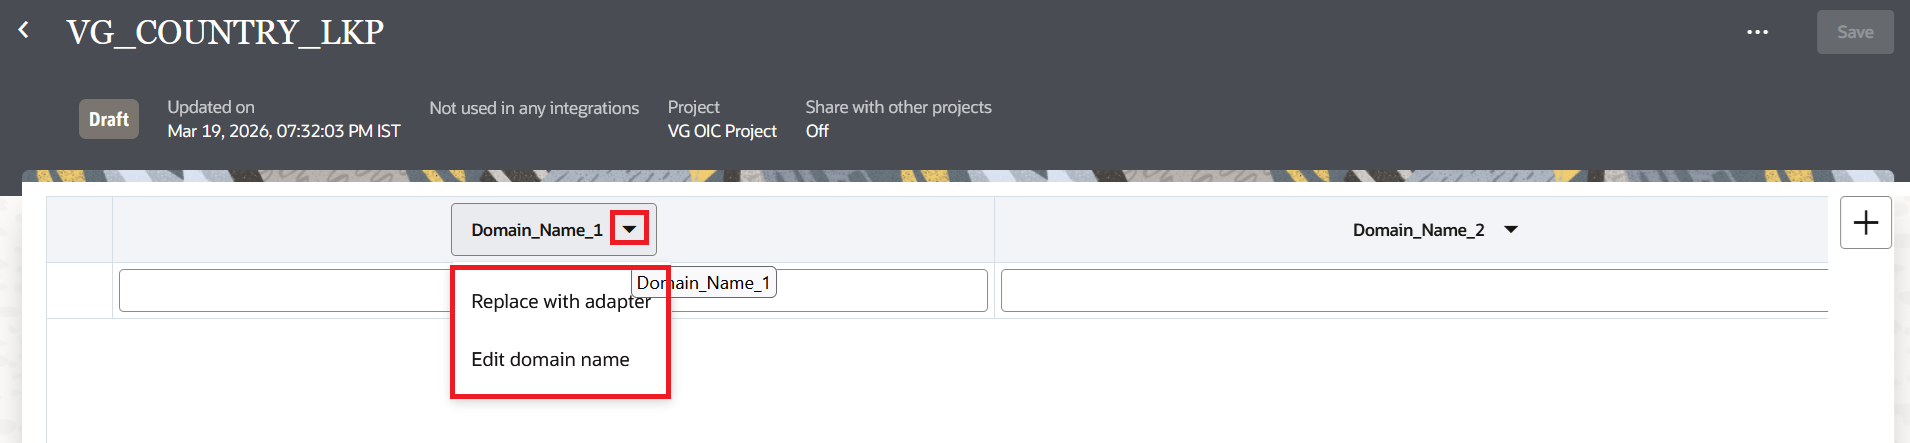
- For our example, rename it to
ERP_Cloudand click "OK".
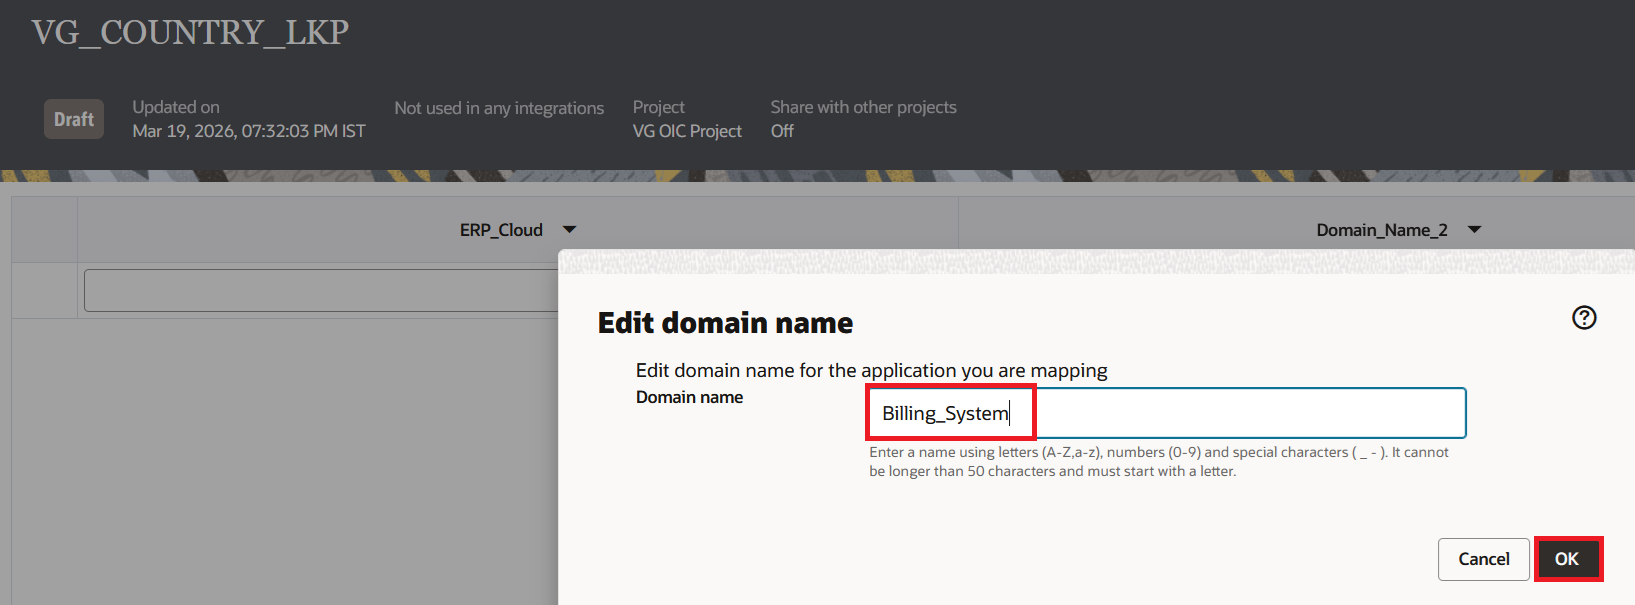
- Repeat for Domain_Name_2. Rename it to
Billing_Systemand click "OK".
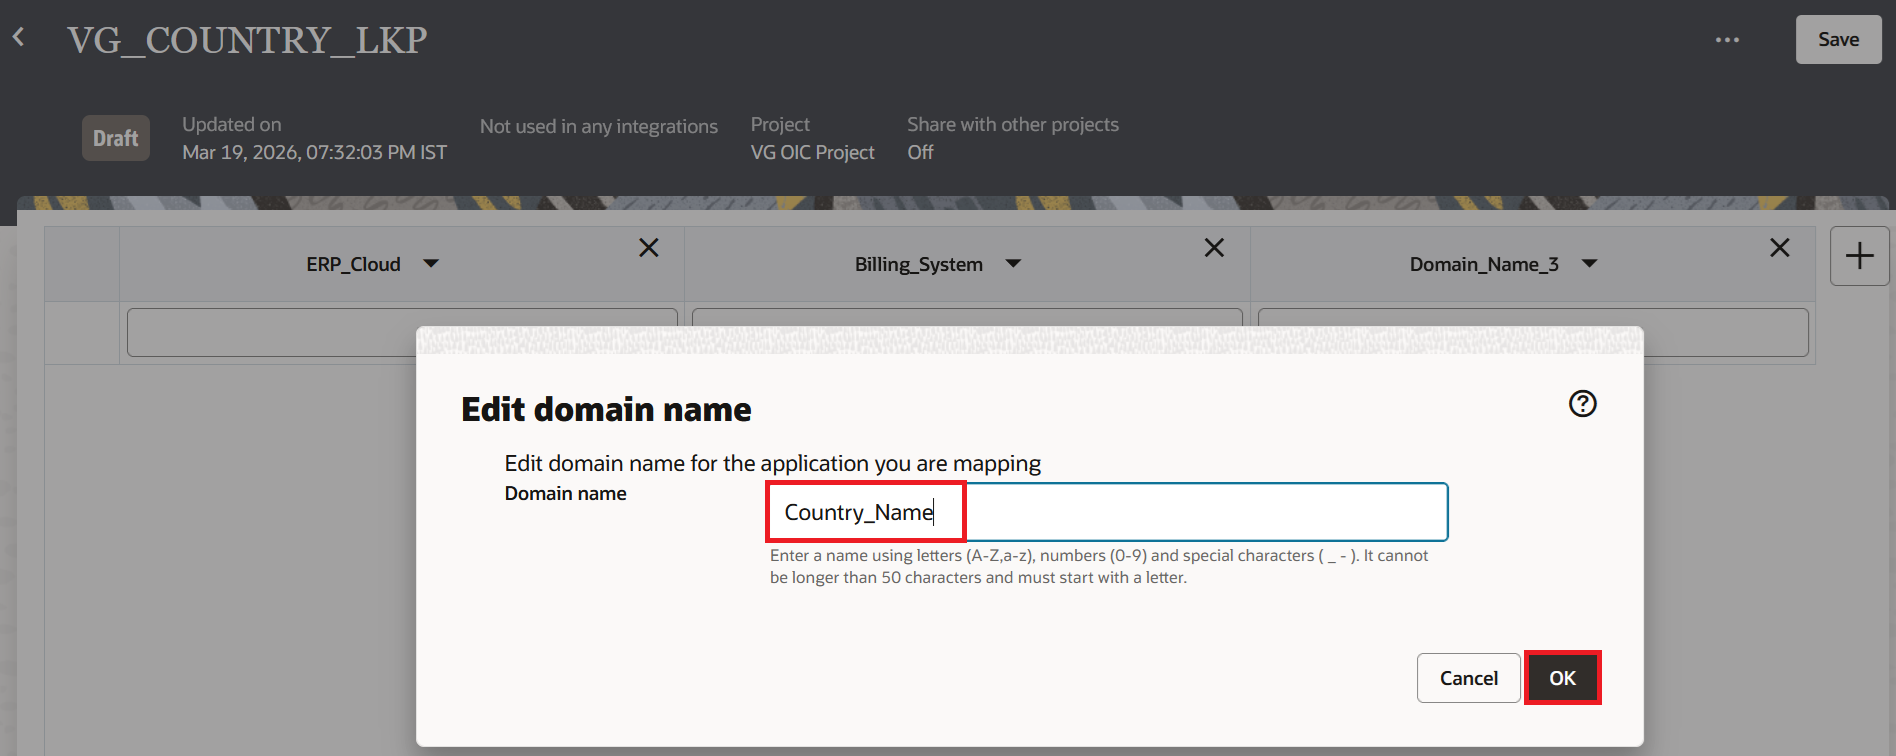
- We need a third column for the country name. Click + next to the column headers to add a new column.
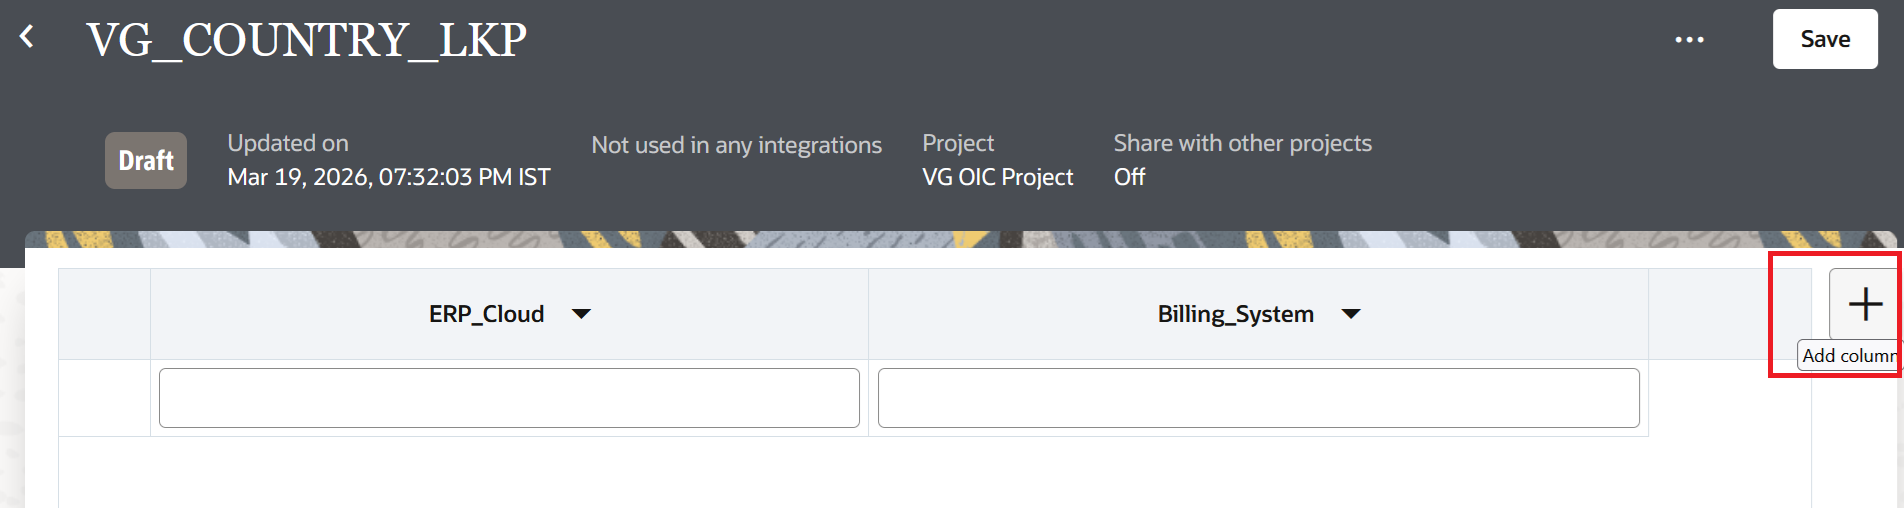
- Rename it to
Country_Nameand click "OK"
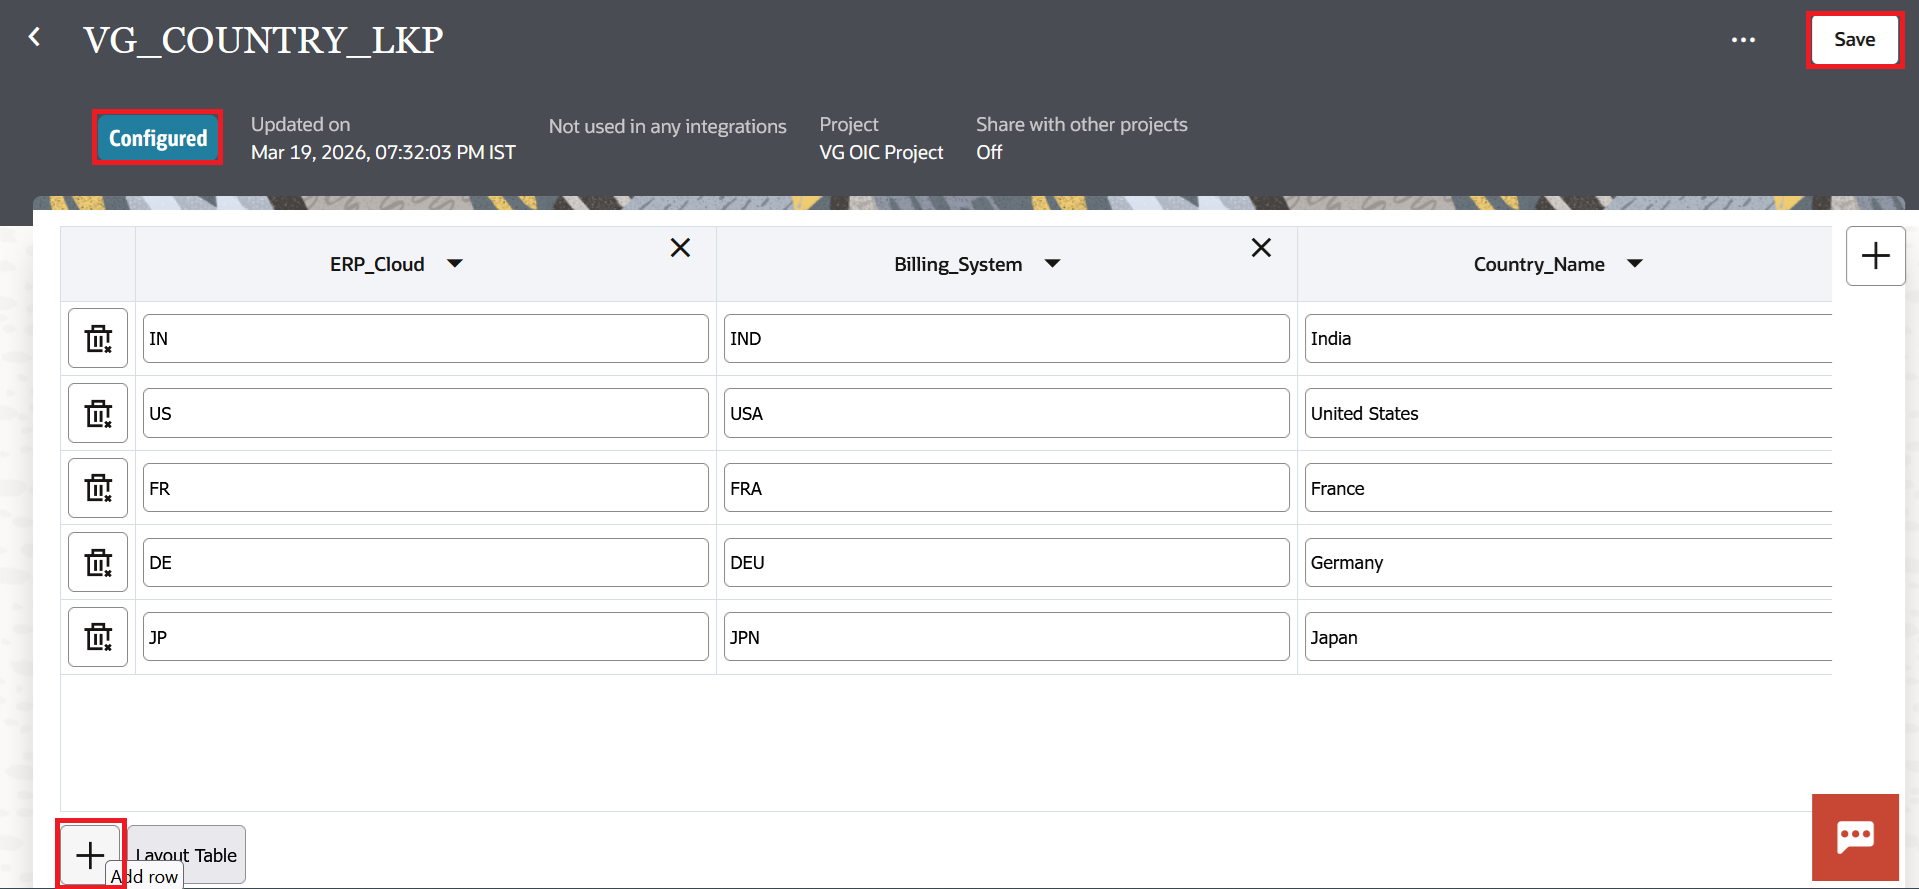
- Click + (at the bottom left as highlighted in the screenshot below) to add rows and enter the values. For example: US maps to USA and United States, IN maps to IND and India, FR maps to FRA and France, DE maps to DEU and Germany, and JP maps to JPN and Japan.
- Click Save and the status of the Lookup will change from Draft to Configured.
Having the country name in the same lookup is handy. A person who does not have the knowledge on Country Codes may not know which country has the code DE. You can use the same lookup in different mappers with different target columns. In one mapper you pick Billing_System to get the three-letter code. In another mapper you pick Country_Name to get the full name for an email notification or a report. One lookup, multiple uses.
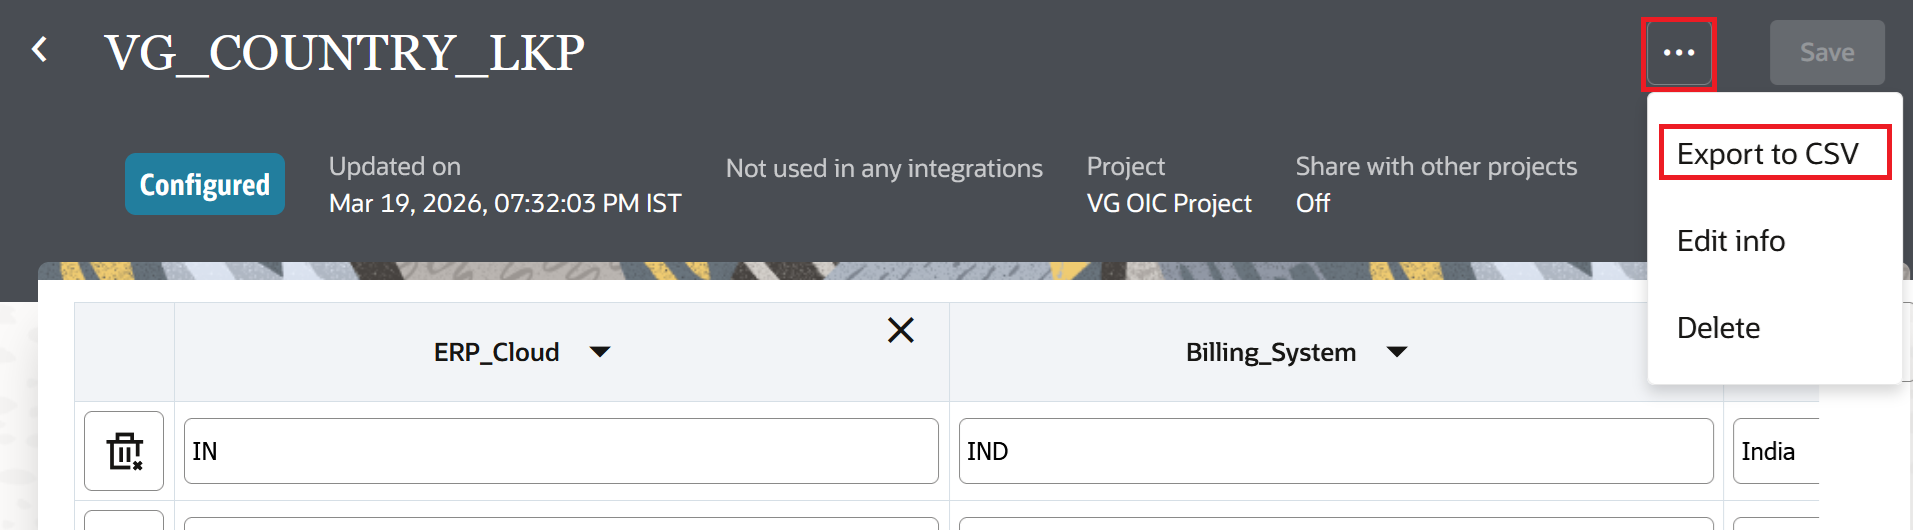
If we have too many values to configure in a lookup, it is better to export the lookup first which will give us a CSV file. Enter the data in the CSV file and import it back. Please note that it will not append the values. Like I mentioned before, it will replace the entire lookup.
Using a Lookup in an Integration
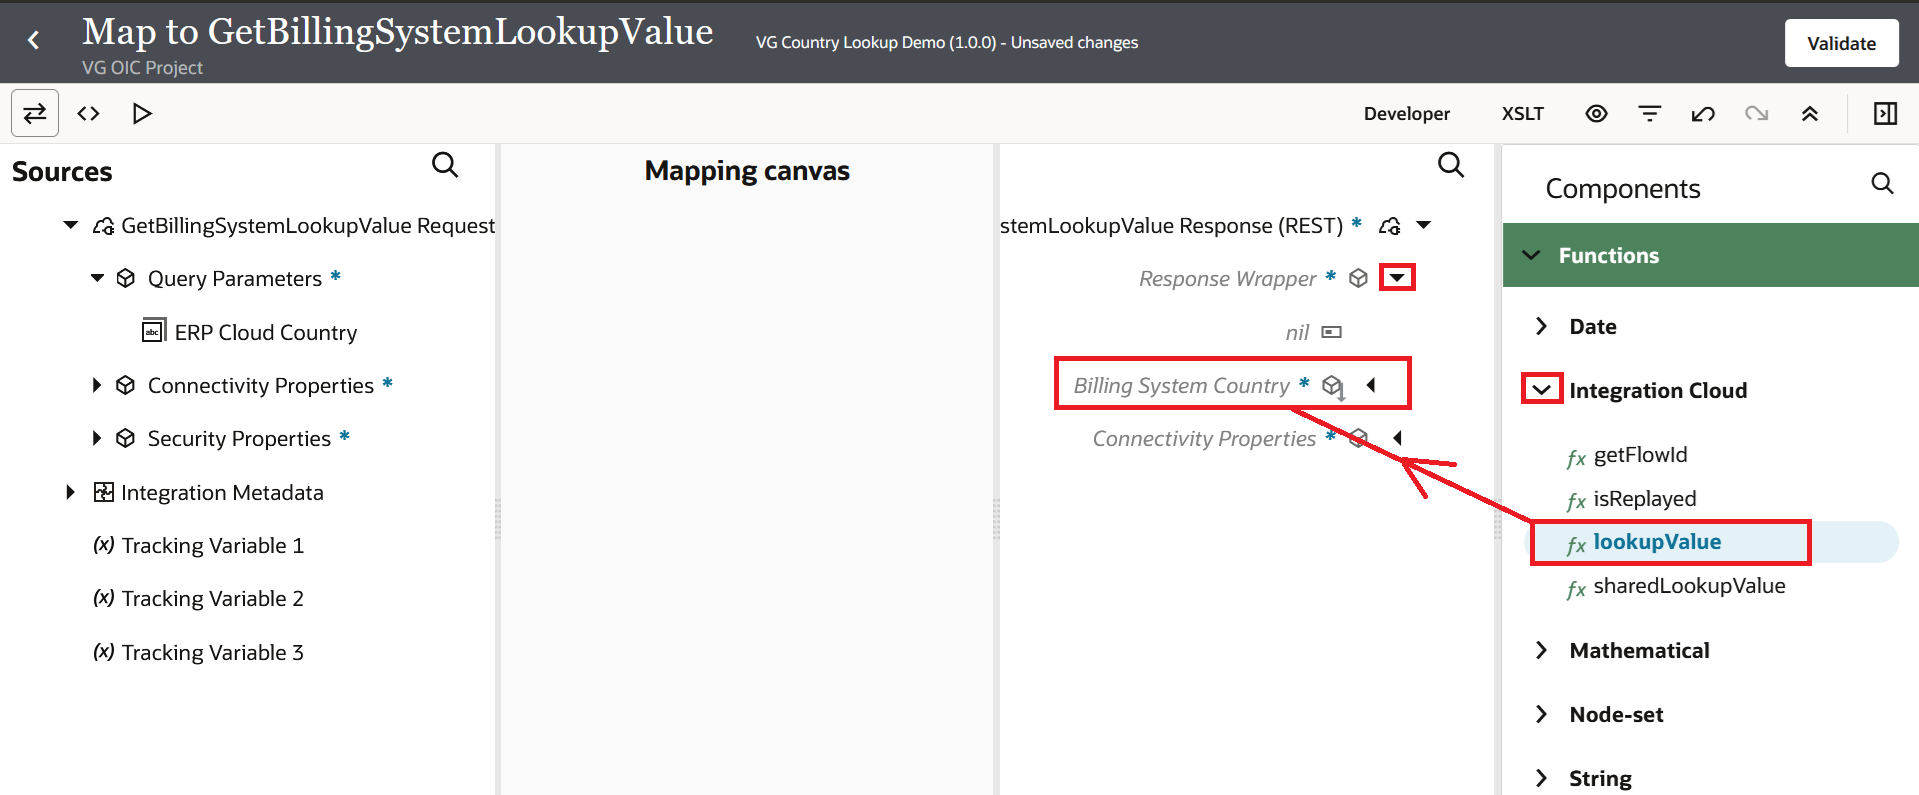
Open the mapper in your integration once your lookup is complete. Click the expand icon. You can either Search by clicking the Search icon and entering lookupValue in the search field or you can expand "Functions" > "Integration Cloud" > Drag and Drop lookupValue into the Target field as shown in the below screenshot.
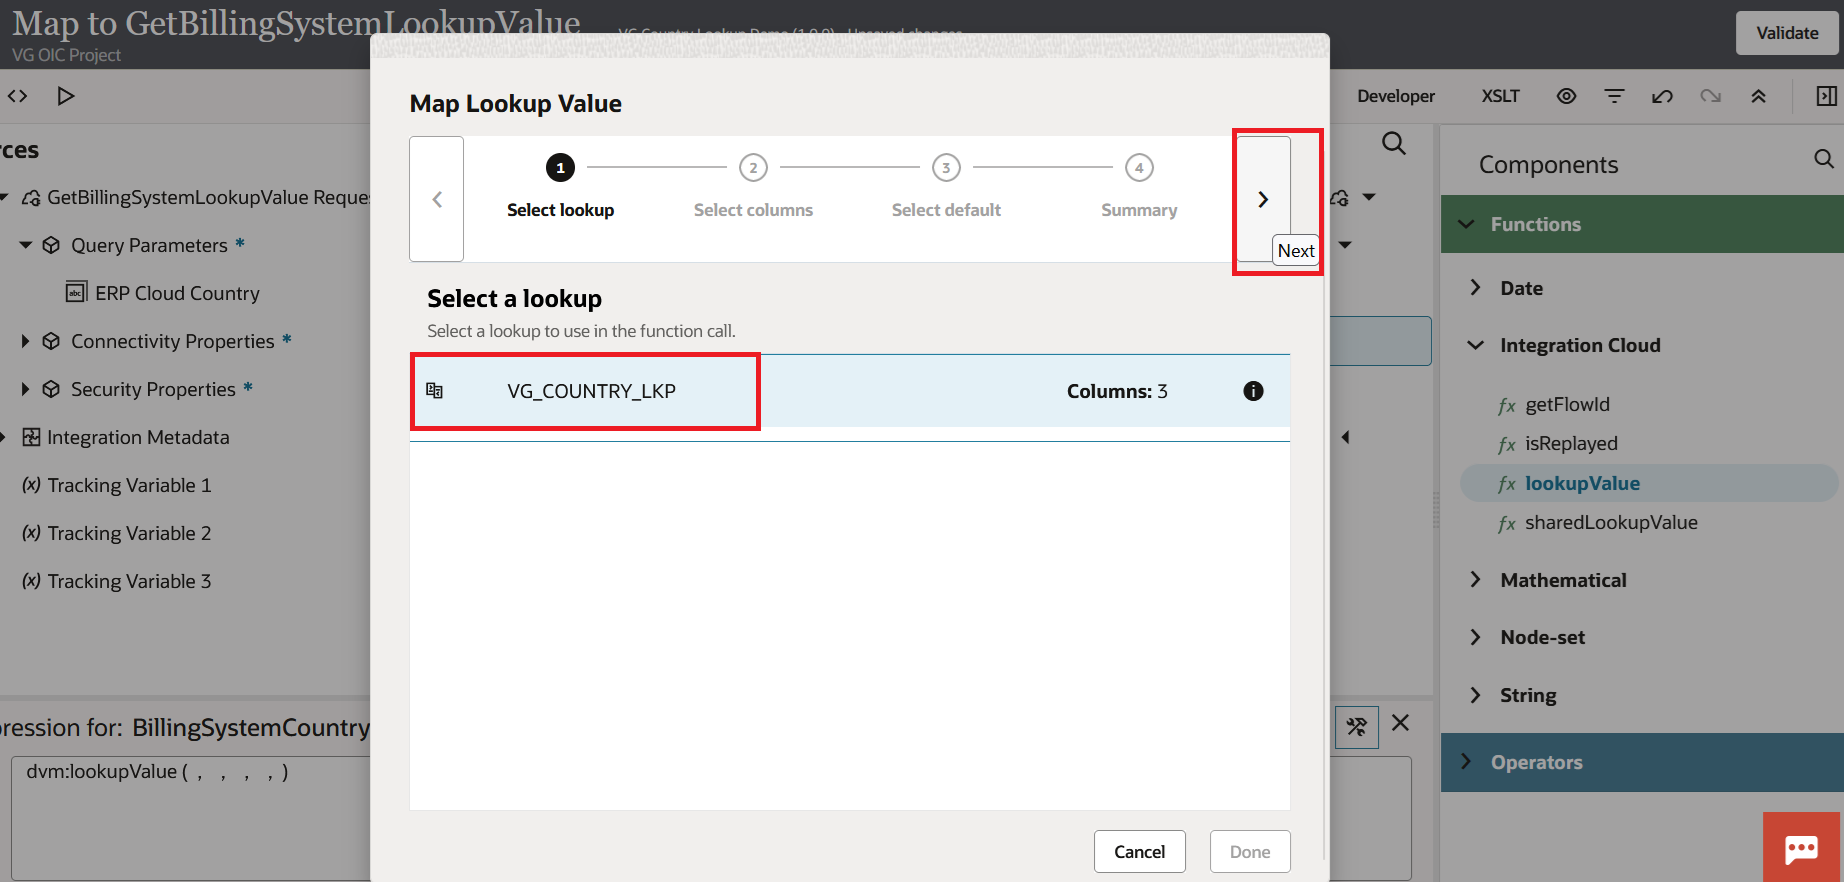
The Map Lookup Value wizard appears. The wizard has four steps:
- Select Lookup: Select the country code lookup we created earlier. Press the forward arrow.
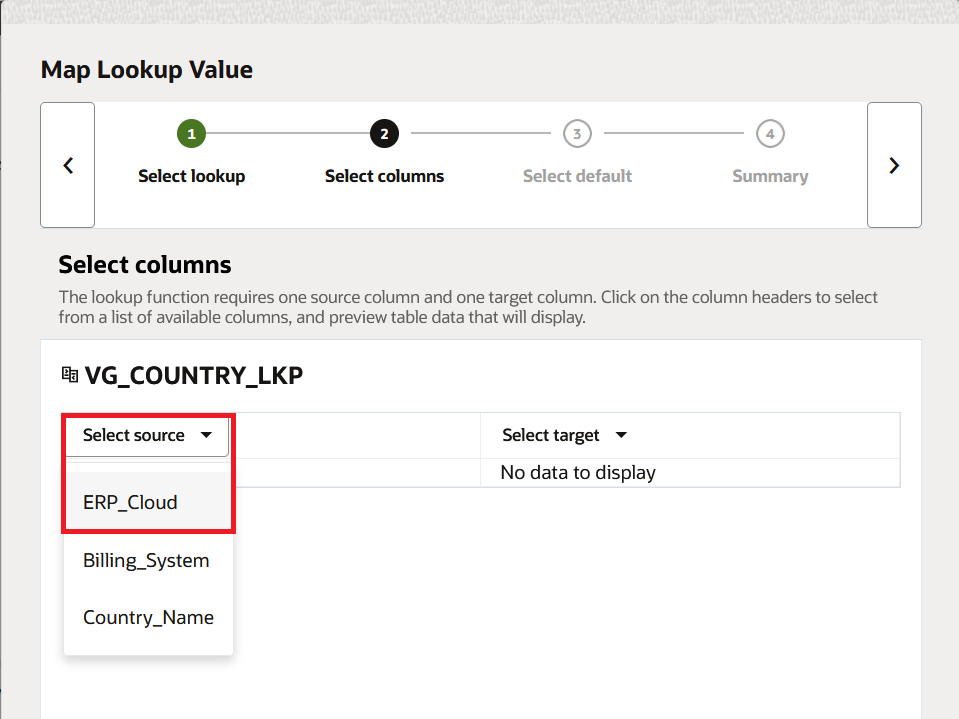
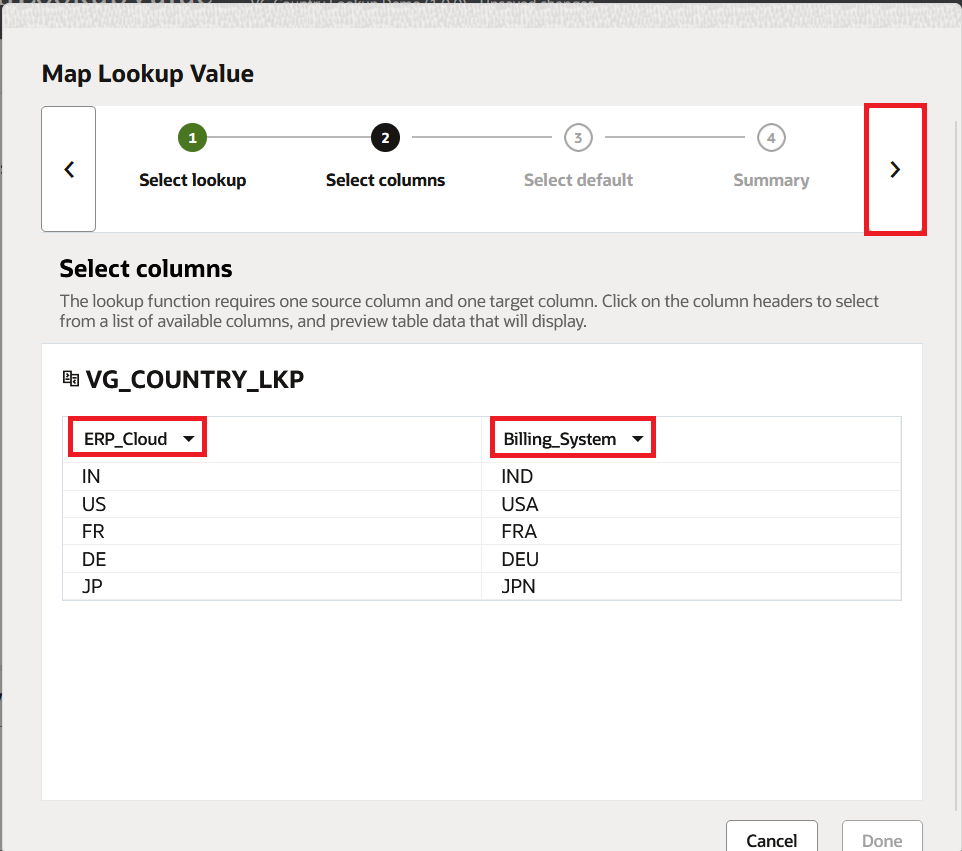
- Select Columns: Choose
ERP_Cloudas the source column andBilling_Systemas the target. To ensure you are selecting the correct values, the wizard displays the values in each column. Press the forward arrow.
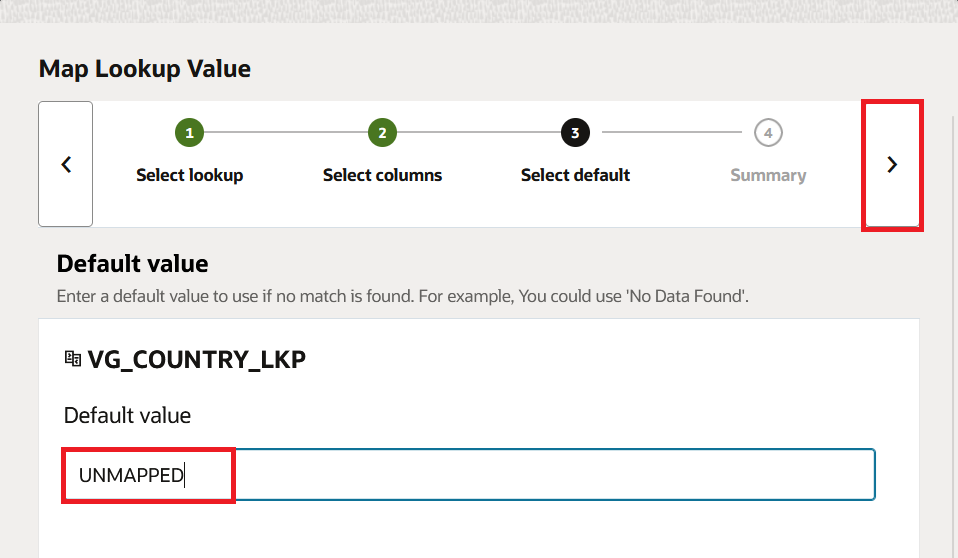
- Indicate the Default Value: Set
UNMAPPEDas the default. When the lookup is unable to locate the country code, this is what is returned. Instead of sending blank or meaningless data, I always set a meaningful default so that the downstream system knows something didn't match. Press the forward arrow.
- Review Synopsis: The resultant expression is displayed by the wizard. This is how it will appear:
dvm:lookupValue('VG_COUNTRY_LKP', 'ERP_Cloud', srcValuePlaceHolder, 'Billing_System', 'UNMAPPED')
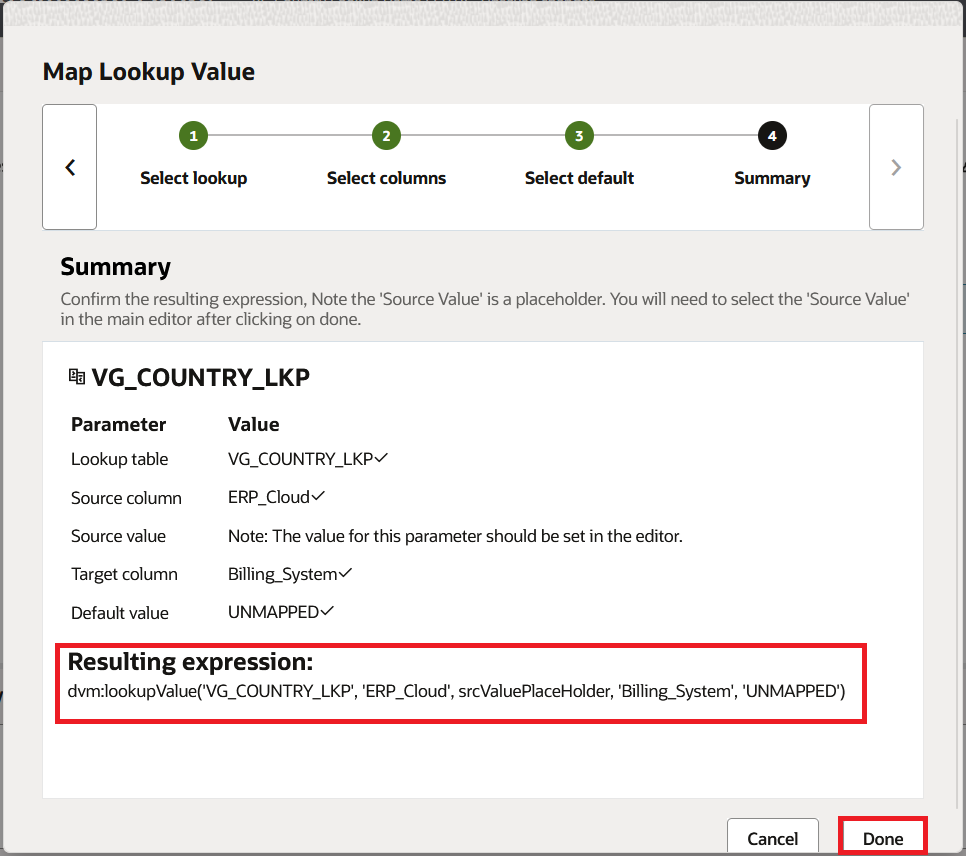
Click Done.
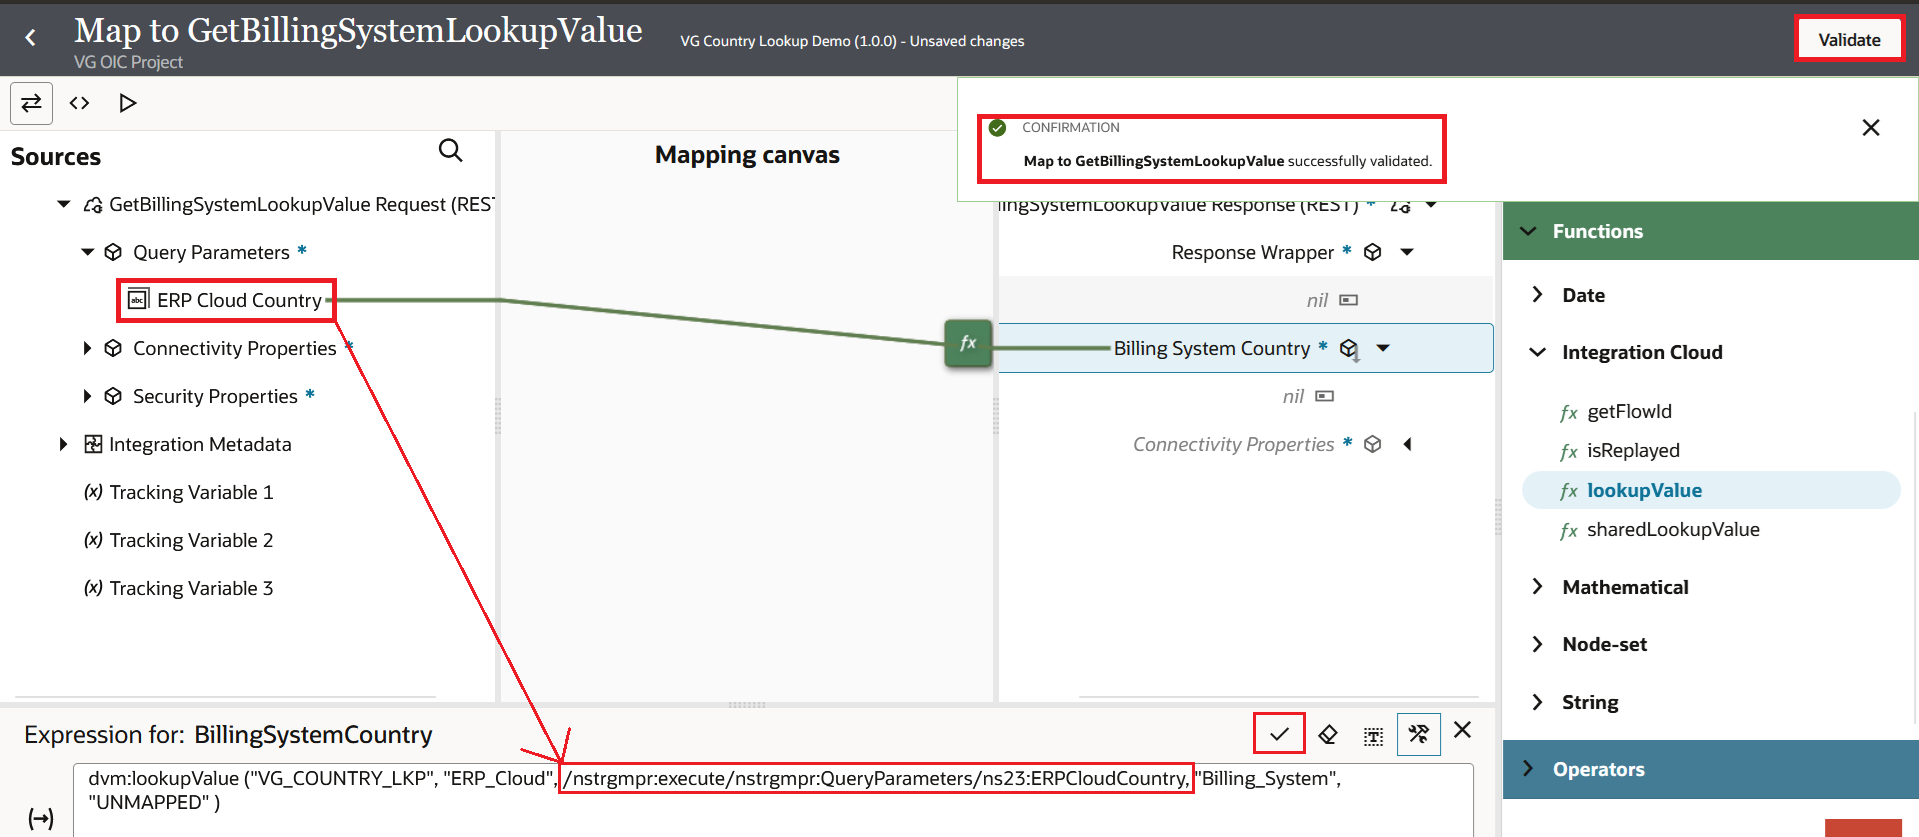
Once the wizard has finished, drag and drop the source country code field from the Sources panel on the left into the srcValuePlaceHolder of the expression. After selecting the Check icon, select Validate, and finally select Back.
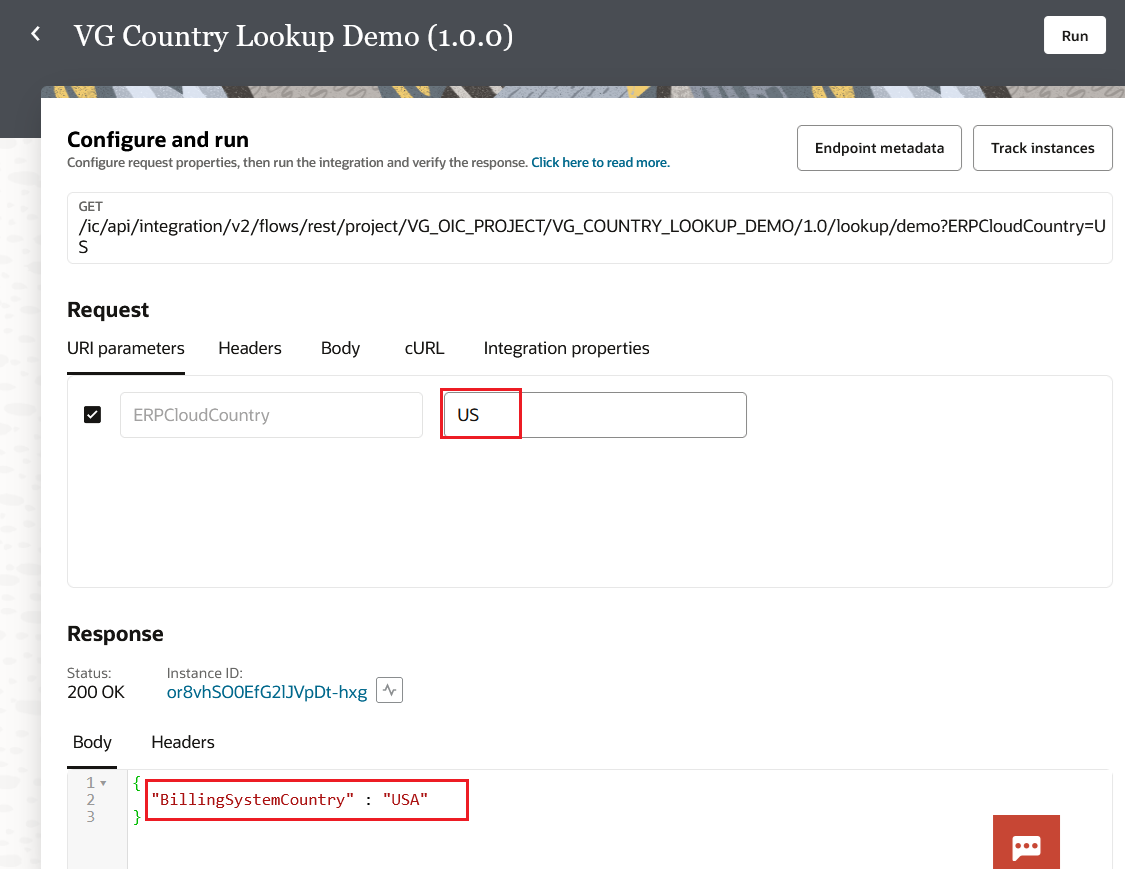
Now, when the integration runs and ERP Cloud sends US, the lookup returns USA. When it sends FR, the lookup returns FRA. If you need the full country name in a different integration or mapper, you can use the same lookup and choose Country_Name as the target column instead of Billing_System. You don't need to make a separate lookup for that.
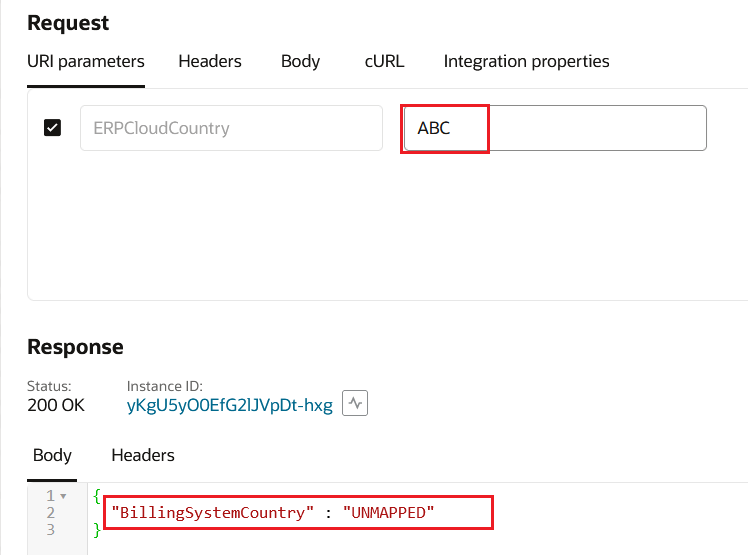
If the integration sends a code that isn't in the lookup, it doesn't fail silently; instead, it returns UNMAPPED.
This is the best part. What if the business moves to a new country? Just go to the lookup, add a new row, and save it. It's that easy. The new value is picked up when the integration runs again. You didn't even have to touch the integration. No stopping. No reactivation.
Cloning and Deleting
If you need a new lookup with a similar structure, you can clone an existing one. Navigate to the lookup row, choose Clone from the action menu, rename it, and make any necessary changes. Additionally, deletion is simple. From the action menu, choose Delete, then click Confirm. But exercise caution. It will fail at runtime if that lookup is referenced by any active integration.
Some Things to Keep in Mind
Lookups are not deployed during integration activation. Changes made to active integrations take effect right away. This is effective for last-minute fixes, but if someone makes a careless edit during production, it could be risky. I always export a backup of the CSV before touching a production lookup.
Changes may take a short while to appear at runtime. Oracle mentions that queuing can happen and it may take a couple of minutes. In my experience, it usually happens instantly, but there have been instances where it took about a minute.
If you enter duplicate values in the source column, the UI does not warn you. The first match that OIC finds will be returned. Make sure the values in your source column are unique.
Before you edit or delete a lookup, check if any integration is using it. OIC shows this right on the Lookups page. You will see a count of how many integrations reference that lookup. Click on it and OIC will show you the list, including integrations that are not currently active. This has saved me a few times when I was about to delete a lookup that I thought was unused.
Project-scoped lookups and global lookups are not visible to one another. A global lookup cannot be used inside a project and vice versa. If you move an integration into a project later, you will need to recreate the lookup inside that project. Plan this early.
Closing Thoughts
We covered the definition of lookups, how to create them both globally and within a project, how to add values, and how to use lookupValue to wire them up in the mapper. I'd like to leave you with a piece of advice that has helped me avoid many headaches over the years. Lookups are not the only way to map values. Keep your batch sizes, email distribution lists, API URLs, and any other value that might vary between environments in a lookup. When the company returns with a change request and you only need to update a lookup row rather than modify the integration, your future self will be grateful.
References
- Oracle Integration 3, About Lookups: https://docs.oracle.com/en/cloud/paas/application-integration/integrations-user/lookups.html
- Oracle Integration 3, lookupValue Function: https://docs.oracle.com/en/cloud/paas/application-integration/mapper-user/creating-lookup-function.html