OIC Gen3 Connections - OAuth 2.0 for Same Domain
Why Connections Deserve Their Own Deep Dive
The previous blog on OIC Gen3 adapters (OIC Gen3 Adapters) covered what adapters are, how to check their capabilities, and the most commonly used adapters such as Oracle ERP Cloud, REST, SOAP, ATP Database, and FTP. Also, I already covered connections at a high level in my first blog.
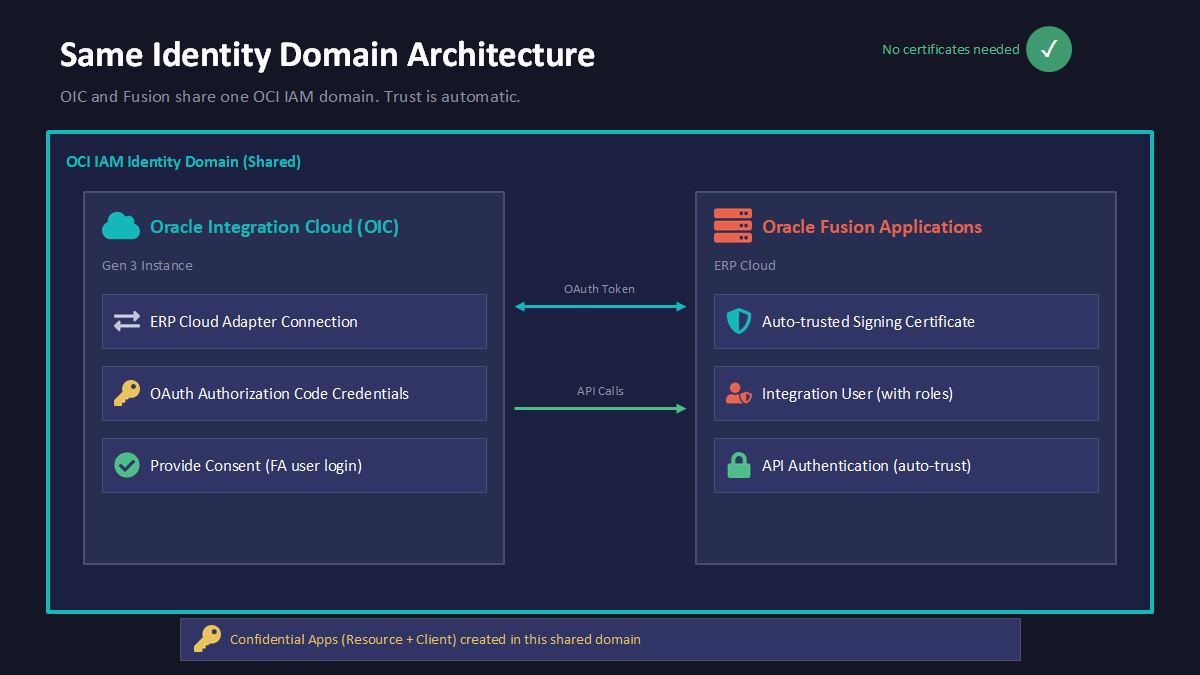
Before I jump into creating a connection, it is very important that you provision OIC in the same domain as Fusion. This saves many steps that we have to perform for cross domain. We may end up doing setups for cross domain as well in some cases. For example, when we usually spin up OIC, we only have two OIC environments (TEST and PROD), but we have three or four Oracle ERP Cloud environments (DEV1, DEV2, TEST, and PROD). We can configure DEV1, DEV2, and TEST connections for ERP in a single OIC environment, but only one Fusion environment will be present in the same identity domain in OCI as OIC. Configuring OAuth 2.0 has some additional steps when both Fusion and OIC are in a cross domain setup.
Creating a connection is pretty straightforward for many adapters. You just have to provide a URL, a username, and a password. However, using a username and password (also known as Basic Authentication) is not recommended. You should always use OAuth 2.0, and I will be covering how to configure and create an OAuth 2.0 connection for Oracle ERP Cloud in this blog.
Before creating an OAuth 2.0 connection in OIC for Oracle ERP Cloud, we first need to configure OAuth in Oracle Cloud Infrastructure (OCI).
Configuring OAuth 2.0 When OIC and Fusion are in the Same Domain
Please follow the below steps for configuring OAuth 2.0 in OCI:
Phase A: Create the Resource Application
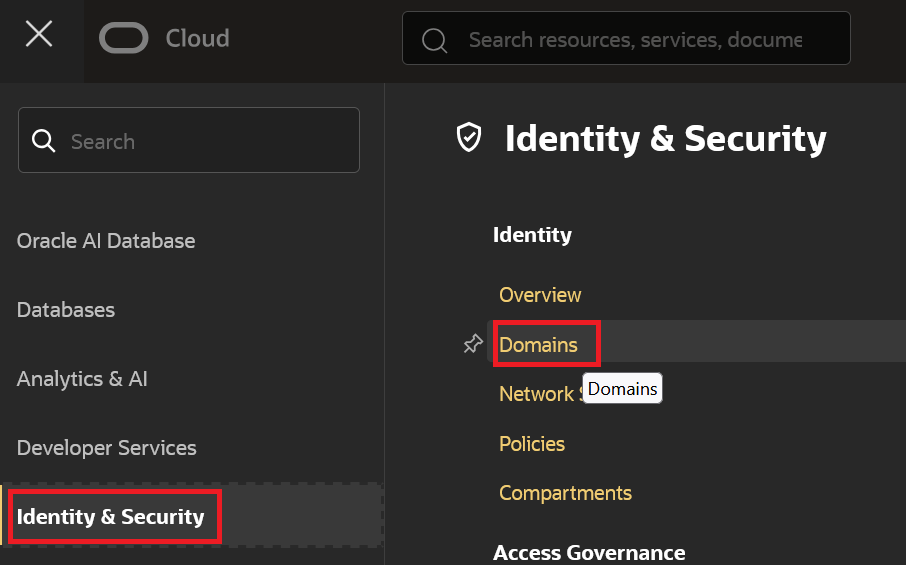
The resource application tells the identity domain that Oracle Fusion Applications is an OAuth resource server. To set this up, log in to the OCI Console as a domain administrator, go to "Identity & Security", then "Domains":
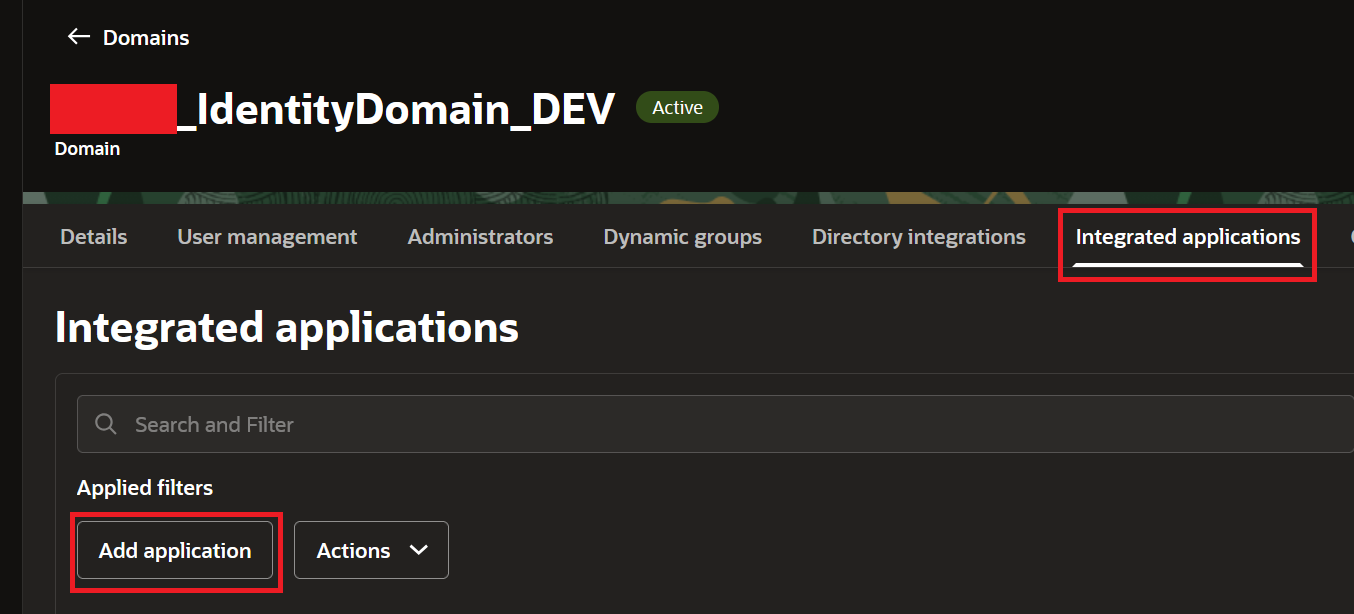
Select your domain where both Fusion and OIC are present, copy the Domain URL (We will use it while creating a Connection in OIC in Phase C), and click on "Integrated Applications" tab --> Click "Add Application":
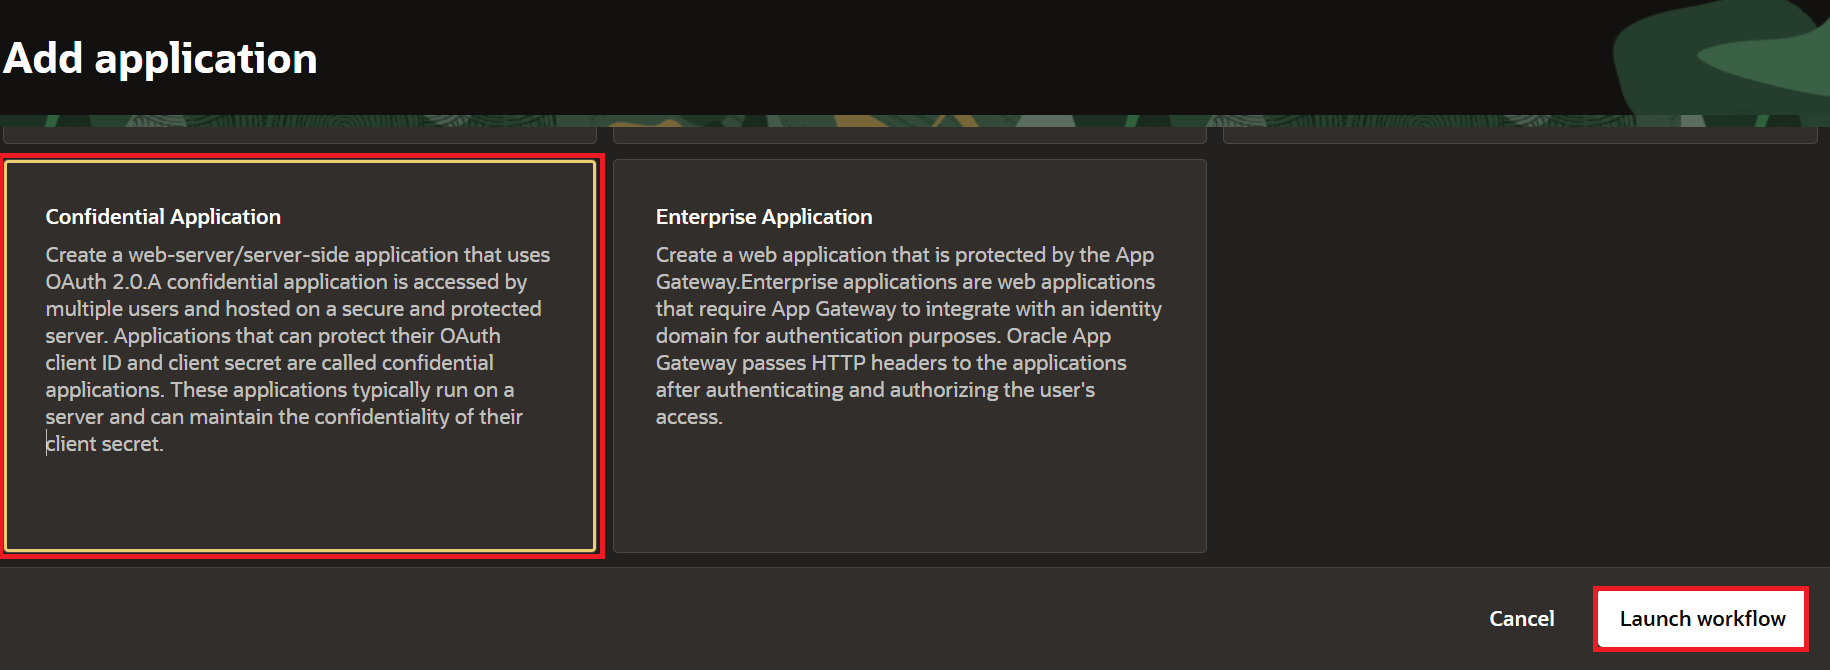
Select "Confidential Application", and click Launch Workflow.
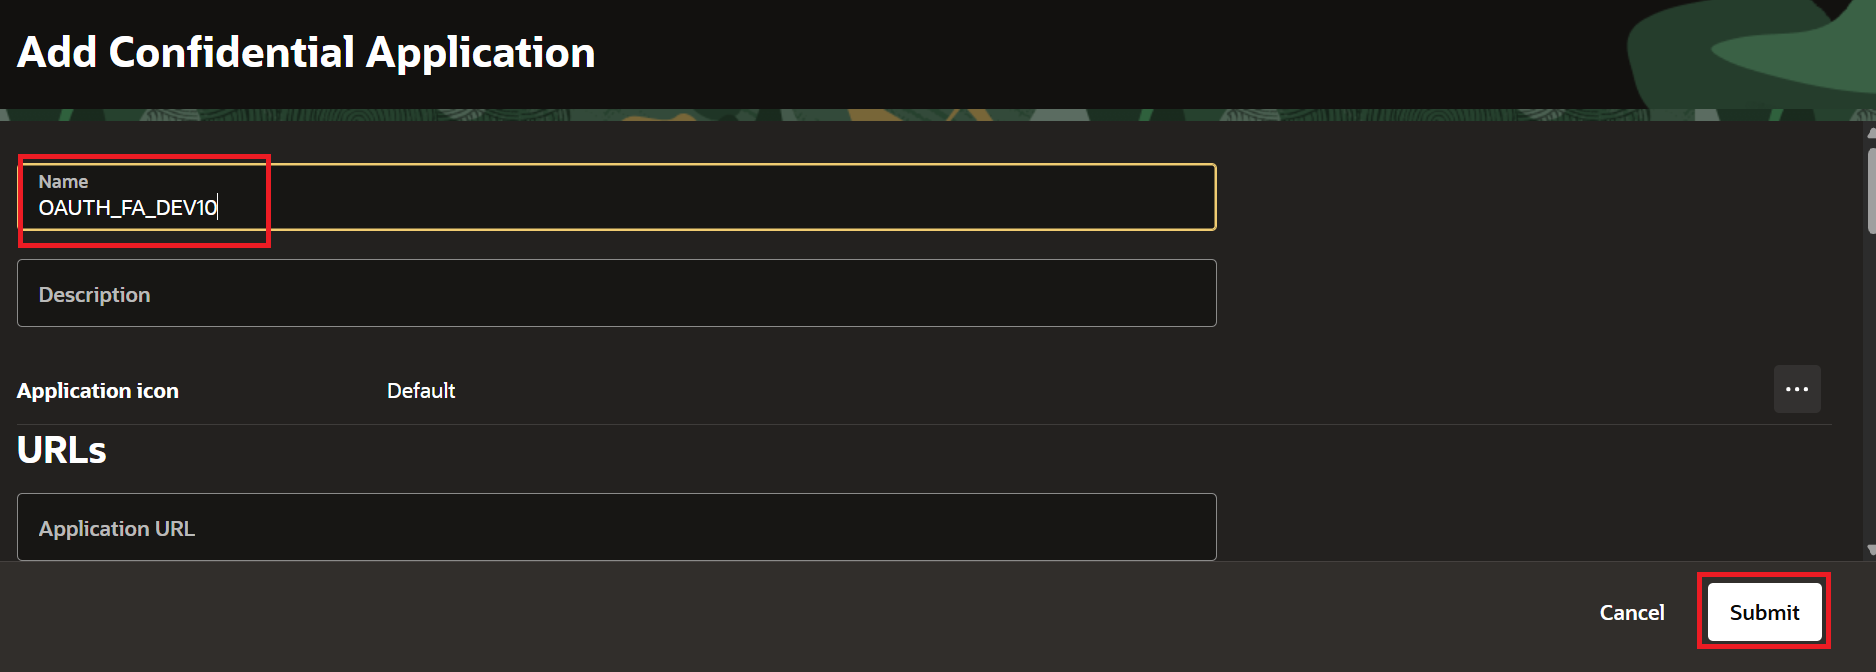
Enter Name. For Example, "OAUTH_FA_DEV10" and click Submit.
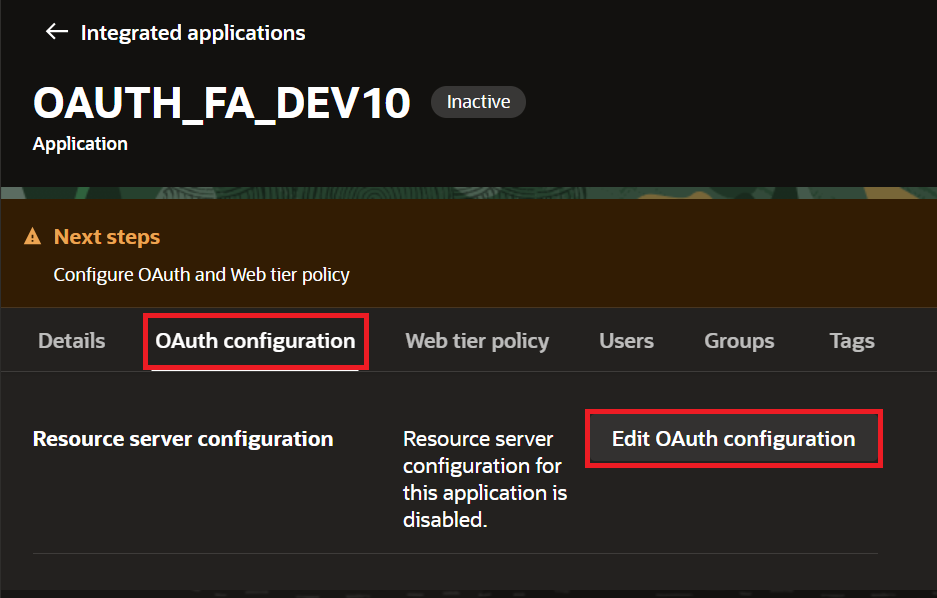
Go to the OAuth Configuration tab and click Edit OAuth Configuration.
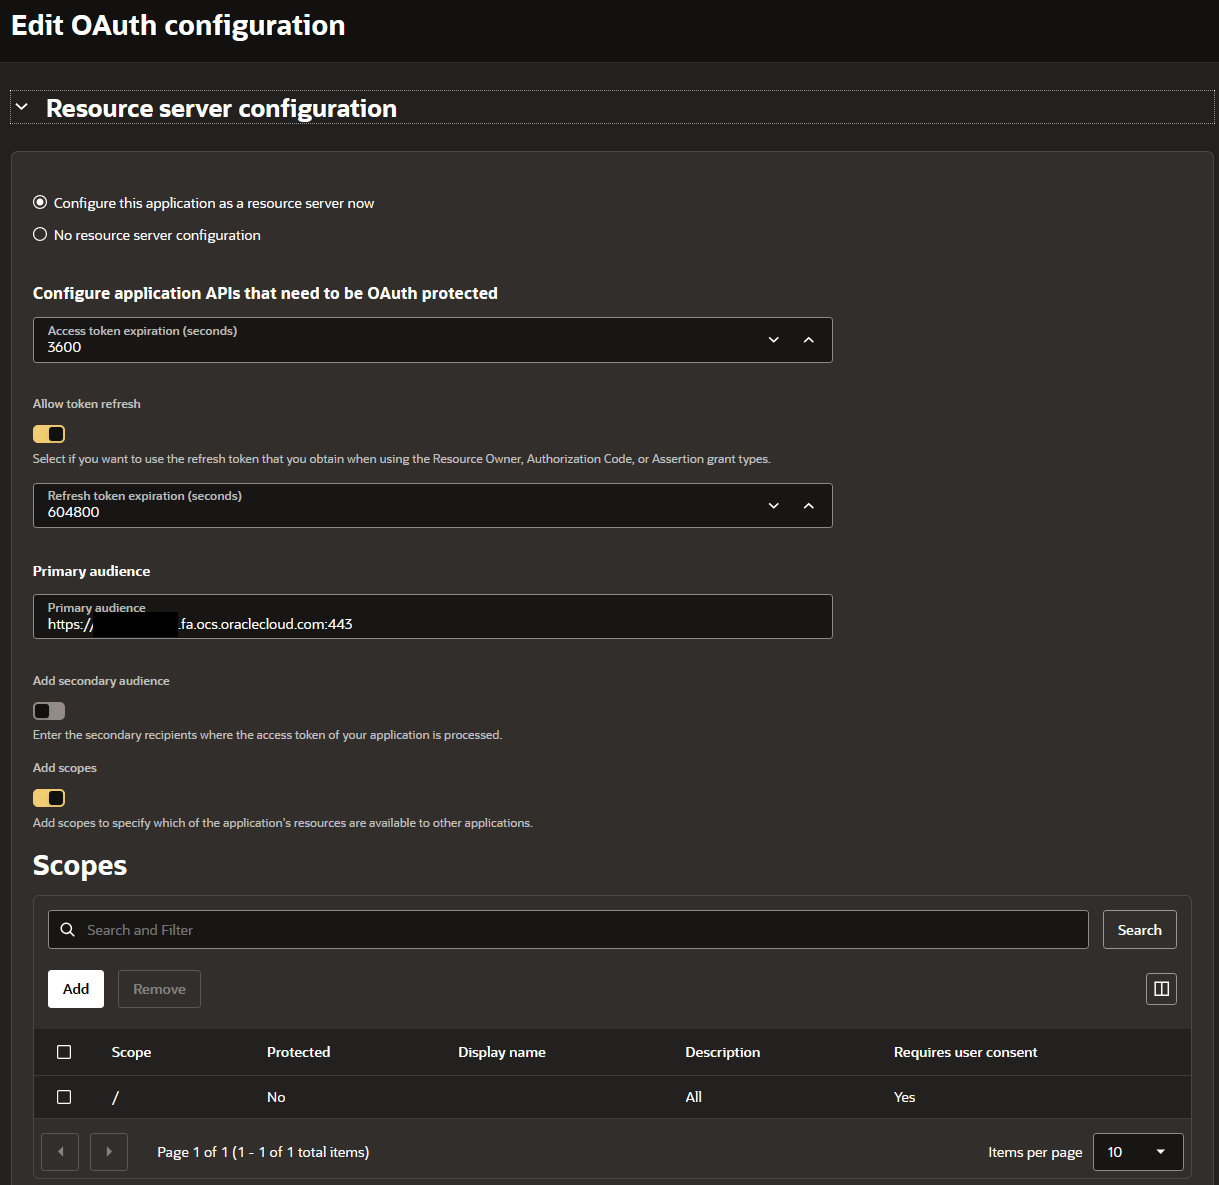
- Select "Configure this application as a resource server now."
- Keep the Access Token as 3600 (it defaults to 3600 seconds).
- Turn on "Allow Token Refresh."
- Set the Refresh Token Expiration to 604,800 seconds (7 days).
- Enter the Fusion URL for the Primary Audience. The format is https://myDomain.fa.us2.oraclecloud.com:443.
- Click Add Scope. Enter / in the Scope field and All in Description.
- Check "Requires Consent."
- Click Submit, then Activate.
Phase B: Create the Client Application for OIC
This second app gives OIC the credentials it needs to actually request tokens.
- In the same identity domain and in the same "Integrated Applications" tab, click Add Application, select Confidential Application, and click Launch Workflow.
- Enter the name. For example, "OAUTH_FA_DEV10_CLIENT_APP" and click Submit.
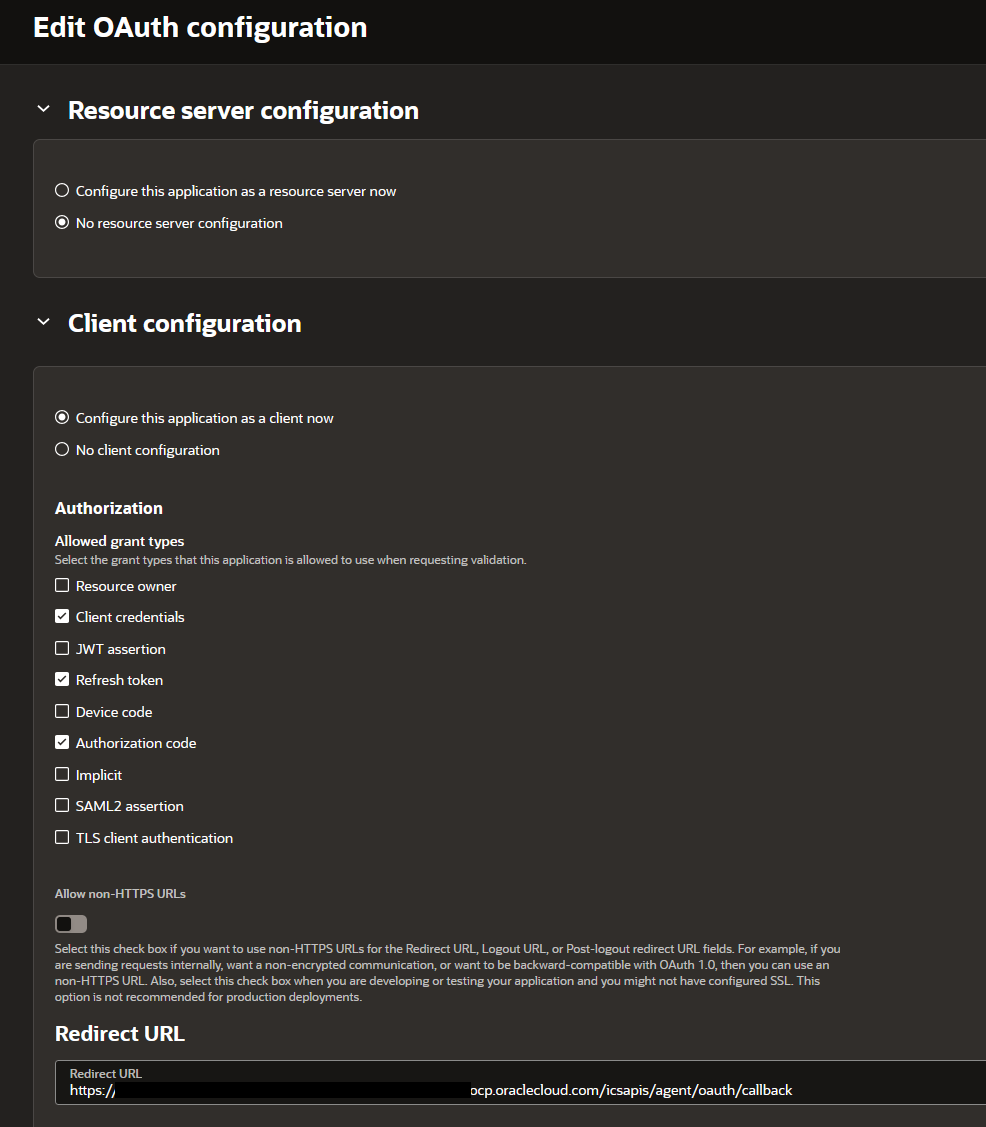
- Open the OAuth Configuration tab and click Edit OAuth Configuration.
- Select "Configure this application as a client now"
- Under Allowed Grant Types, check both Refresh Token and Authorization Code.
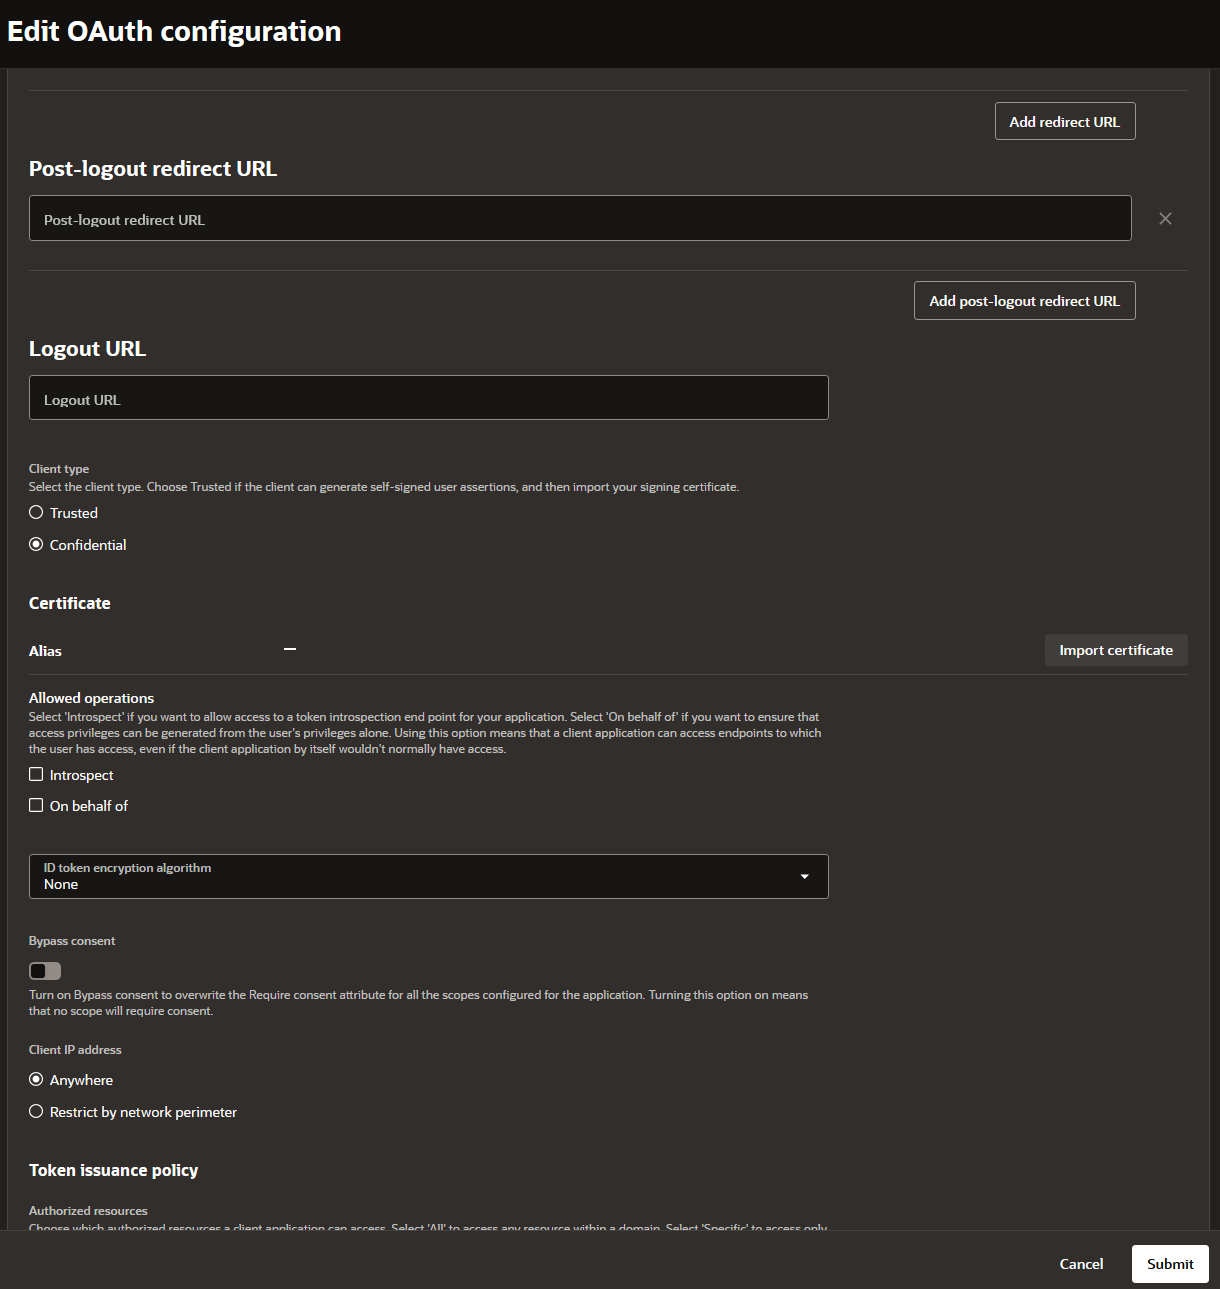
- In the Redirect URL field, put the OIC callback URL. For Gen3, this looks like
https://<OIC_RUNTIME_URL>/icsapis/agent/oauth/callback. Please make sure to use the Service Console Runtime URL and not the Design Time URL.
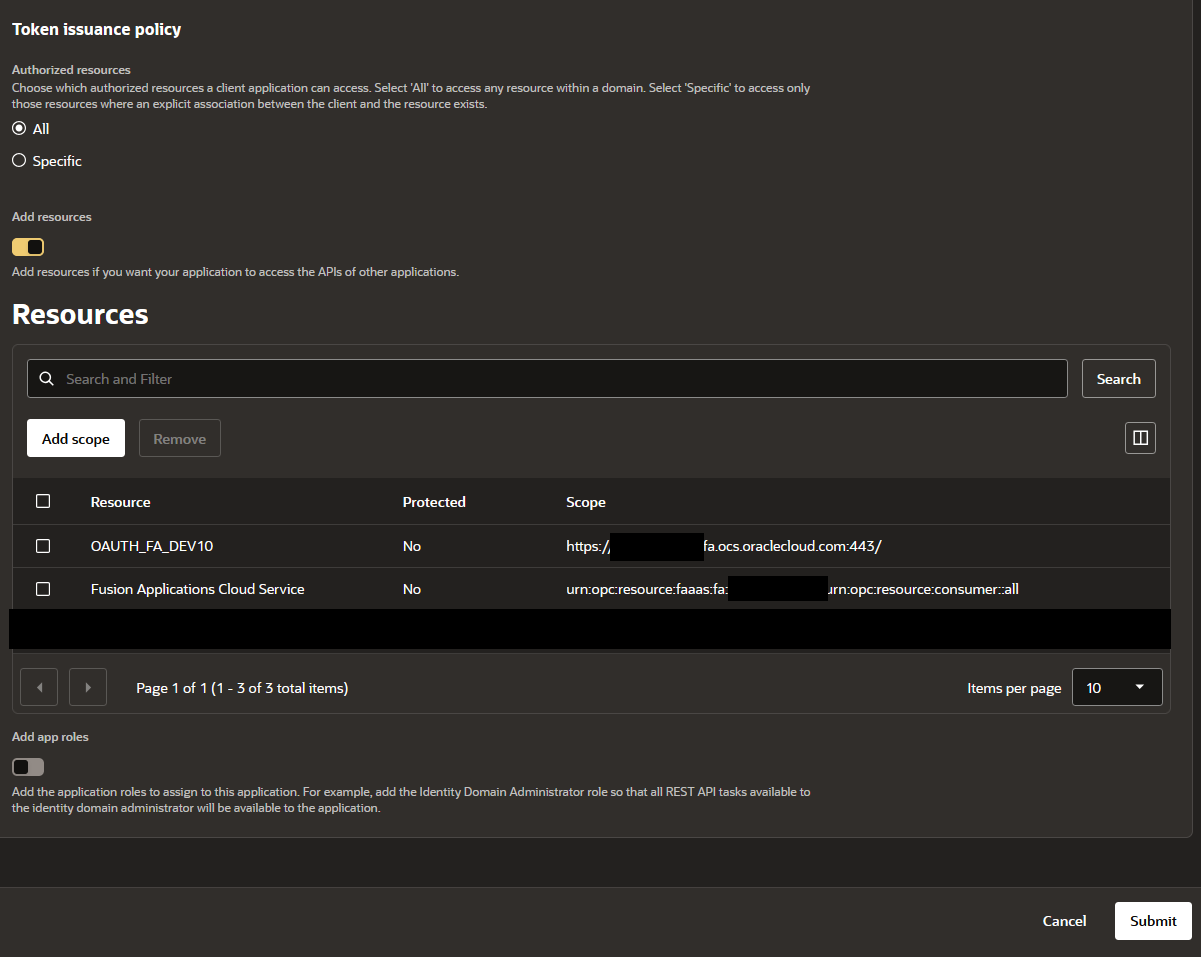
- Click Add Resources, then Add Scope. Search for the OAUTH_FA_DEV10 from Phase A, select its scope, and click Add.
- Click Submit.
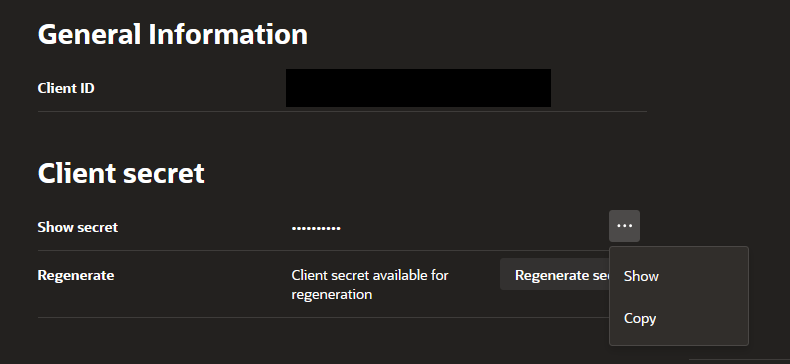
- Copy the Client ID and Client Secret from General Information.
- Activate the application.
Phase C: Configure the OIC Connection
With both confidential apps created and activated in OCI, we will now login to OIC Gen3 and set up the connection.
- Go to Projects, then Connections, then click Add.
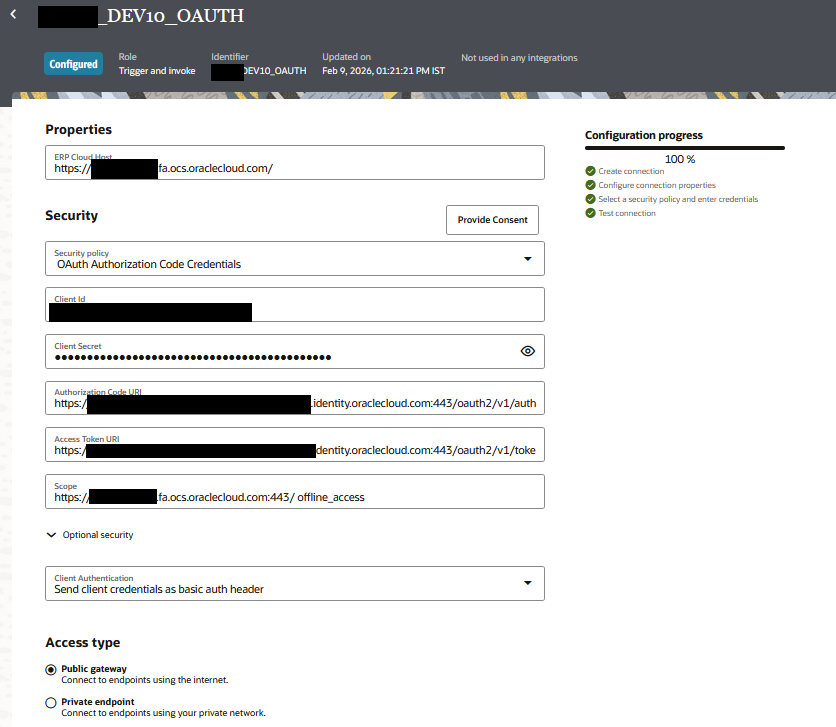
- Search for "Oracle ERP Cloud" adapter and enter the requested details such as Name, Description, and select Role as "Trigger and Invoke".
- In Properties, enter the ERP Cloud Host:
https://myDomain.fa.us2.oraclecloud.com. - In Security dropdown, select OAuth Authorization Code Credentials.
- Enter/Paste the Client ID and Client Secret from Phase B.
- For Authorization Code URI, enter
https://<identity_domain_URL>/oauth2/v1/authorize. You copied the domain URL in Phase A when you entered the domain. - For Access Token URI, enter
https://<identity_domain_URL>/oauth2/v1/token. - For Scope, type the resource scope, then a space, then
offline_access. For example,https://myDomain.fa.us2.oraclecloud.com:443/ offline_access.offline_accessallows you to refresh the token every time the API is invoked. - Click Provide Consent. A new tab in the same browser will open and will redirect you to the identity domain login page. Log in with a user that exists in Oracle Fusion Applications. If you log in with someone who only exists in OIC, consent will show a success message, but the connection test will throw a 401 error.
- Note: We usually use Service Account credentials to provide the consent. When the MFA is enabled, it asks for MFA configured for the Service Account. You can temporarily add your own Email Address to the Service Account to enter the MFA code to login successfully. Having Service Account providing the consent will ensure that the OAuth Connection has access to only those APIs which the service account has access to and that is controlled using Roles in Fusion.
- Close the new tab and go back to the Connections tab.
- Click Test --> Click "Validate and Test" --> The connection will show 100% --> Save the Connection and it will change the Connection's status from Draft to Configured.
Closing Thoughts
Same-domain vs cross-domain OAuth for OIC Gen3 Fusion connections really boils down to trust. In a same-domain setup, trust is built in. The identity domain accepts its own signed tokens. You create two confidential apps, click Provide Consent, and you are done.
For a refresher on how the Oracle ERP Cloud Adapter and other adapters work in OIC Gen3, refer to the previous blog: OIC Gen3 Adapters.
References
- Oracle Integration 3, Create a Connection (Oracle ERP Cloud Adapter). https://docs.oracle.com/en/cloud/paas/application-integration/erp-adapter/create-connection.html
- Oracle Integration 3, Set Up the OAuth Authorization Code Credentials Security Policy with the Oracle Fusion Applications Identity Domain. https://docs.oracle.com/en/cloud/paas/application-integration/erp-adapter/use-identity-domain-included-oracle-fusion-applications.html
- Oracle Integration 3, Invoke Oracle Fusion Application Endpoints with OAuth. https://docs.oracle.com/en/cloud/paas/application-integration/integrations-user/invoke-fusion-application-endpoints-oauth.html
- Oracle Integration 3, Oracle ERP Cloud Adapter Capabilities. https://docs.oracle.com/en/cloud/paas/application-integration/erp-adapter/oracle-erp-cloud-adapter-capabilities.html
- Oracle Integration 3, Assign Required Roles to the Integration User. https://docs.oracle.com/en/cloud/paas/application-integration/erp-adapter/assign-required-roles-integration-user.html
- Provision a Oracle Cloud Integration Service into the Fusion Applications Identity Domain. https://docs.oracle.com/en/cloud/saas/applications-common/26a/oaext/provision-a-new-platform-as-a-service-into-a-fusion-identity-and-access-management-domain-.html